Oh look.
I'm going to pull a 180.
http://fsjnetwork.com/forum/viewtopic.php?f=11&t=5554
'83 J-10 Daily Driver Build
-
 Atla
Atla
Topic author - Posts: 303
- Joined: Tue Jul 31, 2012 6:47 am
- Location: North Carolina
Re: '83 J-10 Daily Driver Build
~Atla. (I'm just here for the pictures)
1983 J-10
2001 TJ
My Build Thread - http://fsjnetwork.com/forum/viewtopic.php?f=12&t=2722
1983 J-10
2001 TJ
My Build Thread - http://fsjnetwork.com/forum/viewtopic.php?f=12&t=2722
-
 Nutz-n-Bolts
- Posts: 313
- Joined: Thu Dec 05, 2013 12:06 pm
- Location: Strattanville,PA
Re: '83 J-10 Daily Driver Build
Looks more like your pulling a 715 !  I'd say the easiest swap is to set the new cab on your old 83 frame, But if the 83 frame is shot compared to the new one, then you had better find some room to shuffle!
Lover of all Old Iron
60-79 CJ5 The best parts from several years combined to make one tough ALL JEEP CJ
81 J10 Pickup My newest acquisition undergoing a complete restoration
60-79 CJ5 The best parts from several years combined to make one tough ALL JEEP CJ
81 J10 Pickup My newest acquisition undergoing a complete restoration
-
Atla
Topic author - Posts: 303
- Joined: Tue Jul 31, 2012 6:47 am
- Location: North Carolina
Re: '83 J-10 Daily Driver Build
After a -lot- of consideration and planning, I decided not to pull the trigger on the M715. The logistics would kill me, I have a one car carport(the J10), and enough room to park two others(the drivers - My Wrangler and the Wifes Kia). And that's it, no real yard to speak of and no where I can store it/work on it.
Renting, sucks. Renting in town, sucks even more.
The good news, is that since this project is going ahead, I bought a Hobart wire welder. Should arrive by the end of next week.
Hobart 125 115V (Yeah yeah - should have gotten the 220V...But I wanted one that I could plug in anywhere without having a line run - and the thickest I plan on welding is .120 DOM Tubing for a roll cage)
http://www.northerntool.com/shop/tools/ ... _200447703
I've wanted one ever since I took a welding course(Stick/Arc Welding) in HS. Not having one has really held me back on a lot, and cost me a lot of money as well.
Should have plenty of scrap at work I can get to practice on, and there's plenty of cheap body panels in the junkyard as well.
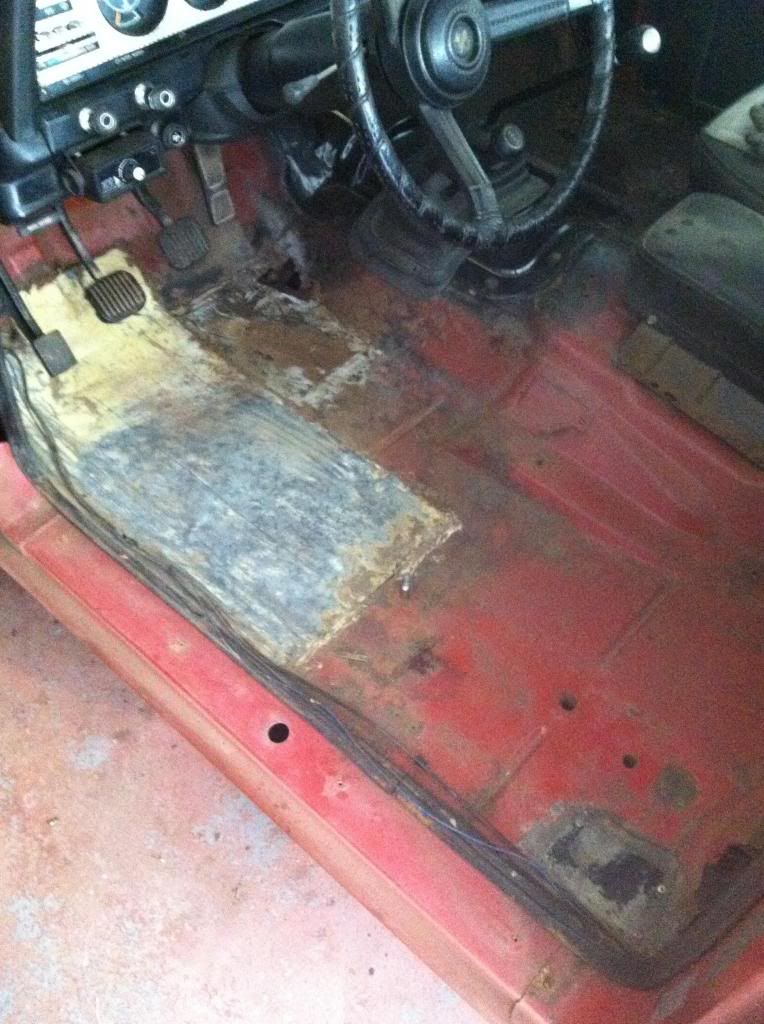
So I yanked the seats/console to get a better look at the floor pans. Someone already patched on the driver side with rivets. I'm not totally opposed to that as it will be covered with sound proofing and a vinyl mat... but the flexible sheet tin? Ugh.
I don't know if I will be up to speed on being able to butt weld when I redo these, I may just overlap and weld.
Renting, sucks. Renting in town, sucks even more.
The good news, is that since this project is going ahead, I bought a Hobart wire welder. Should arrive by the end of next week.
Hobart 125 115V (Yeah yeah - should have gotten the 220V...But I wanted one that I could plug in anywhere without having a line run - and the thickest I plan on welding is .120 DOM Tubing for a roll cage)
http://www.northerntool.com/shop/tools/ ... _200447703
I've wanted one ever since I took a welding course(Stick/Arc Welding) in HS. Not having one has really held me back on a lot, and cost me a lot of money as well.
Should have plenty of scrap at work I can get to practice on, and there's plenty of cheap body panels in the junkyard as well.
So I yanked the seats/console to get a better look at the floor pans. Someone already patched on the driver side with rivets. I'm not totally opposed to that as it will be covered with sound proofing and a vinyl mat... but the flexible sheet tin? Ugh.
I don't know if I will be up to speed on being able to butt weld when I redo these, I may just overlap and weld.


~Atla. (I'm just here for the pictures)
1983 J-10
2001 TJ
My Build Thread - http://fsjnetwork.com/forum/viewtopic.php?f=12&t=2722
1983 J-10
2001 TJ
My Build Thread - http://fsjnetwork.com/forum/viewtopic.php?f=12&t=2722
-
 jaber
jaber
- Vendor
- Posts: 3066
- Joined: Sat Aug 27, 2011 5:24 pm
- Location: Chino Valley, Az.
Re: '83 J-10 Daily Driver Build
http://www.harborfreight.com/air-punch- ... -1110.html
The above tool puts a z stamp in the edge of panels. Make a patch panel, and scribe it into the floor. Cut 1/4" inside your mark, then run the flange tool around the edge you just cut, and your panel should sit down into the flange and be flush.
The above tool puts a z stamp in the edge of panels. Make a patch panel, and scribe it into the floor. Cut 1/4" inside your mark, then run the flange tool around the edge you just cut, and your panel should sit down into the flange and be flush.
Jeff
'46 cj3a
'51 Willys p/u
'51 Willys Parkway Conversion
'74 CJ5
'75 J-20 Wrecker
'75 J-20 Cummins service truck
'77 J-10 p/u
'79 Cherokee
'88 Grand Wagoneer
http://s252.photobucket.com/albums/hh14/jeffaber/
'46 cj3a
'51 Willys p/u
'51 Willys Parkway Conversion
'74 CJ5
'75 J-20 Wrecker
'75 J-20 Cummins service truck
'77 J-10 p/u
'79 Cherokee
'88 Grand Wagoneer
http://s252.photobucket.com/albums/hh14/jeffaber/
-
Atla
Topic author - Posts: 303
- Joined: Tue Jul 31, 2012 6:47 am
- Location: North Carolina
Re: '83 J-10 Daily Driver Build
Oh that is cool. And it also punches holes for plug welding?
It looks like it isn't adjustable for thickness though. It only flanges to x depth, regardless of the gauge sheet metal you are using.
It looks like it isn't adjustable for thickness though. It only flanges to x depth, regardless of the gauge sheet metal you are using.
~Atla. (I'm just here for the pictures)
1983 J-10
2001 TJ
My Build Thread - http://fsjnetwork.com/forum/viewtopic.php?f=12&t=2722
1983 J-10
2001 TJ
My Build Thread - http://fsjnetwork.com/forum/viewtopic.php?f=12&t=2722
-
racerx12003r1
- Posts: 406
- Joined: Sun Dec 29, 2013 8:12 am
- Location: China Grove NC
Re: '83 J-10 Daily Driver Build
Looks like your doing a great job on your J10. I was just at harbor Freight the other day looking around and picked up some air shears. I looked at that flanging tool while I was there among other things like the TIG welder and oxy/acetaline torch set. Where in NC are you Alta? China Grove here.
Daniel
1980 J10 Thunderbolt Grease slapper (formerly Beast II)
1980 J10 Thunderbolt Grease slapper (formerly Beast II)
-
Atla
Topic author - Posts: 303
- Joined: Tue Jul 31, 2012 6:47 am
- Location: North Carolina
Re: '83 J-10 Daily Driver Build
I'm over in Morganton. Looks like you're about an hour and a half away from me. Can't guarantee much knowledge, but if you need a wrenching hand - let me know and I'll come over and give ya a hand.
I was looking at harbor freights website earlier at some tools I could use as well. I've spent most of the morning youtubing welding/grinding/flap discing so far.
Watching the lack of safety in most of these videos makes them downright scary.
I've no interest in a grenaded cutting disc fragments in my face.
~Atla. (I'm just here for the pictures)
1983 J-10
2001 TJ
My Build Thread - http://fsjnetwork.com/forum/viewtopic.php?f=12&t=2722
1983 J-10
2001 TJ
My Build Thread - http://fsjnetwork.com/forum/viewtopic.php?f=12&t=2722
-
racerx12003r1
- Posts: 406
- Joined: Sun Dec 29, 2013 8:12 am
- Location: China Grove NC
Re: '83 J-10 Daily Driver Build
Ain't that the truth. I learned my lesson a while back when i had one of the small grinding wheels from a dremal tool fly apart and i picked shrapnal out for days. I have one of the HF grinders, but I use quality wheels on it with the shields in place and at least goggles. Had to go to the ER once to get a shard of steel pulled out of my eye and was wearing safety glasses when it happened. I also appreciate the offer for help. I'm gonna be preforming an engine transplant this summer after ECI. Been working on my bell housing off and on for a few weeks so I can use my t176 with a small block Chevy.
Daniel
1980 J10 Thunderbolt Grease slapper (formerly Beast II)
1980 J10 Thunderbolt Grease slapper (formerly Beast II)
-
Atla
Topic author - Posts: 303
- Joined: Tue Jul 31, 2012 6:47 am
- Location: North Carolina
Re: '83 J-10 Daily Driver Build
Progress is progress...


The good news, my wife has wrapped up school and is employed. Yay income! The bad news, we are house hunting. Boo stress!
The saga continues...


The good news, my wife has wrapped up school and is employed. Yay income! The bad news, we are house hunting. Boo stress!
The saga continues...
~Atla. (I'm just here for the pictures)
1983 J-10
2001 TJ
My Build Thread - http://fsjnetwork.com/forum/viewtopic.php?f=12&t=2722
1983 J-10
2001 TJ
My Build Thread - http://fsjnetwork.com/forum/viewtopic.php?f=12&t=2722
-
Atla
Topic author - Posts: 303
- Joined: Tue Jul 31, 2012 6:47 am
- Location: North Carolina
Re: '83 J-10 Daily Driver Build
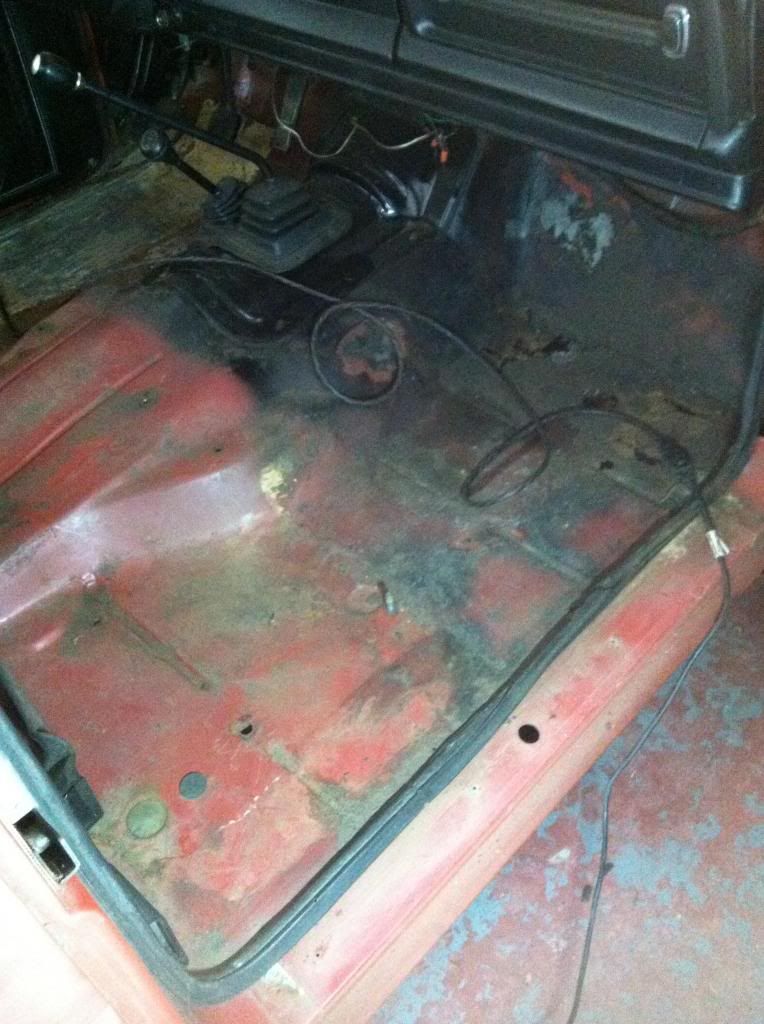
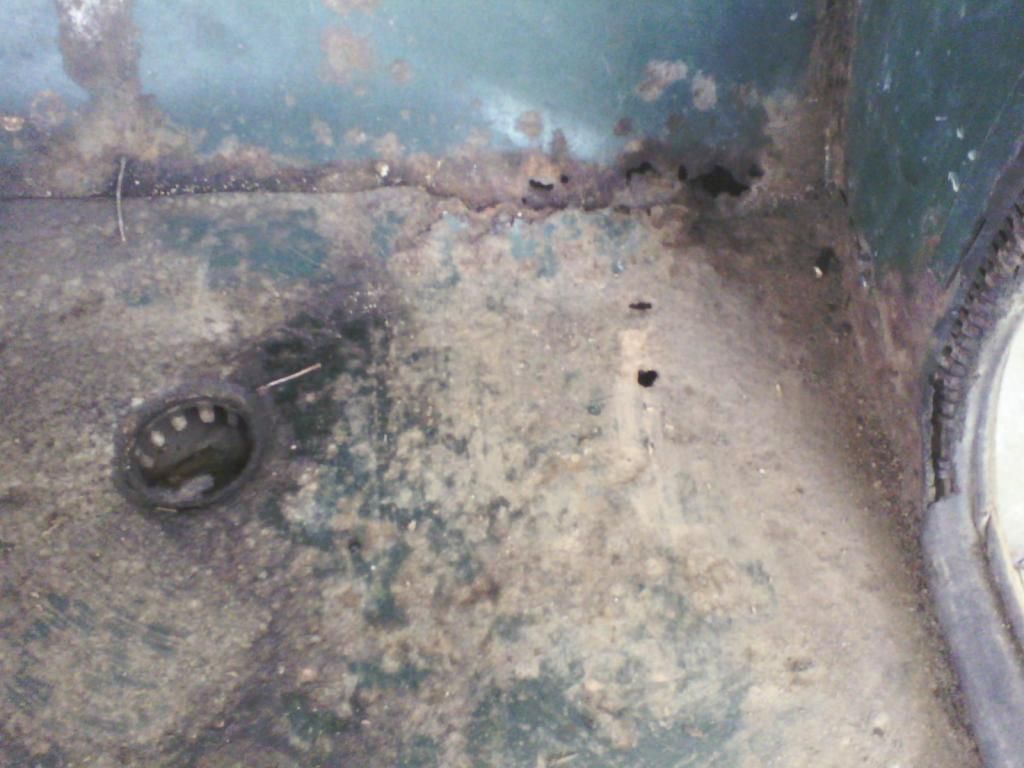
Cut the passenger floor rust out:

Replacement piece, 22 gauge:

I'm not going to show you what my first 'Ahh, I'll just wing it' attempt looked like lap welding it in...
I ended up ripping it up and grinding the welds back down. Did a lot of reading/watching on how to properly lap weld thin steel, especially floor pans, going to tackle it this coming weekend.
Cut out part of the driver side, looks like it had been patched at least twice now. Right over top of each other. Need to remove the pedals and repaint/pad them to get to the firewall side of the rot. The driver side is going to suck.
Been hitting the punch list some as well. Small odds and ends.
Nothing worth mentioning.
~Atla. (I'm just here for the pictures)
1983 J-10
2001 TJ
My Build Thread - http://fsjnetwork.com/forum/viewtopic.php?f=12&t=2722
1983 J-10
2001 TJ
My Build Thread - http://fsjnetwork.com/forum/viewtopic.php?f=12&t=2722
-
 Jjkage84
- Posts: 220
- Joined: Wed Apr 30, 2014 10:38 pm
- Location: Show Me State
Re: '83 J-10 Daily Driver Build
Floor boards are so much fun  Tackling that myself. It's a pain. A pneumatic chisel was a huge help for where it was spot welded to the body frame.
-
 Strode182
- Posts: 374
- Joined: Sat Jun 09, 2012 8:38 am
- Location: Littleton, Co
Re: '83 J-10 Daily Driver Build
Keep at it Atla!
-
Atla
Topic author - Posts: 303
- Joined: Tue Jul 31, 2012 6:47 am
- Location: North Carolina
Re: '83 J-10 Daily Driver Build
Thank you Strode.
I wonder if there is really any benefit to welding vs riveting, so long as you seal, and if you plan to cover with insulation/carpet/vinyl anyways? Cause riveting looks appealing.
With my work shifts I don't get a lot of daylight during the work week. And the carport lighting sucks beyond regular sucking. I'm going to take another stab at finishing the patches this weekend.
This week I've been running a coarse wire brush on the drill over the floor to get up a bunch of the rust and crud before I drop some Osphos and Chassis Saver on it. (I think for effectiveness and price, I'm going to use the Silver colored Chassis Saver I already have - it will be sound-deadened and vinyl matted later) Found a few more rust spots under the crud. Small but annoying.
~Atla. (I'm just here for the pictures)
1983 J-10
2001 TJ
My Build Thread - http://fsjnetwork.com/forum/viewtopic.php?f=12&t=2722
1983 J-10
2001 TJ
My Build Thread - http://fsjnetwork.com/forum/viewtopic.php?f=12&t=2722
-
racerx12003r1
- Posts: 406
- Joined: Sun Dec 29, 2013 8:12 am
- Location: China Grove NC
Re: '83 J-10 Daily Driver Build
Just Keep at it Alta. Those floorboards can be a real pain in the butt. I got mine all welded up. Used a HF flux core welder to put them in then painted them with bed liner paint.

Persistance pays off. I'm not a good welder, but I was happy with the end result.


Persistance pays off. I'm not a good welder, but I was happy with the end result.
Daniel
1980 J10 Thunderbolt Grease slapper (formerly Beast II)
1980 J10 Thunderbolt Grease slapper (formerly Beast II)
-
racerx12003r1
- Posts: 406
- Joined: Sun Dec 29, 2013 8:12 am
- Location: China Grove NC
Re: '83 J-10 Daily Driver Build
Are you going to try to come to the Fall Ride at Uwharrie?
Daniel
1980 J10 Thunderbolt Grease slapper (formerly Beast II)
1980 J10 Thunderbolt Grease slapper (formerly Beast II)
-
Atla
Topic author - Posts: 303
- Joined: Tue Jul 31, 2012 6:47 am
- Location: North Carolina
Re: '83 J-10 Daily Driver Build
Racer - That looks really good! What settings did you use?
I'm using a Hobart 125 (115v), even on the lowest setting I was melting .22 gauge.
After doing some reading, I saw that for lap welds instead of running it down the seam like usual, you should touch it off to the base metal then sort of skirt it into the edge of the top metal with spot welds. Just enough to grab but not enough to melt/burn through.
As for Uwharrie... I'm going to aim for that as my deadline.
Off the top of my head and not running down my 4 page punch list(I don't even have Paint on the list yet!), I'll need to:
-Finish Floor
-Reinstall Seats(Pick and Choose and Fit)
-Replace Brakes from Master Cylinder back to Rear Drums.
-Replace Body Mounts/Brackets
-Replace Window Seals(Gotta keep the rust out of my nice doors)
-HEI Dist Install
-Voltmeter Swap
-Tach
-New Battery
-Replace Rear Pinion Seal(Been putting that off... for like a year now..)
-Set up Carb/etc.
-Possibly trouble shoot fuel system delivery still.
-Test Drive/Trouble Shoot/Repeat
And I should be bare bones driveable.
This list is probably what I should be prioritizing right now anyways rofl.
~Atla. (I'm just here for the pictures)
1983 J-10
2001 TJ
My Build Thread - http://fsjnetwork.com/forum/viewtopic.php?f=12&t=2722
1983 J-10
2001 TJ
My Build Thread - http://fsjnetwork.com/forum/viewtopic.php?f=12&t=2722
-
 lobie
lobie
- Posts: 488
- Joined: Wed Aug 03, 2011 7:17 pm
- Location: Fountain Inn, SC
Re: '83 J-10 Daily Driver Build
22 ga is thin for welding. I stick with the 16-18 ga medal for welding. Don't have the tack, tack, tack...... patients. Although u can't just run a bead with 16-18 ga either.Atla wrote: I'm using a Hobart 125 (115v), even on the lowest setting I was melting .22 gauge.
77 Wagoneer | 6.0 | TH400 | NP205 | Sterling 10.5 | Dana 60
07 6.7 Cummins 2500 4wd
http://www.lobie4x4.com
http://www.cfsjc.com
07 6.7 Cummins 2500 4wd
http://www.lobie4x4.com
http://www.cfsjc.com
-
racerx12003r1
- Posts: 406
- Joined: Sun Dec 29, 2013 8:12 am
- Location: China Grove NC
Re: '83 J-10 Daily Driver Build
Thats what I use too. Had that HF welder set on low with a wire speed of about 2 if memory serves me correct and tack about 1/2 an inch at a time, then move somewhere else. It's a time consuming job, but well worth it in the end. In my honest opinion, I'd go with 16 guage in the floor. It can be alittle hard to shape, but well worth it in the end. Before buying the sheet I have now, I used to use panels cut from old appliances. Driers work well. oops, there's my redneck showing again. 
Daniel
1980 J10 Thunderbolt Grease slapper (formerly Beast II)
1980 J10 Thunderbolt Grease slapper (formerly Beast II)
-
Atla
Topic author - Posts: 303
- Joined: Tue Jul 31, 2012 6:47 am
- Location: North Carolina
Re: '83 J-10 Daily Driver Build
Floor pans are in as of an hour ago, waiting on the paint to dry to put some seam sealer on it. Might get that done tonight, and maybe get them insulated tomorrow... then I can move on to finer things. Like driving. Been doing some small odds and ends, voltmeter swap, repainting muscle grill, replacing window seals, etc. Once you have momentum, you can't let life stop you.
So question, powder coating door sills, I don't have anything to polish them with and access to our companies powdercoating supplier.
These are the parts I'm thinking about(not mine - just a google image stolen):

They feel pretty thin and flimsy, would they hold up to powdercoating? Or would it crack and flake off?
So question, powder coating door sills, I don't have anything to polish them with and access to our companies powdercoating supplier.
These are the parts I'm thinking about(not mine - just a google image stolen):
They feel pretty thin and flimsy, would they hold up to powdercoating? Or would it crack and flake off?
~Atla. (I'm just here for the pictures)
1983 J-10
2001 TJ
My Build Thread - http://fsjnetwork.com/forum/viewtopic.php?f=12&t=2722
1983 J-10
2001 TJ
My Build Thread - http://fsjnetwork.com/forum/viewtopic.php?f=12&t=2722
-
Atla
Topic author - Posts: 303
- Joined: Tue Jul 31, 2012 6:47 am
- Location: North Carolina
Re: '83 J-10 Daily Driver Build
Been lazy with uploading pictures.
Passenger side was easiest, small area to cut out and a single piece patch to put in. I waited four weeks for BJ panels to come in and finally just used what I had laying around to patch it in. Since my welding skills need a lot more practice(Think I'm gonna give up and take a class in Jan), I riveted it.
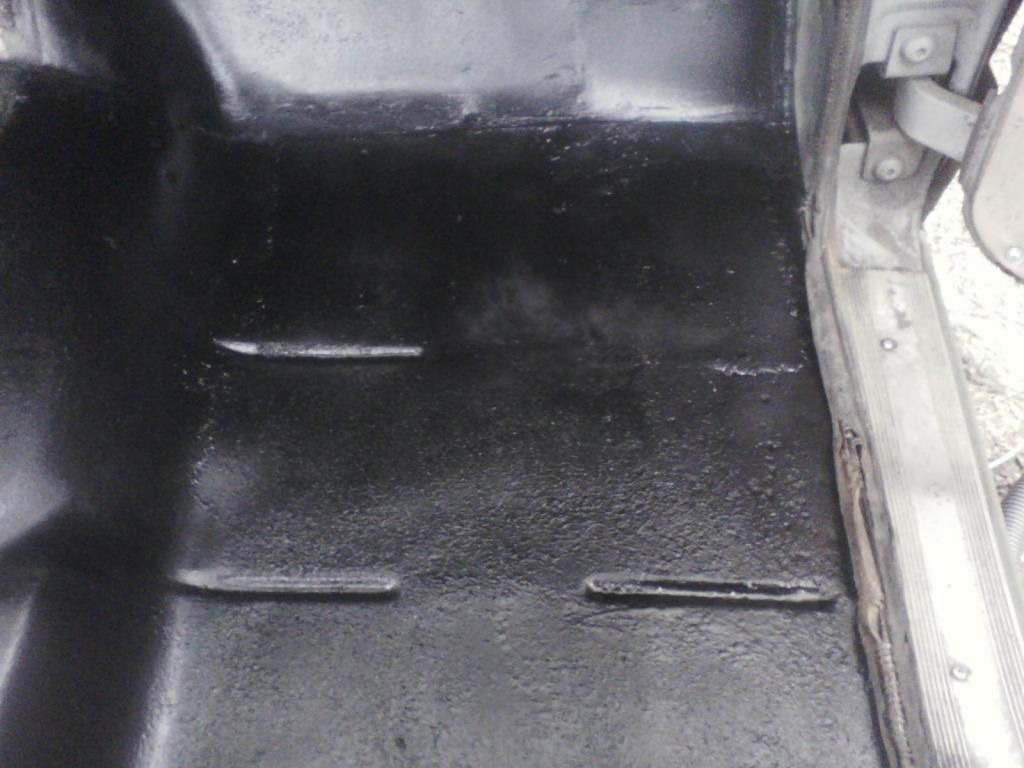
Not my first choice...but enh. Riveted it, POR-15'd, and Sealed top and bottom.


Driver side, ugh. Just Ugh. It had patches over patches... over bondo... over gobs of sealant.


Cut out, this was a PITA using just an angle grinder... and this truck is the first time I've ever used one for anything. It's a learning curve.

I'm really not proud of this, but because the span was pretty big and I used an 18 ga on the right side hump, then 22 ga on the left by the sill and the center patch to help strength it. Riveted it all and sealed. The sealed patch on the hump is a previous patch that had been riveted but never sealed, it looked legit so I just goobed over it. The shiny black color is Rustoleum rattle can, the dull is POR15.
Note - I screwed up here. I didn't paint the under side of the panels, some being over-lapped...I expect to have to redo this eventually - even sealed and painted from underneath. By then I hope my welding skills are up to par.

Passenger side was easiest, small area to cut out and a single piece patch to put in. I waited four weeks for BJ panels to come in and finally just used what I had laying around to patch it in. Since my welding skills need a lot more practice(Think I'm gonna give up and take a class in Jan), I riveted it.
Not my first choice...but enh. Riveted it, POR-15'd, and Sealed top and bottom.


Driver side, ugh. Just Ugh. It had patches over patches... over bondo... over gobs of sealant.


Cut out, this was a PITA using just an angle grinder... and this truck is the first time I've ever used one for anything. It's a learning curve.

I'm really not proud of this, but because the span was pretty big and I used an 18 ga on the right side hump, then 22 ga on the left by the sill and the center patch to help strength it. Riveted it all and sealed. The sealed patch on the hump is a previous patch that had been riveted but never sealed, it looked legit so I just goobed over it. The shiny black color is Rustoleum rattle can, the dull is POR15.
Note - I screwed up here. I didn't paint the under side of the panels, some being over-lapped...I expect to have to redo this eventually - even sealed and painted from underneath. By then I hope my welding skills are up to par.

~Atla. (I'm just here for the pictures)
1983 J-10
2001 TJ
My Build Thread - http://fsjnetwork.com/forum/viewtopic.php?f=12&t=2722
1983 J-10
2001 TJ
My Build Thread - http://fsjnetwork.com/forum/viewtopic.php?f=12&t=2722