Looking good. Thanks for posting pics of your progress. Im working through the same install at the moment, so seeing your progress is keeping me motived to keep pushing forward. I used that same vent setup that you did, but I cut it between the two rectangular vents and extended it to make room for the controls. Ill take a pic once I get it installed. I found with that vent that if I placed the round passenger side vent where I wanted it, it put the two rect. vents too far to the passenger side for the driver to get much air.
You would have had to modify your glove box no matter where you placed the evaporator. I did mine based on the mockup unit, and thought it was good, but now that the final unit is in, along with all the vent hoses, looks like I will have to modify it even more. So, I would suggest not finalizing anything on the glove box until everything else is in. Ill be interested to see how yours turns out!
Vintage Air install on 78 Wagoneer
-
RamJetFSJ
- Posts: 431
- Joined: Fri Mar 22, 2013 12:36 pm
- Location: Carpinteria, CA
Re: Vintage Air install on 78 Wagoneer
80 Wag in 73 attire, Ram Jet 350 power
-
 Full Size Jeeper
Topic author - Posts: 154
- Joined: Mon Feb 23, 2015 9:14 pm
- Location: Mandeville Louisiana
Re: Vintage Air install on 78 Wagoneer
Yes, please post some pics of your glove box fix, and how you cut the vents and where you mounted the control panel.
1978 Jeep Wagoneer
401/turbo 400 transmission Quadra-Trac BW1339 (with Low) 4" Rusty's lift with 31" Summit Mud Dawgs
Mods:
Fuel Tank, Red Holley Electric Fuel Pump, Razor Grill, Rebuilt steering box
401/turbo 400 transmission Quadra-Trac BW1339 (with Low) 4" Rusty's lift with 31" Summit Mud Dawgs
Mods:
Fuel Tank, Red Holley Electric Fuel Pump, Razor Grill, Rebuilt steering box
-
Full Size Jeeper
Topic author - Posts: 154
- Joined: Mon Feb 23, 2015 9:14 pm
- Location: Mandeville Louisiana
Re: Vintage Air install on 78 Wagoneer
Built some brackets for a pusher electric fan.

1978 Jeep Wagoneer
401/turbo 400 transmission Quadra-Trac BW1339 (with Low) 4" Rusty's lift with 31" Summit Mud Dawgs
Mods:
Fuel Tank, Red Holley Electric Fuel Pump, Razor Grill, Rebuilt steering box
401/turbo 400 transmission Quadra-Trac BW1339 (with Low) 4" Rusty's lift with 31" Summit Mud Dawgs
Mods:
Fuel Tank, Red Holley Electric Fuel Pump, Razor Grill, Rebuilt steering box
-
Full Size Jeeper
Topic author - Posts: 154
- Joined: Mon Feb 23, 2015 9:14 pm
- Location: Mandeville Louisiana
Re: Vintage Air install on 78 Wagoneer
I wish I had a break, but I don't.

1978 Jeep Wagoneer
401/turbo 400 transmission Quadra-Trac BW1339 (with Low) 4" Rusty's lift with 31" Summit Mud Dawgs
Mods:
Fuel Tank, Red Holley Electric Fuel Pump, Razor Grill, Rebuilt steering box
401/turbo 400 transmission Quadra-Trac BW1339 (with Low) 4" Rusty's lift with 31" Summit Mud Dawgs
Mods:
Fuel Tank, Red Holley Electric Fuel Pump, Razor Grill, Rebuilt steering box
-
Full Size Jeeper
Topic author - Posts: 154
- Joined: Mon Feb 23, 2015 9:14 pm
- Location: Mandeville Louisiana
Re: Vintage Air install on 78 Wagoneer
I like it!

1978 Jeep Wagoneer
401/turbo 400 transmission Quadra-Trac BW1339 (with Low) 4" Rusty's lift with 31" Summit Mud Dawgs
Mods:
Fuel Tank, Red Holley Electric Fuel Pump, Razor Grill, Rebuilt steering box
401/turbo 400 transmission Quadra-Trac BW1339 (with Low) 4" Rusty's lift with 31" Summit Mud Dawgs
Mods:
Fuel Tank, Red Holley Electric Fuel Pump, Razor Grill, Rebuilt steering box
-
Full Size Jeeper
Topic author - Posts: 154
- Joined: Mon Feb 23, 2015 9:14 pm
- Location: Mandeville Louisiana
Re: Vintage Air install on 78 Wagoneer
Was able to finish up the A/C lines today and evacuate the system. Looks like it's holding will check it again in the morning.

1978 Jeep Wagoneer
401/turbo 400 transmission Quadra-Trac BW1339 (with Low) 4" Rusty's lift with 31" Summit Mud Dawgs
Mods:
Fuel Tank, Red Holley Electric Fuel Pump, Razor Grill, Rebuilt steering box
401/turbo 400 transmission Quadra-Trac BW1339 (with Low) 4" Rusty's lift with 31" Summit Mud Dawgs
Mods:
Fuel Tank, Red Holley Electric Fuel Pump, Razor Grill, Rebuilt steering box
-
Full Size Jeeper
Topic author - Posts: 154
- Joined: Mon Feb 23, 2015 9:14 pm
- Location: Mandeville Louisiana
Re: Vintage Air install on 78 Wagoneer
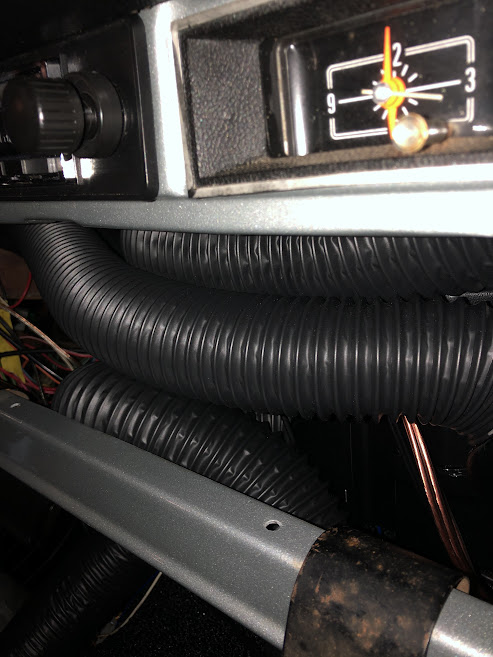
I had a friend that can do all on cars. He went over the wiring diagram with me and I took some notes, and I think I can finish the wiring this week. Also ran the ac duct work, no way I will have a glove box.
1978 Jeep Wagoneer
401/turbo 400 transmission Quadra-Trac BW1339 (with Low) 4" Rusty's lift with 31" Summit Mud Dawgs
Mods:
Fuel Tank, Red Holley Electric Fuel Pump, Razor Grill, Rebuilt steering box
401/turbo 400 transmission Quadra-Trac BW1339 (with Low) 4" Rusty's lift with 31" Summit Mud Dawgs
Mods:
Fuel Tank, Red Holley Electric Fuel Pump, Razor Grill, Rebuilt steering box
-
Full Size Jeeper
Topic author - Posts: 154
- Joined: Mon Feb 23, 2015 9:14 pm
- Location: Mandeville Louisiana
Re: Vintage Air install on 78 Wagoneer
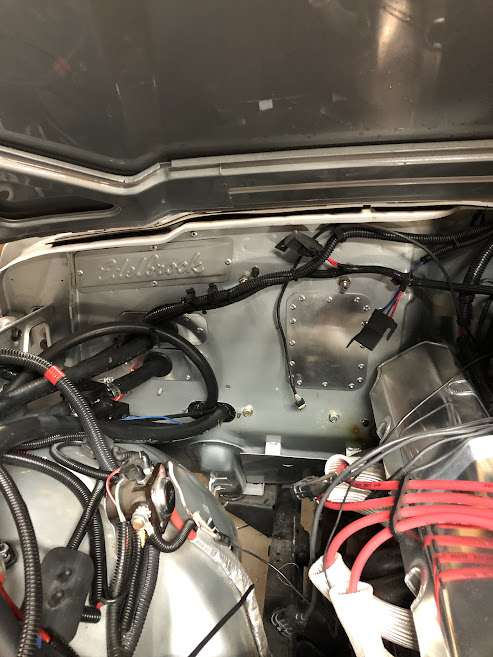
Also working on routing the heater hoses and heater control valve. I'll get it figured out eventually. The heater hose near the air cleaner with the yellow tape, is the one I'am trying to figure out.

1978 Jeep Wagoneer
401/turbo 400 transmission Quadra-Trac BW1339 (with Low) 4" Rusty's lift with 31" Summit Mud Dawgs
Mods:
Fuel Tank, Red Holley Electric Fuel Pump, Razor Grill, Rebuilt steering box
401/turbo 400 transmission Quadra-Trac BW1339 (with Low) 4" Rusty's lift with 31" Summit Mud Dawgs
Mods:
Fuel Tank, Red Holley Electric Fuel Pump, Razor Grill, Rebuilt steering box
-
sonoraed
- Vendor
- Posts: 674
- Joined: Sun Apr 07, 2013 7:38 am
- Location: Sonora,Ca
- Contact:
Re: Vintage Air install on 78 Wagoneer

If the unit is mounted against the kick panel it clears the glove box, which creates a problem with running the lines thru the firewall,

Not a unsolvable problem just another challenge
Sent from my iPhone using Tapatalk
-
Full Size Jeeper
Topic author - Posts: 154
- Joined: Mon Feb 23, 2015 9:14 pm
- Location: Mandeville Louisiana
Re: Vintage Air install on 78 Wagoneer
Heater hoses are done, the one on the back of the intake runs from the back to the front. Used a 90 fitting and it runs across the top of the a/c compressor to the passenger fender with the rest of the a/c and heater hoses.

1978 Jeep Wagoneer
401/turbo 400 transmission Quadra-Trac BW1339 (with Low) 4" Rusty's lift with 31" Summit Mud Dawgs
Mods:
Fuel Tank, Red Holley Electric Fuel Pump, Razor Grill, Rebuilt steering box
401/turbo 400 transmission Quadra-Trac BW1339 (with Low) 4" Rusty's lift with 31" Summit Mud Dawgs
Mods:
Fuel Tank, Red Holley Electric Fuel Pump, Razor Grill, Rebuilt steering box
-
Full Size Jeeper
Topic author - Posts: 154
- Joined: Mon Feb 23, 2015 9:14 pm
- Location: Mandeville Louisiana
Re: Vintage Air install on 78 Wagoneer
My son doesn't like the fact that the hose runs in between the two a/c lines. I,am good with it for now.

1978 Jeep Wagoneer
401/turbo 400 transmission Quadra-Trac BW1339 (with Low) 4" Rusty's lift with 31" Summit Mud Dawgs
Mods:
Fuel Tank, Red Holley Electric Fuel Pump, Razor Grill, Rebuilt steering box
401/turbo 400 transmission Quadra-Trac BW1339 (with Low) 4" Rusty's lift with 31" Summit Mud Dawgs
Mods:
Fuel Tank, Red Holley Electric Fuel Pump, Razor Grill, Rebuilt steering box
-
Full Size Jeeper
Topic author - Posts: 154
- Joined: Mon Feb 23, 2015 9:14 pm
- Location: Mandeville Louisiana
Re: Vintage Air install on 78 Wagoneer
We finished up the plates for the heater hoses and found a place to mount the heater control valve. It's kind of hidden and away from the headers. I think it worked out pretty good.

1978 Jeep Wagoneer
401/turbo 400 transmission Quadra-Trac BW1339 (with Low) 4" Rusty's lift with 31" Summit Mud Dawgs
Mods:
Fuel Tank, Red Holley Electric Fuel Pump, Razor Grill, Rebuilt steering box
401/turbo 400 transmission Quadra-Trac BW1339 (with Low) 4" Rusty's lift with 31" Summit Mud Dawgs
Mods:
Fuel Tank, Red Holley Electric Fuel Pump, Razor Grill, Rebuilt steering box
-
Full Size Jeeper
Topic author - Posts: 154
- Joined: Mon Feb 23, 2015 9:14 pm
- Location: Mandeville Louisiana
Re: Vintage Air install on 78 Wagoneer
I think it's coming out pretty clean for my first Vintage Air install. I'am going to do a little bit of rerouting of the wires on the left fender well later this week.
1978 Jeep Wagoneer
401/turbo 400 transmission Quadra-Trac BW1339 (with Low) 4" Rusty's lift with 31" Summit Mud Dawgs
Mods:
Fuel Tank, Red Holley Electric Fuel Pump, Razor Grill, Rebuilt steering box
401/turbo 400 transmission Quadra-Trac BW1339 (with Low) 4" Rusty's lift with 31" Summit Mud Dawgs
Mods:
Fuel Tank, Red Holley Electric Fuel Pump, Razor Grill, Rebuilt steering box
-
Full Size Jeeper
Topic author - Posts: 154
- Joined: Mon Feb 23, 2015 9:14 pm
- Location: Mandeville Louisiana
Re: Vintage Air install on 78 Wagoneer
I needed a keyed ignition source for a trigger wire for the compressor switch. I hate to shove a spade connector in on one of the old style glass fuses. So I found a lug on the fuse panel that I think maybe was used for the factory a/c system. Was able to push a spade connector onto the un-fused lug with this fuse set up. I think it's going to work well.

1978 Jeep Wagoneer
401/turbo 400 transmission Quadra-Trac BW1339 (with Low) 4" Rusty's lift with 31" Summit Mud Dawgs
Mods:
Fuel Tank, Red Holley Electric Fuel Pump, Razor Grill, Rebuilt steering box
401/turbo 400 transmission Quadra-Trac BW1339 (with Low) 4" Rusty's lift with 31" Summit Mud Dawgs
Mods:
Fuel Tank, Red Holley Electric Fuel Pump, Razor Grill, Rebuilt steering box
-
Full Size Jeeper
Topic author - Posts: 154
- Joined: Mon Feb 23, 2015 9:14 pm
- Location: Mandeville Louisiana
Re: Vintage Air install on 78 Wagoneer
I will try and post a pic of where I plugged it into the fuse panel once I'am done.

1978 Jeep Wagoneer
401/turbo 400 transmission Quadra-Trac BW1339 (with Low) 4" Rusty's lift with 31" Summit Mud Dawgs
Mods:
Fuel Tank, Red Holley Electric Fuel Pump, Razor Grill, Rebuilt steering box
401/turbo 400 transmission Quadra-Trac BW1339 (with Low) 4" Rusty's lift with 31" Summit Mud Dawgs
Mods:
Fuel Tank, Red Holley Electric Fuel Pump, Razor Grill, Rebuilt steering box
-
sonoraed
- Vendor
- Posts: 674
- Joined: Sun Apr 07, 2013 7:38 am
- Location: Sonora,Ca
- Contact:
Re: Vintage Air install on 78 Wagoneer
Really appreciate all the pictures, lots of thought and creativity has gone into your build!
-
Full Size Jeeper
Topic author - Posts: 154
- Joined: Mon Feb 23, 2015 9:14 pm
- Location: Mandeville Louisiana
Re: Vintage Air install on 78 Wagoneer
Thanks Ed for all your help! Yeah, my goal with this thread was to help others that were thinking about doing A similar a/c swap. Even if it is, Wow, I would never do my rig like this. They can hopefully take some of the ideas or Technics I used, and get their Wagon some ice cold air!!!!
1978 Jeep Wagoneer
401/turbo 400 transmission Quadra-Trac BW1339 (with Low) 4" Rusty's lift with 31" Summit Mud Dawgs
Mods:
Fuel Tank, Red Holley Electric Fuel Pump, Razor Grill, Rebuilt steering box
401/turbo 400 transmission Quadra-Trac BW1339 (with Low) 4" Rusty's lift with 31" Summit Mud Dawgs
Mods:
Fuel Tank, Red Holley Electric Fuel Pump, Razor Grill, Rebuilt steering box