Advice for Welding thin Sheet Metal
-
 Nutz-n-Bolts
Topic author - Posts: 313
- Joined: Thu Dec 05, 2013 12:06 pm
- Location: Strattanville,PA
Re: Advice for Welding thin Sheet Metal
Wow Robert, Thanks for all of that info!  I'm still digesting what you wrote let alone checking out all of the links. Really great stuff and totally makes sense. I actually haven't started this yet, but plan to take some time off work and hit it hard in the next couple weeks. All your advice will make things go much better I'm sure. I'll be posting back with my progress. Thanks again!
Lover of all Old Iron
60-79 CJ5 The best parts from several years combined to make one tough ALL JEEP CJ
81 J10 Pickup My newest acquisition undergoing a complete restoration
60-79 CJ5 The best parts from several years combined to make one tough ALL JEEP CJ
81 J10 Pickup My newest acquisition undergoing a complete restoration
-
 j20owner
- Posts: 461
- Joined: Sat Aug 27, 2011 1:46 pm
Re: Advice for Welding thin Sheet Metal
MP&C, you have a new youtube subscriber! Any way you could do another with a corner weld? Like a 90 degree corner? I can be more specific if needed.
Tatsadasayago wrote:And here i thought Capitalism was hitting the Shift Key...
-
MP&C
- Posts: 28
- Joined: Tue Aug 26, 2014 3:53 am
- Location: Southern MD
Re: Advice for Welding thin Sheet Metal
Yeah, a few more details please!
-
j20owner
- Posts: 461
- Joined: Sat Aug 27, 2011 1:46 pm
Re: Advice for Welding thin Sheet Metal
Ok, on my Wagoneer there has been some cutting done to the rear fenders.

I need to finish cutting the bottom of the quarter off, figure out my fuel hoses, and the put a patch in, kind of like this:


I would like the new piece to be a little thicker, to absorb debris and hits and maybe not deform as much. I've heard all about keeping the majority of the heat on the thicker material and 'pulling' the thinner into the weld. Just liked your vids and thought maybe you'd have some other helpful hints.
I need to finish cutting the bottom of the quarter off, figure out my fuel hoses, and the put a patch in, kind of like this:
I would like the new piece to be a little thicker, to absorb debris and hits and maybe not deform as much. I've heard all about keeping the majority of the heat on the thicker material and 'pulling' the thinner into the weld. Just liked your vids and thought maybe you'd have some other helpful hints.
Tatsadasayago wrote:And here i thought Capitalism was hitting the Shift Key...
-
 243
243
- Posts: 740
- Joined: Sat Mar 16, 2013 7:32 am
- Location: Texas
Re: Advice for Welding thin Sheet Metal
I dug through my plumbing tote and found a couple of short pieces of 3/4" and 1 1/2" copper tubing, I smashed them flat and used both as backers for sheet metal work, I quit using the copper when I tried a piece of 3/4" 6061 I had in the scrap pile.
1978 Cherokee NT, 5.3/4L60/NP241 in Progress
-
MP&C
- Posts: 28
- Joined: Tue Aug 26, 2014 3:53 am
- Location: Southern MD
Re: Advice for Welding thin Sheet Metal
Looking at this picture:
.....is that flat area a factory feature or an "owner added option"? You'll have to excuse me as I've had limited exposure to the FSJ's so if this is a factory feature it's a new one on me. Most won't have a flat transition at the bottom of a quarter like that. Looking at the way the wheelwell "roll" abruptly stops this appears more like an owner option.. Clarify please? Yours in the white paint does not appear the same, unless it's just the viewing angle.
.....is that flat area a factory feature or an "owner added option"? You'll have to excuse me as I've had limited exposure to the FSJ's so if this is a factory feature it's a new one on me. Most won't have a flat transition at the bottom of a quarter like that. Looking at the way the wheelwell "roll" abruptly stops this appears more like an owner option.. Clarify please? Yours in the white paint does not appear the same, unless it's just the viewing angle.
-
j20owner
- Posts: 461
- Joined: Sat Aug 27, 2011 1:46 pm
Re: Advice for Welding thin Sheet Metal
You are correct. The above picture shows another jeeper's vehicle and a modification he made. I need to do something similar to the white wagon. I've moved my rear axle back about 6" and the fender needs to be shortened to accommodate a tire(or 2).
Tatsadasayago wrote:And here i thought Capitalism was hitting the Shift Key...
-
MP&C
- Posts: 28
- Joined: Tue Aug 26, 2014 3:53 am
- Location: Southern MD
Re: Advice for Welding thin Sheet Metal
As shown in the picture above, you need a nicely trimmed tight fit. Any gaps here is going to promote the pin cushion effect on the inside when the welding wire pokes through. As you suggested, your torch aim with favor the thicker metal. Also, your heat setting should be set for the thicker metal when welding differing thicknesses. Here especially, some practice pieces to get the welder dialed in is highly suggested. And as I posted on the first page, when using practice pieces you want to duplicate what is on the truck. This includes the different thicknesses, if that's what you're installing, and practice welds with the pieces at a 90. I'd do some practice pieces and post up some pics for critique..
-
j20owner
- Posts: 461
- Joined: Sat Aug 27, 2011 1:46 pm
Re: Advice for Welding thin Sheet Metal
I might just do that when it comes to that point. It's actually fairly low on the priority list right now. Front axle needs to be back together, trans and t-case need to be in it, then the engine needs to run before I worry about the body.
Tatsadasayago wrote:And here i thought Capitalism was hitting the Shift Key...
-
MP&C
- Posts: 28
- Joined: Tue Aug 26, 2014 3:53 am
- Location: Southern MD
Re: Advice for Welding thin Sheet Metal
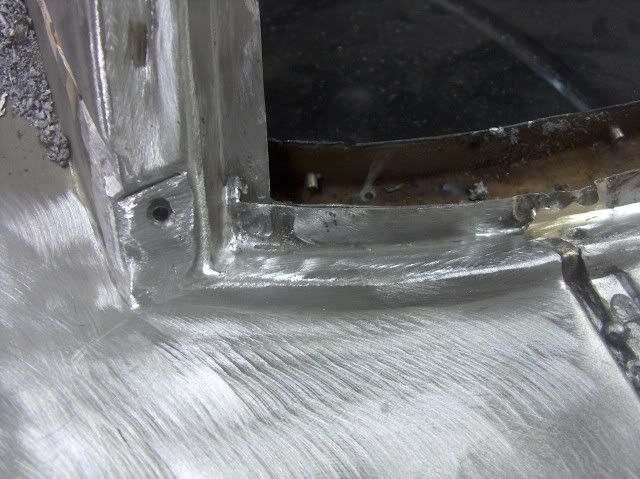
I checked my past projects to see what I had done in welding panels together at a 90. This was about all I had. Note how tightly the joints are trimmed. With working on the bottom of your quarter, especially if welding up-side down, you'll want the joint as tight as you can get to reduce the possibility of blowing holes......
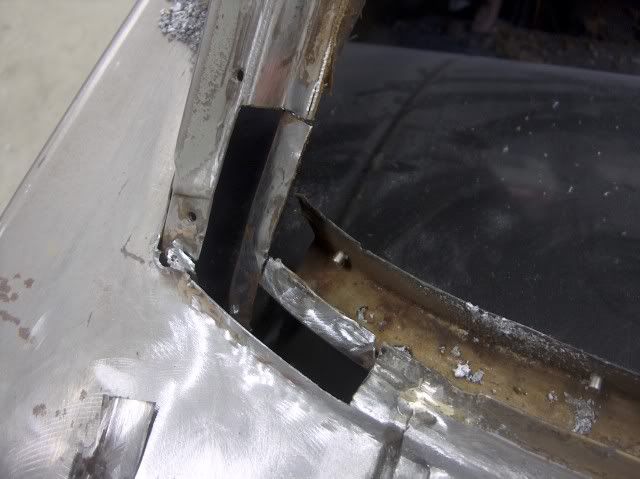
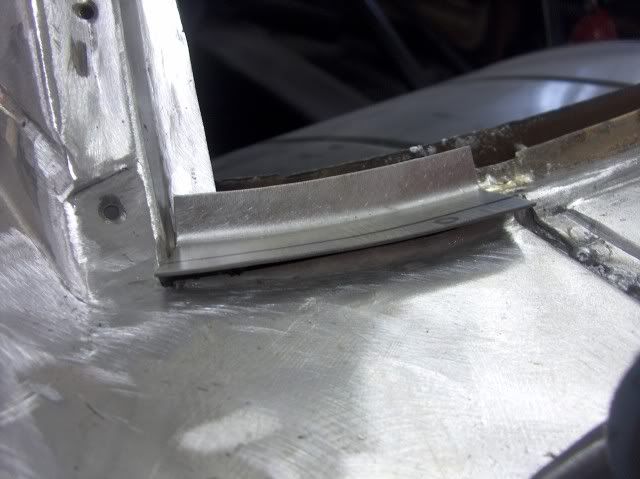
Noticed this damage while cleaning up the rear window channel today, hoping to get a step closer to primer.
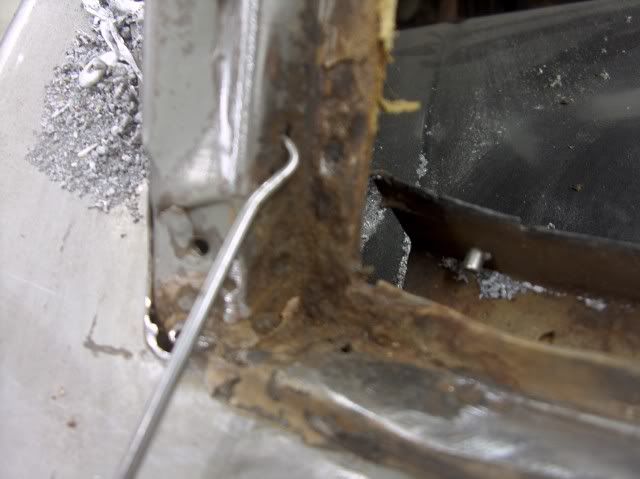

The first step I normally take is to use the pick to check the surrounding area for any hidden damage, and decide how far to take the opening. Once you find solid metal, the next consideration is the ease of dressing out the repair. It's easier to grind and sand on an outside radius than an inside one, so that is factored into the cut size. Sometimes you don't have a choice, but best to make it easier on yourself when you can!
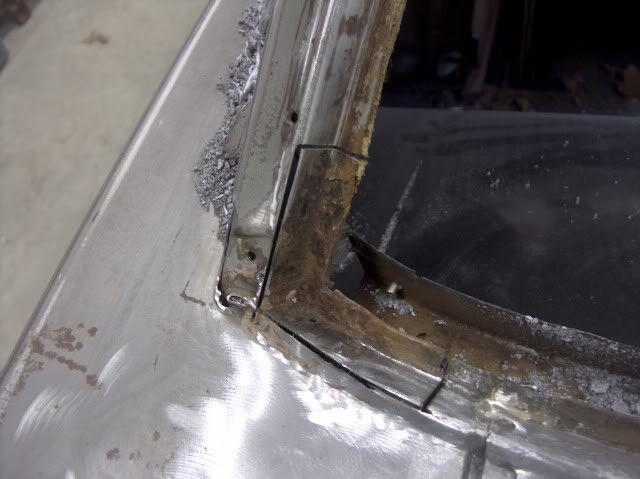
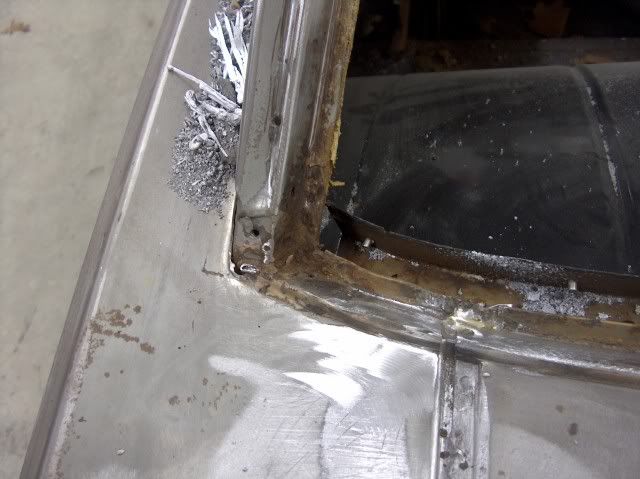
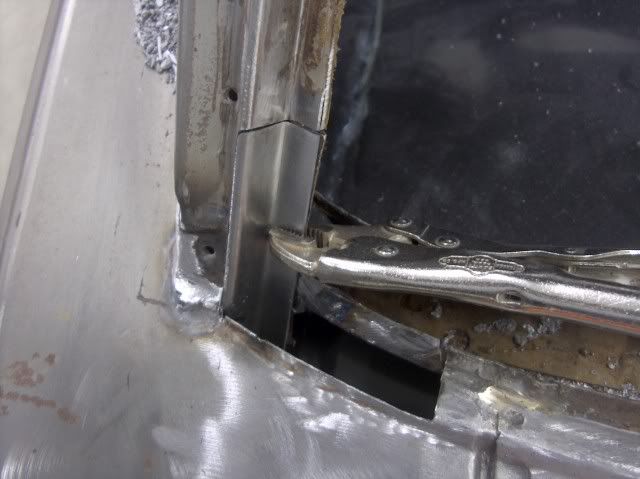
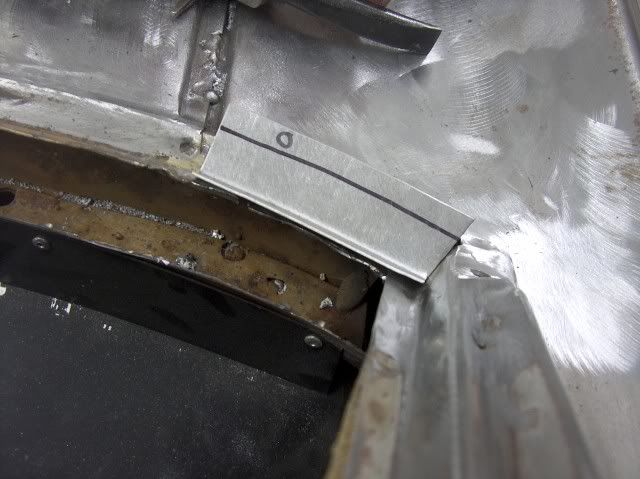
The channel is actually made in two pieces. The spot welds in the pinch weld area are removed from the top layer to remove the damaged pieces. The vertical piece actually travels down beyond the bottom of the window in this case, so that will be installed first. A new piece is cut out and bent to fit, and final sanding/grinding to get a tight weld joint.
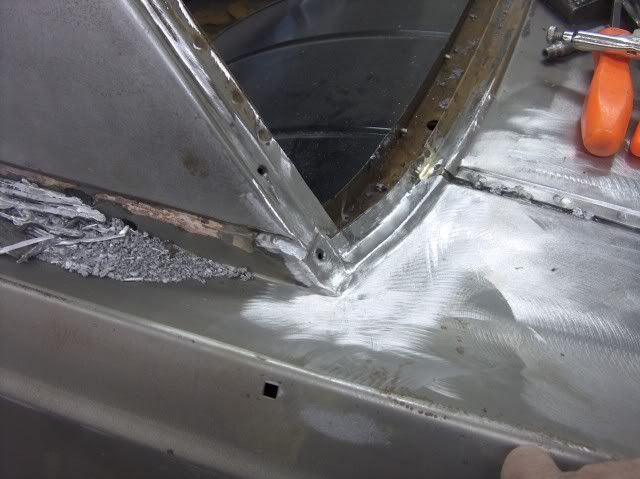
Notice that the outside corner where I had cut vertically actually has a slight radius to the bend. Had I merely butted a straight patch up against the old, it would have pulled in from where it should be located, resulting in the absolute need for filler. So a bend was added to the patch during fabrication, then trimmed most of it off to match what was there prior, for a no-filler patch..

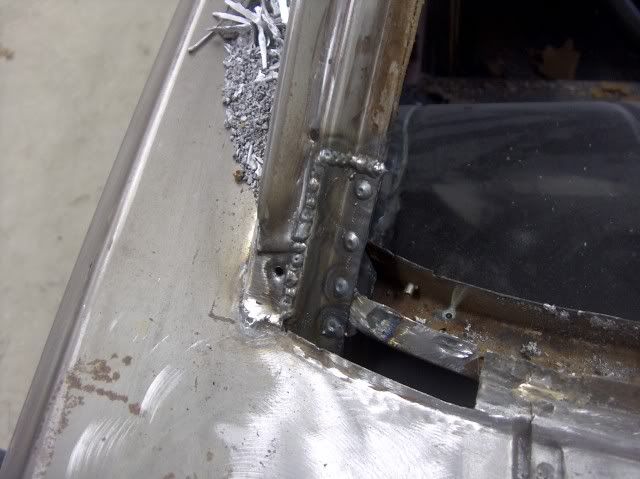
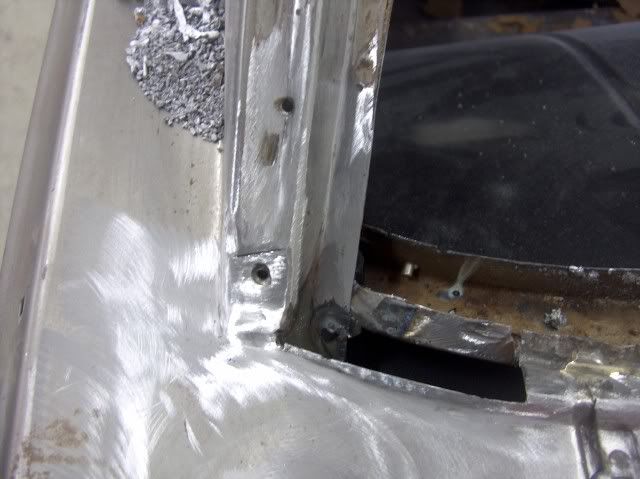
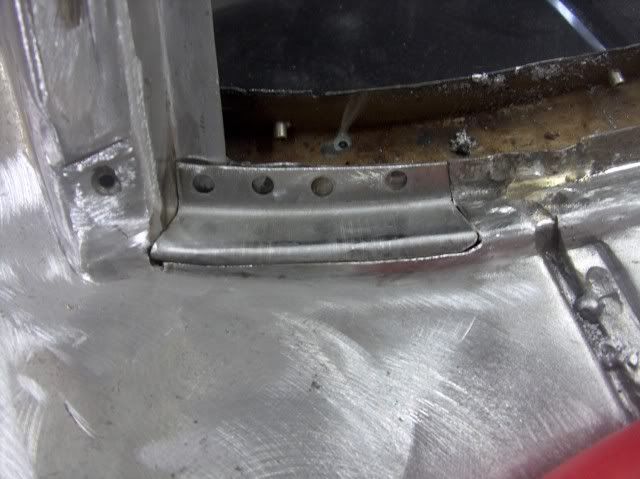
The bottom piece has a radius in two directions, slopes up and in.
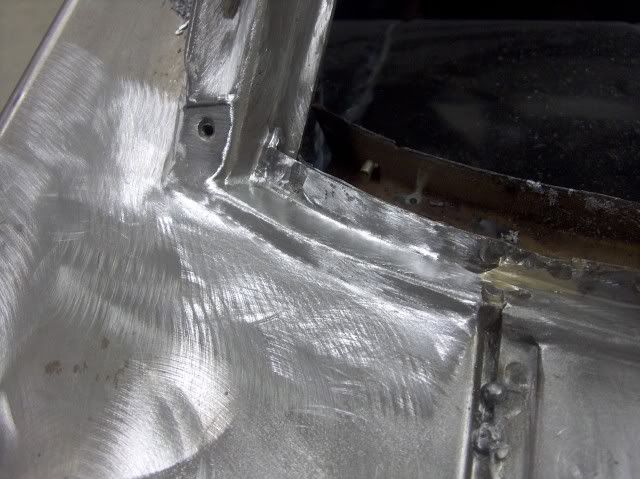
The outer radius was hammer formed after the shrinking and stretching was done. Then trimmed to fit and welded in place.
Noticed this damage while cleaning up the rear window channel today, hoping to get a step closer to primer.
The first step I normally take is to use the pick to check the surrounding area for any hidden damage, and decide how far to take the opening. Once you find solid metal, the next consideration is the ease of dressing out the repair. It's easier to grind and sand on an outside radius than an inside one, so that is factored into the cut size. Sometimes you don't have a choice, but best to make it easier on yourself when you can!
The channel is actually made in two pieces. The spot welds in the pinch weld area are removed from the top layer to remove the damaged pieces. The vertical piece actually travels down beyond the bottom of the window in this case, so that will be installed first. A new piece is cut out and bent to fit, and final sanding/grinding to get a tight weld joint.
Notice that the outside corner where I had cut vertically actually has a slight radius to the bend. Had I merely butted a straight patch up against the old, it would have pulled in from where it should be located, resulting in the absolute need for filler. So a bend was added to the patch during fabrication, then trimmed most of it off to match what was there prior, for a no-filler patch..
The bottom piece has a radius in two directions, slopes up and in.
The outer radius was hammer formed after the shrinking and stretching was done. Then trimmed to fit and welded in place.
-
j20owner
- Posts: 461
- Joined: Sat Aug 27, 2011 1:46 pm
Re: Advice for Welding thin Sheet Metal
Very nice!
Tatsadasayago wrote:And here i thought Capitalism was hitting the Shift Key...
-
letank
- Posts: 4036
- Joined: Wed Oct 03, 2012 9:16 pm
- Location: SF bay area
Re: Advice for Welding thin Sheet Metal
Robert, this is awesome, thank you for your answer and I started to check your tutorials.... the kids will have to wait for their meal.... just kidding, as the kids are in their late 20's.
Started with bondo like everybody, then discovered it appetite for water, then fiberglass... and now marine epoxy for the small holes, it works wonder, I know it is not a trade skill. But about to try welding, I attended the local community college, but their funds are shrinking so half of the equipment was held with duct tape...
Best,
Michel
74 wag (349 Kmiles... parked, next step is a rust free body)
85 Gwag (229 Kmiles... the running test lab)
74 wag (349 Kmiles... parked, next step is a rust free body)
85 Gwag (229 Kmiles... the running test lab)
-
kathyrose
- Posts: 8
- Joined: Mon Feb 02, 2015 2:46 am
- Contact:
Re: Advice for Welding thin Sheet Metal
You can also weld two metal sheets with a gas or electric welder. You should grind its surface very carefully so that it remains smooth.
-
 wewillsurvive
- Posts: 1093
- Joined: Mon Mar 18, 2013 1:10 pm
- Location: Martinsville, IN
Advice for Welding thin Sheet Metal
Robert you are a man of great skill. Where are you located?
Sent from my iPad using Tapatalk
Sent from my iPad using Tapatalk
-
wewillsurvive
- Posts: 1093
- Joined: Mon Mar 18, 2013 1:10 pm
- Location: Martinsville, IN
Advice for Welding thin Sheet Metal
Where is your YouTube channelj20owner wrote:MP&C, you have a new youtube subscriber! Any way you could do another with a corner weld? Like a 90 degree corner? I can be more specific if needed.
Sent from my iPad using Tapatalk
-
MP&C
- Posts: 28
- Joined: Tue Aug 26, 2014 3:53 am
- Location: Southern MD
-
 flingwing1969
- Posts: 117
- Joined: Mon Jun 16, 2014 9:46 pm
Re: Advice for Welding thin Sheet Metal
This Thread deserve a BUMP, so that those who are projecting or those who look only at new posts might have an opportunity to gain from Robert's great information - Thank you Robert.
Tom
Tall Cedars of Shasta County California Near Lassen Park
1965 J-2600 Buick 350 V8, Camper Special (6,000 lb GVW) (Engine Blown 10/2014 )
)
1973 J-4800 Service Body, AMC 360 4bbl, T18A
1975 CJ-5, AMC 304 V8, T-15
1974 CJ-5, AMC IL 258, T-18A
1974 Dodge W300 Dump Truck (10,000 lb GVW) (Sold 11/2014)
Tall Cedars of Shasta County California Near Lassen Park
1965 J-2600 Buick 350 V8, Camper Special (6,000 lb GVW) (Engine Blown 10/2014
1973 J-4800 Service Body, AMC 360 4bbl, T18A
1975 CJ-5, AMC 304 V8, T-15
1974 CJ-5, AMC IL 258, T-18A
1974 Dodge W300 Dump Truck (10,000 lb GVW) (Sold 11/2014)
-
wewillsurvive
- Posts: 1093
- Joined: Mon Mar 18, 2013 1:10 pm
- Location: Martinsville, IN
Re: Advice for Welding thin Sheet Metal
Thanks I was looking for this earlier
1972 Dodge Demon with a 451" stroker Big Block
1986 Jeep Grand Wagoneer AMC 360" AKA Golddigger- SOLD
2003 Dodge Crewcab 2500 Cummins longbed 4x4
2011 Jeep Grand Cherokee V-6 full time 4x4
Alternators, winches, 4x4, guns all have the same issue if you don't have any knowledge of them usually bad things will happen. Serehill
1986 Jeep Grand Wagoneer AMC 360" AKA Golddigger- SOLD
2003 Dodge Crewcab 2500 Cummins longbed 4x4
2011 Jeep Grand Cherokee V-6 full time 4x4
Alternators, winches, 4x4, guns all have the same issue if you don't have any knowledge of them usually bad things will happen. Serehill
-
jasspaul
- Posts: 5
- Joined: Wed Jun 10, 2015 12:57 am
- Contact:
Re: Advice for Welding thin Sheet Metal
Ya it looks tough. But welding in bullets is a great idea. It will joint the parts and give more strength to its binding.
-
MP&C
- Posts: 28
- Joined: Tue Aug 26, 2014 3:53 am
- Location: Southern MD
Re: Advice for Welding thin Sheet Metal
About three weeks back we held a metalshaping class here at my shop (Oct 1-4), with Peter Tommasini (coachbuilder from Australia) as instructor. Thought I'd show some of the class highlights as it may help someone in their own panel fabrications..
Getting ready for the metal shaping class at the shop this week, picked up Peter today from the airport (Tuesday).
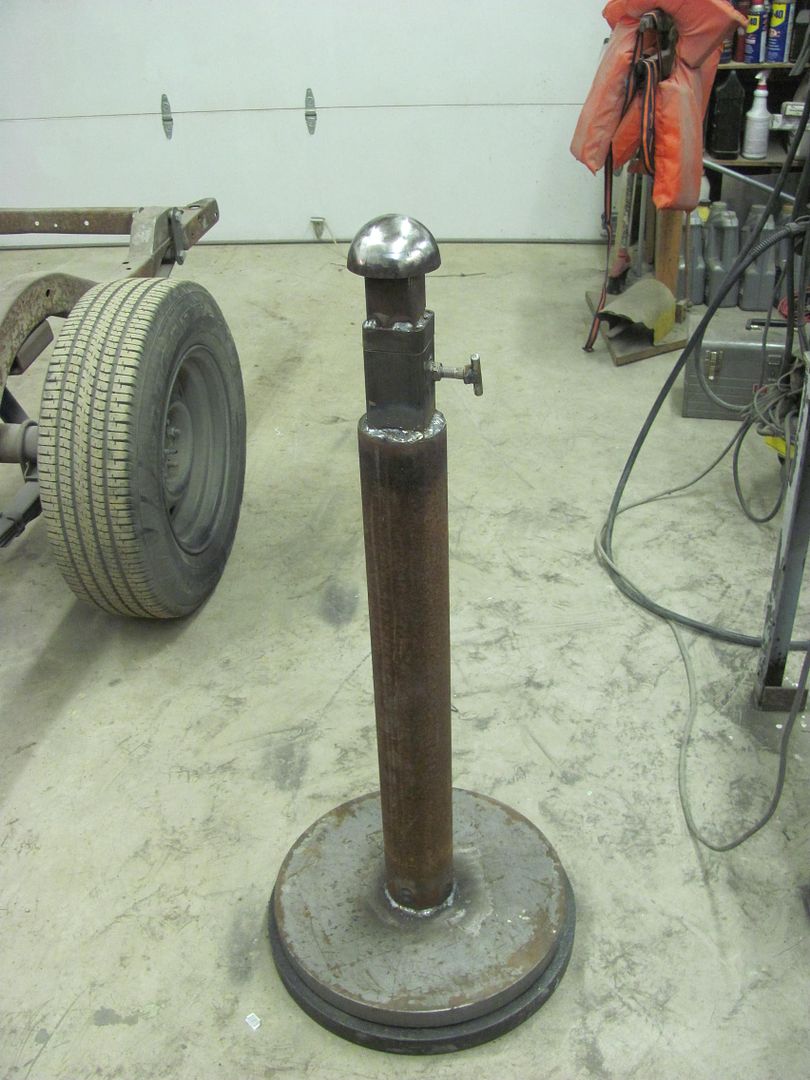
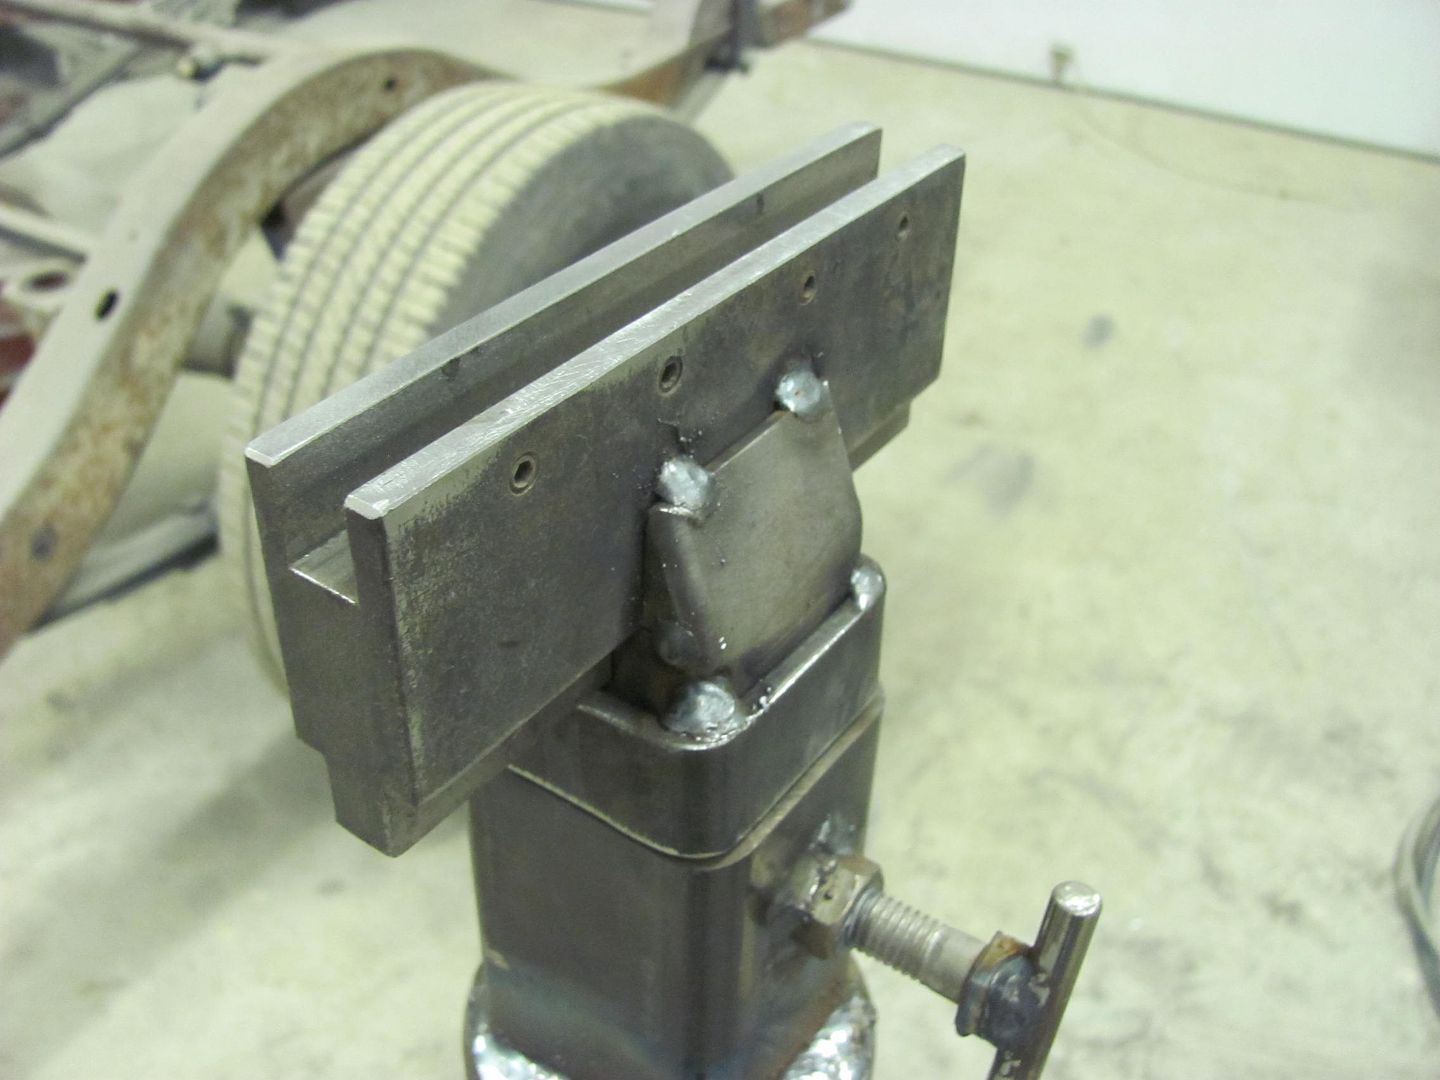
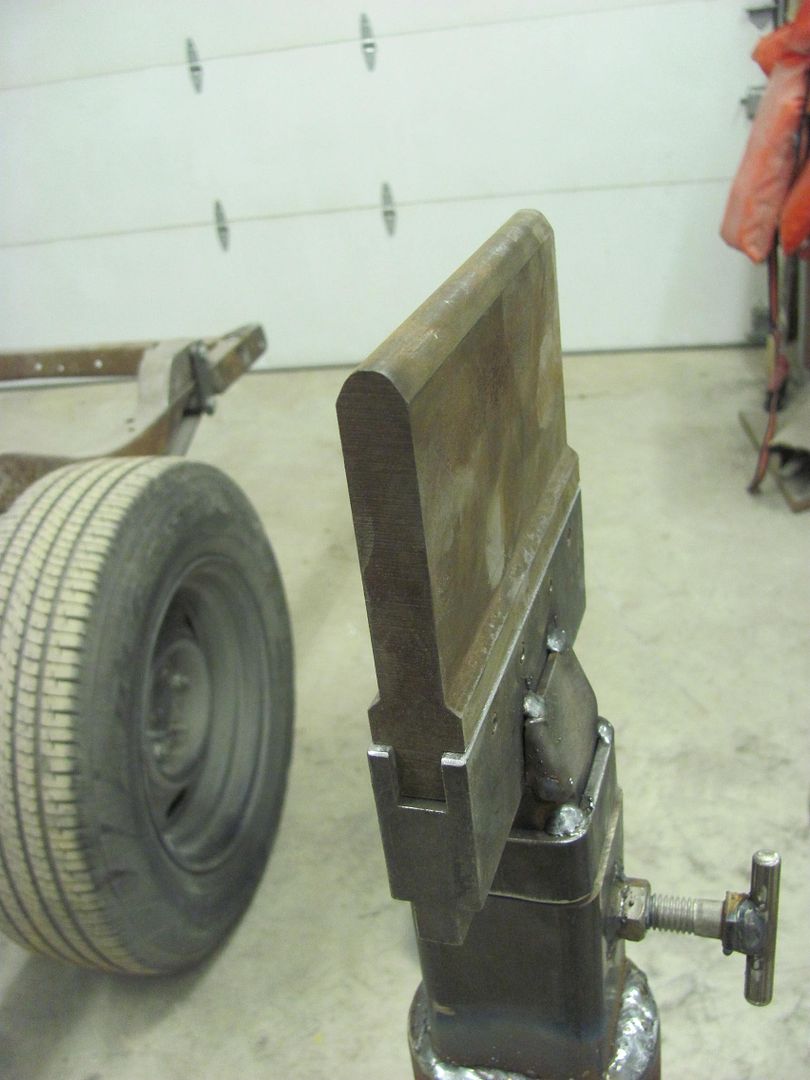
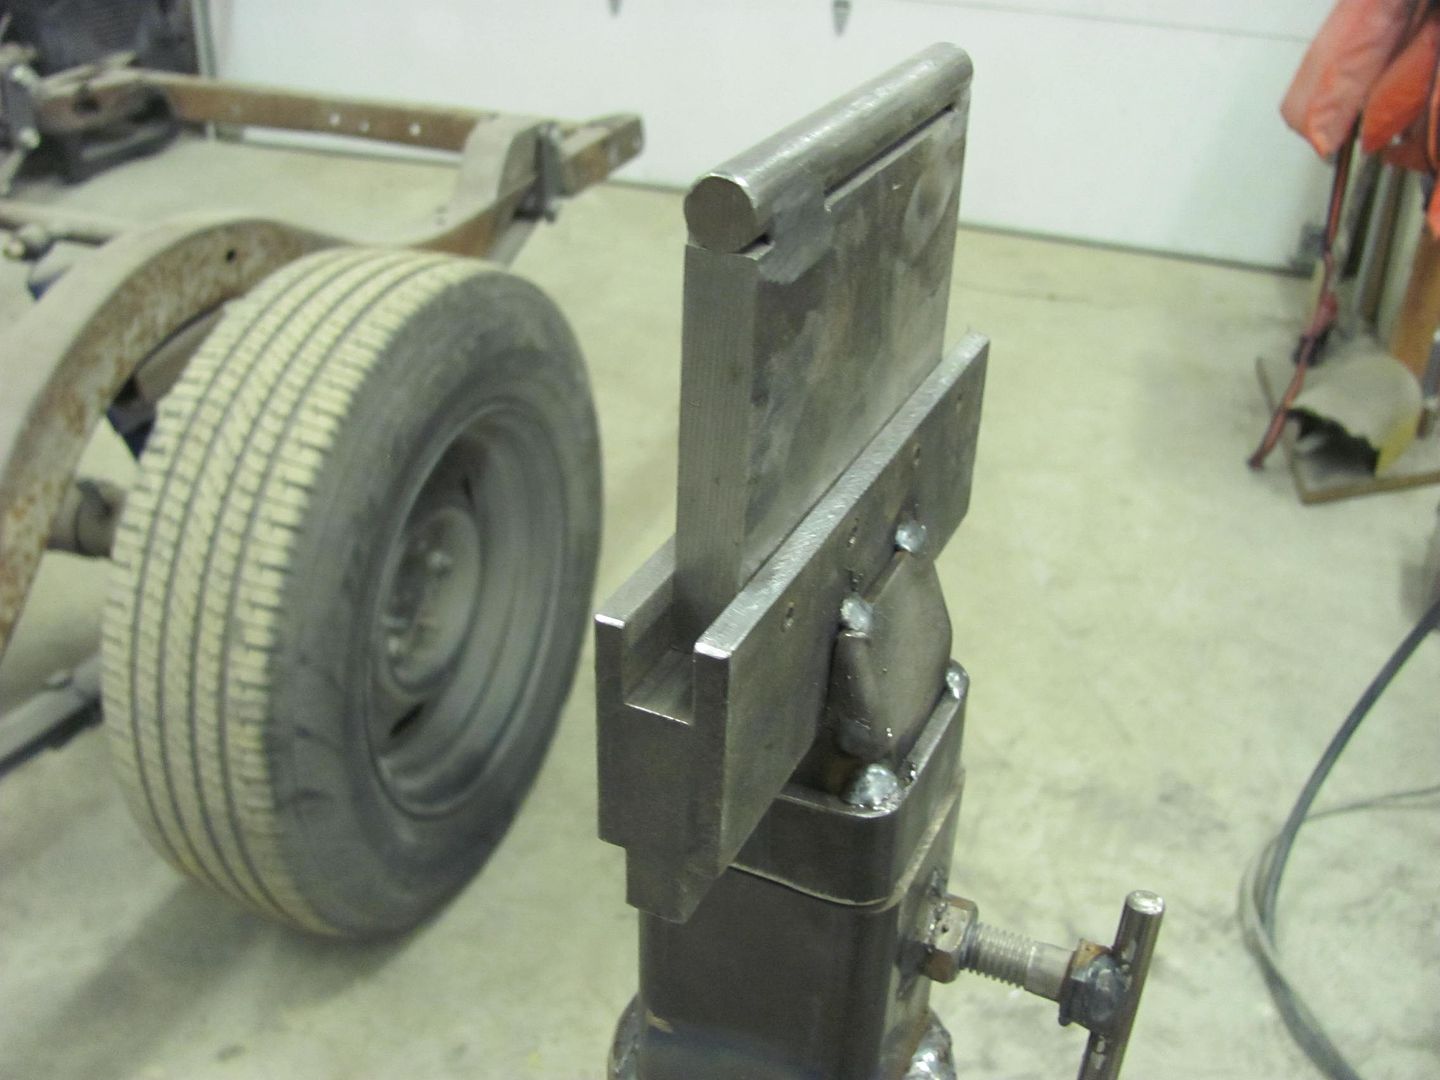
Last night Kyle and I made a pedestal for some home-made stake anvils using a couple 45 lb dumbbells and some pipe/tubing, tonight made the round-head anvil and another with a holder for press brake dies....
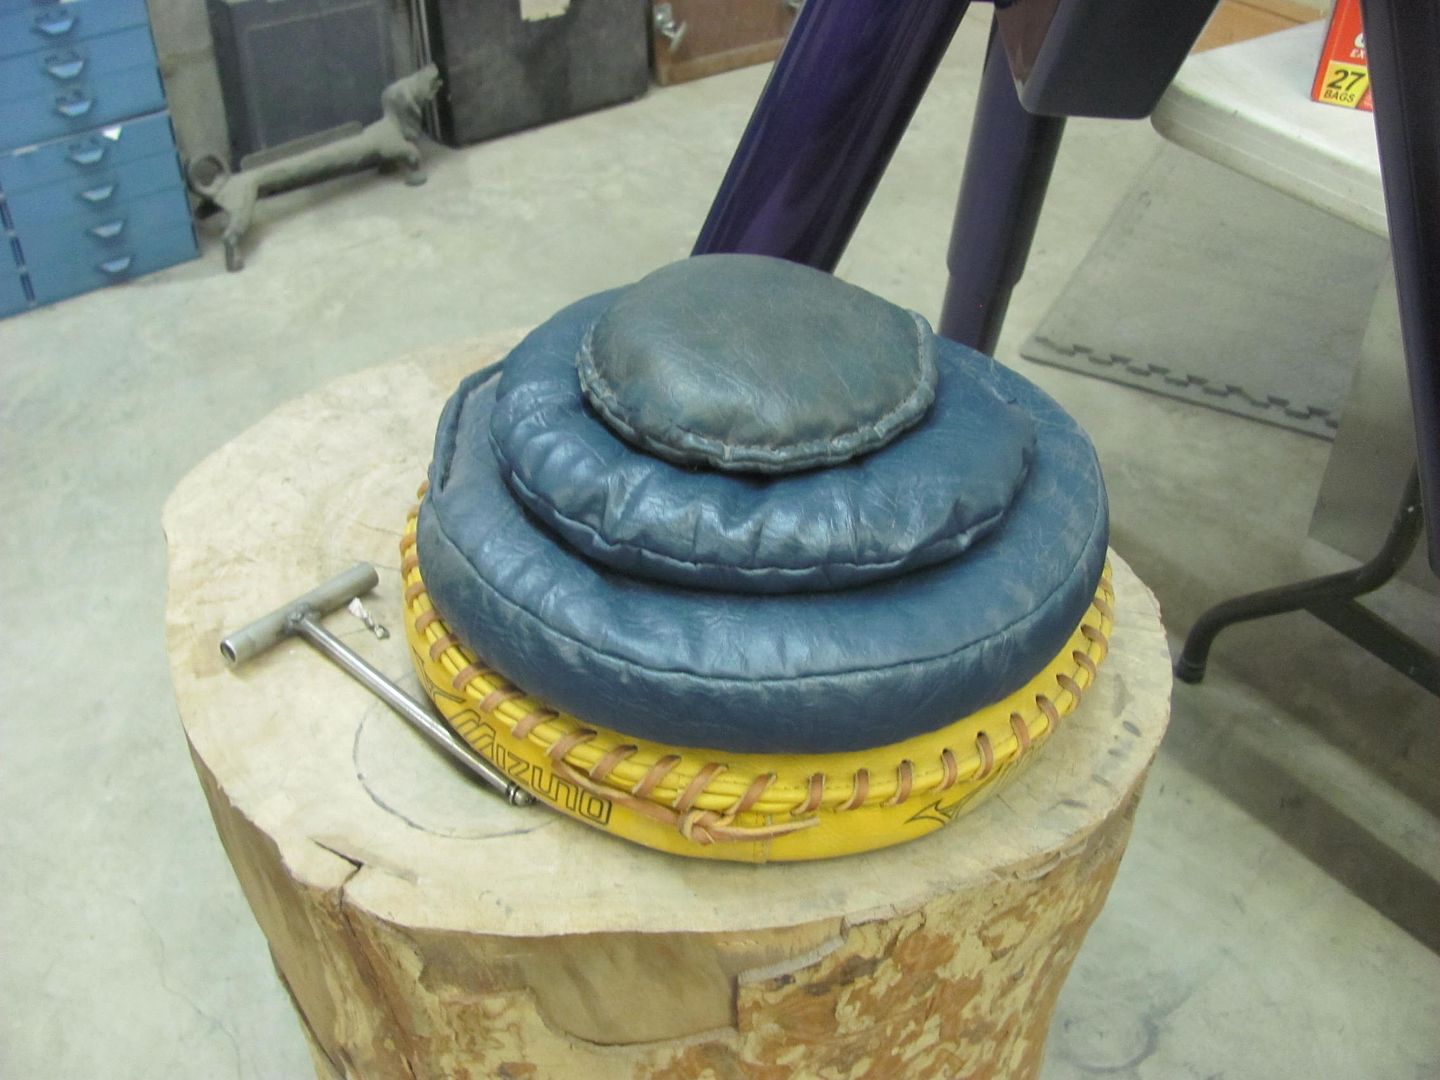
.....and stopped by the upholstery shop this morning to get another shot bag stitched up...
Counting the hours!
Getting ready for the metal shaping class at the shop this week, picked up Peter today from the airport (Tuesday).
Last night Kyle and I made a pedestal for some home-made stake anvils using a couple 45 lb dumbbells and some pipe/tubing, tonight made the round-head anvil and another with a holder for press brake dies....
.....and stopped by the upholstery shop this morning to get another shot bag stitched up...
Counting the hours!