
74' Cherokee First Jeep
-
 volkswaben
Topic author - Posts: 57
- Joined: Fri Sep 16, 2016 9:45 am
Re: 74' Cherokee First Jeep
Anybody have any ideas on how to redo this area with bondo? The bondo has tiny cracks in it and is unattractive. I'm thinking I could sand down that area, start over, and buy factory color paint. Not sure how well it will match, but it will probably look better then it does now. I am also not sure what color that darker brown is  , so I might have to trial and error that. The paint is still super dirty and I bet it will buff out good.
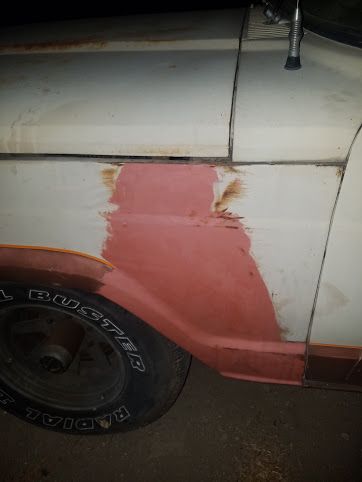
1974 Cherokee 360/T15
1979 Cherokee - parts rig/ future project?
1979 Cherokee - parts rig/ future project?
-
letank
- Posts: 4029
- Joined: Wed Oct 03, 2012 9:16 pm
- Location: SF bay area
Re: 74' Cherokee First Jeep
a bit late, yes sanding with 220 grit to start investigating the thickness of bondo and its adhesion, the pict is not too clear on how much bondo has been added. Bondo absorb water, so if it is not primed and painted, it will fail.volkswaben wrote:Anybody have any ideas on how to redo this area with bondo? The bondo has tiny cracks in it and is unattractive.
As for paint, yours looks a bit off luster, you can try to mix some rustoleum paint that sells in small cans, white with a dab of light brown from the tint section of any homeimprovement store.
So you can try to find some sand color matte from the rustoleum catalog,
https://www.rustoleum.com/product-catal ... amel-spray
OSH in Calif seems to have a good sampling, I found an almost match for the old 74 light blue... and mix some for the dark blue 85 with an acceptable 6 footer

The previous rust fix around the gas filler is failing, fix was done, the above is an older pict
Michel
74 wag (349 Kmiles... parked, next step is a rust free body)
85 Gwag (229 Kmiles... the running test lab)
74 wag (349 Kmiles... parked, next step is a rust free body)
85 Gwag (229 Kmiles... the running test lab)
-
volkswaben
Topic author - Posts: 57
- Joined: Fri Sep 16, 2016 9:45 am
Re: 74' Cherokee First Jeep
I'll have to try that when I'm done with the other stuff. Thanks!letank wrote:a bit late, yes sanding with 220 grit to start investigating the thickness of bondo and its adhesion, the pict is not too clear on how much bondo has been added. Bondo absorb water, so if it is not primed and painted, it will fail.volkswaben wrote:Anybody have any ideas on how to redo this area with bondo? The bondo has tiny cracks in it and is unattractive.
As for paint, yours looks a bit off luster, you can try to mix some rustoleum paint that sells in small cans, white with a dab of light brown from the tint section of any homeimprovement store.
So you can try to find some sand color matte from the rustoleum catalog,
https://www.rustoleum.com/product-catal ... amel-spray
OSH in Calif seems to have a good sampling, I found an almost match for the old 74 light blue... and mix some for the dark blue 85 with an acceptable 6 footer
The previous rust fix around the gas filler is failing, fix was done, the above is an older pict
1974 Cherokee 360/T15
1979 Cherokee - parts rig/ future project?
1979 Cherokee - parts rig/ future project?
-
volkswaben
Topic author - Posts: 57
- Joined: Fri Sep 16, 2016 9:45 am
Re: 74' Cherokee First Jeep
Sorry about the lack of updates. 
I started stripping the interior of the Jeep about a month ago. When I pulled back the original rubber mat, I found quite a disappointing surprise. There were large rust holes on both the passenger and driver floor pans up front. The seals had gone bad on the doors.
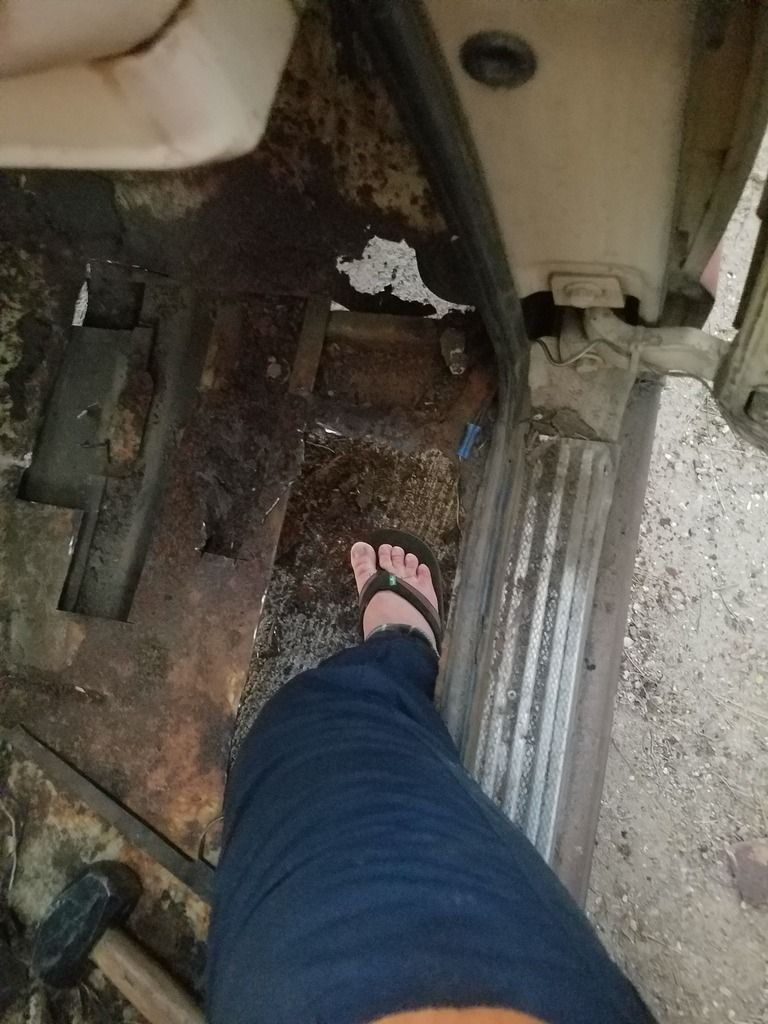 I've since got about 60% of the floor pans welded back. I am looking to see where I can get door seals for fairly cheap. After I finish welding the floor I am going to either paint or bedline the interior. I have also ordered a lot of mechanical parts from Rock auto and am in the process of rebuilding the carb. I'll post picks of the floor in progress when it's not dark outside.
1974 Cherokee 360/T15
1979 Cherokee - parts rig/ future project?
1979 Cherokee - parts rig/ future project?
-
 REDONE
- Posts: 2678
- Joined: Tue Sep 13, 2011 5:48 pm
- Location: Lakewood and Bailey, CO
Re: 74' Cherokee First Jeep
That's not the doorseals that rotted out the floor (though they may have gone bad since then). If you look at the kick panel in front of the door there's an oval shaped vent. It gets fed air from the slots right in front of the windshield. Pine needles and leaves fall through those slots, rain carries them down past that oval kick panel vent and plugs up the drain hole. Water backs up and rots out the floors.
Sucks about the floor, but you're not the first one of us that's had to deal with it and I'd be thrilled if you were the last!
Sucks about the floor, but you're not the first one of us that's had to deal with it and I'd be thrilled if you were the last!
79 J-10 (Honcho Mucho) KE0LSU
304/Performance Fuel Injection TBI/MTA1/SP2P/Magnum rockers
T18/D20/D44s&4.10s/33" Mud Claws
Grizzly Locker Rear
4" front spring drop, 5" rear shackle flip
Chevy style HEI (ECM controlled)
Dolphin "Shark" gauges in a fancy homemade oak bezel
3/4 resto, rotting faster than I've been fixing it.
304/Performance Fuel Injection TBI/MTA1/SP2P/Magnum rockers
T18/D20/D44s&4.10s/33" Mud Claws
Grizzly Locker Rear
4" front spring drop, 5" rear shackle flip
Chevy style HEI (ECM controlled)
Dolphin "Shark" gauges in a fancy homemade oak bezel
3/4 resto, rotting faster than I've been fixing it.
-
letank
- Posts: 4029
- Joined: Wed Oct 03, 2012 9:16 pm
- Location: SF bay area
Re: 74' Cherokee First Jeep
X2 as Redone said, check that post for ways to address one of the possibilitiesREDONE wrote:That's not the doorseals that rotted out the floor (though they may have gone bad since then). If you look at the kick panel in front of the door there's an oval shaped vent. It gets fed air from the slots right in front of the windshield. Pine needles and leaves fall through those slots, rain carries them down past that oval kick panel vent and plugs up the drain hole. Water backs up and rots out the floors.
Sucks about the floor, but you're not the first one of us that's had to deal with it and I'd be thrilled if you were the last!
http://fsjnetwork.com/forum/viewtopic.php?t=7426
most of the older rigs are the same, some of us have been lucky to catch it earlier
Michel
74 wag (349 Kmiles... parked, next step is a rust free body)
85 Gwag (229 Kmiles... the running test lab)
74 wag (349 Kmiles... parked, next step is a rust free body)
85 Gwag (229 Kmiles... the running test lab)
-
Adventure_Wagon88
- Posts: 441
- Joined: Tue Sep 06, 2016 2:00 pm
- Location: Leesport, PA
- Contact:
Re: 74' Cherokee First Jeep
Sorry to hear about the floors man. I had a similar surprise on mine, passenger side only thankfully. Those dang fresh air vents clog up with crap and when there's cartpet, or especially rubber, the owner never would have noticed the damage happening unless they knew to look for it.
-
volkswaben
Topic author - Posts: 57
- Joined: Fri Sep 16, 2016 9:45 am
Re: 74' Cherokee First Jeep
I will look into that, that is most likely the culprit as I found a literal composting pile in the tailgate.REDONE wrote:That's not the doorseals that rotted out the floor (though they may have gone bad since then). If you look at the kick panel in front of the door there's an oval shaped vent. It gets fed air from the slots right in front of the windshield. Pine needles and leaves fall through those slots, rain carries them down past that oval kick panel vent and plugs up the drain hole. Water backs up and rots out the floors.
Sucks about the floor, but you're not the first one of us that's had to deal with it and I'd be thrilled if you were the last!

1974 Cherokee 360/T15
1979 Cherokee - parts rig/ future project?
1979 Cherokee - parts rig/ future project?
-
volkswaben
Topic author - Posts: 57
- Joined: Fri Sep 16, 2016 9:45 am
Re: 74' Cherokee First Jeep
Long time no see guys! After all, Rome wasn't built in a day.  Finally finished up the painstaking rust repair on both the passenger and driver floor pans. Here is the before and progress:


And after LOTS of welding, grinding, sanding, and painting with POR15:


Next step is sound deadening and insulating the interior.
And after LOTS of welding, grinding, sanding, and painting with POR15:
Next step is sound deadening and insulating the interior.
1974 Cherokee 360/T15
1979 Cherokee - parts rig/ future project?
1979 Cherokee - parts rig/ future project?
-
volkswaben
Topic author - Posts: 57
- Joined: Fri Sep 16, 2016 9:45 am
Re: 74' Cherokee First Jeep
Pulled out the headliner and made a mess of fine dust and crusty paint flakes on my fresh floors. 

Used a metal paint scraper to remove these flakes and get to bare roof.

I then used a wire brush to clean up any loose rust, then used a spray can of rust reformer to seal the roof off.


I waited 24h for the roof to dry, then proceeded with sticking Siless 80mil sound deadener on most of it.


So far, so good. One 36sq ft box did the roof with some to spare. I ordered 4 boxes, so I should have plenty for the whole Jeep.
Used a metal paint scraper to remove these flakes and get to bare roof.
I then used a wire brush to clean up any loose rust, then used a spray can of rust reformer to seal the roof off.
I waited 24h for the roof to dry, then proceeded with sticking Siless 80mil sound deadener on most of it.
So far, so good. One 36sq ft box did the roof with some to spare. I ordered 4 boxes, so I should have plenty for the whole Jeep.
1974 Cherokee 360/T15
1979 Cherokee - parts rig/ future project?
1979 Cherokee - parts rig/ future project?
-
sirrus
- Vendor
- Posts: 717
- Joined: Fri Sep 13, 2019 11:13 pm
- Location: Hillsboro, OR
Re: 74' Cherokee First Jeep
Looks good! I’m about to start putting sound deadening on my rig soon, waiting for warmer weather now. I want to do roof, doors, floor, cargo area and tailgate- basically everything  what are your plans with soundproofing?
Wasn’t sure how much I’d need, so decided to go box by box - got my first 36 sq ft order, I’ll start with the doors and then move onto the roof. Looks like I’ll have to get another box to get both done, huh?
what are your plans with soundproofing?Wasn’t sure how much I’d need, so decided to go box by box - got my first 36 sq ft order, I’ll start with the doors and then move onto the roof. Looks like I’ll have to get another box to get both done, huh?
Sometimes we reinvent the wheel not to have more wheels but to have more inventors
1988 Grand Wagoneer - AMC 360 with ProFlo4 MPFI, TF727, NP229 FOR SALE
2021 JLU Willys EcoDiesel - new shiny toy
1988 Grand Wagoneer - AMC 360 with ProFlo4 MPFI, TF727, NP229 FOR SALE
2021 JLU Willys EcoDiesel - new shiny toy
-
volkswaben
Topic author - Posts: 57
- Joined: Fri Sep 16, 2016 9:45 am
Re: 74' Cherokee First Jeep
I am going to do the same, I'm trying to get it as quiet and comfortable as possible. I used most of one box for the roof, and then had a bit leftover to start the rear quarter panels. 2 boxes should be enough for the doors and roof I'd think. I bought the same amount of closed cell foam as deadener to apply over. https://www.amazon.com/dp/B07B75PD8B/re ... FEbWDC25YCsirrus wrote: ↑Sat Mar 28, 2020 10:04 am Looks good! I’m about to start putting sound deadening on my rig soon, waiting for warmer weather now. I want to do roof, doors, floor, cargo area and tailgate- basically everything
Wasn’t sure how much I’d need, so decided to go box by box - got my first 36 sq ft order, I’ll start with the doors and then move onto the roof. Looks like I’ll have to get another box to get both done, huh?
I may buy some extra bubble foil insulation to put on the roof under the headliner, but it might not be necessary.
1974 Cherokee 360/T15
1979 Cherokee - parts rig/ future project?
1979 Cherokee - parts rig/ future project?
-
volkswaben
Topic author - Posts: 57
- Joined: Fri Sep 16, 2016 9:45 am
Re: 74' Cherokee First Jeep
I decided to paint the inside panels while the interior is apart, as they were showing their age. I used the Rustoleum texured paint in Desert Bisque, and I really like the way it turned out. It did take bit more than I thought though, as I used 6 cans.
Before:

After:


Before:
After:
1974 Cherokee 360/T15
1979 Cherokee - parts rig/ future project?
1979 Cherokee - parts rig/ future project?
-
volkswaben
Topic author - Posts: 57
- Joined: Fri Sep 16, 2016 9:45 am
Re: 74' Cherokee First Jeep
Making more progress! Applied 5 layers of AL's HNR (heat and noise reducer) aka lizardskin to the front half of the floor. I had it on hand, so I decided to put it down before applying the deadener and foam.


Next, I applied the deadener throughout the whole Jeep.


Pretty happy with this stuff, goes on easily and was easy to work. The doors feel much more solid and heavy with the deadener. I also dropped the seats off at the upholstery shop, and have a pretty awesome plan for them! Carpet and more is on the way.
Next, I applied the deadener throughout the whole Jeep.
Pretty happy with this stuff, goes on easily and was easy to work. The doors feel much more solid and heavy with the deadener. I also dropped the seats off at the upholstery shop, and have a pretty awesome plan for them! Carpet and more is on the way.
1974 Cherokee 360/T15
1979 Cherokee - parts rig/ future project?
1979 Cherokee - parts rig/ future project?
-
sirrus
- Vendor
- Posts: 717
- Joined: Fri Sep 13, 2019 11:13 pm
- Location: Hillsboro, OR
Re: 74' Cherokee First Jeep
Good progress!
How much material did it take for the floor? And how difficult was it with doors? We’re you able to cover the whole door on the inside? Are you going to put foam in the doors?
Lot of questions- I’m still in a waiting stage, between it raining and being 40 degrees outside and my hand slowly recovering after surgery, so trying to figure as much as I can before I’m able to start
How much material did it take for the floor? And how difficult was it with doors? We’re you able to cover the whole door on the inside? Are you going to put foam in the doors?
Lot of questions- I’m still in a waiting stage, between it raining and being 40 degrees outside and my hand slowly recovering after surgery
, so trying to figure as much as I can before I’m able to startSometimes we reinvent the wheel not to have more wheels but to have more inventors
1988 Grand Wagoneer - AMC 360 with ProFlo4 MPFI, TF727, NP229 FOR SALE
2021 JLU Willys EcoDiesel - new shiny toy
1988 Grand Wagoneer - AMC 360 with ProFlo4 MPFI, TF727, NP229 FOR SALE
2021 JLU Willys EcoDiesel - new shiny toy
-
volkswaben
Topic author - Posts: 57
- Joined: Fri Sep 16, 2016 9:45 am
Re: 74' Cherokee First Jeep
Thanks! I went through just about 3.5 boxes of 36sq ft for the doors, roof, floor, and quarter panels (enough left over for the tailgate when I get to that). The doors were actually surprisingly easier than I thought they'd be. Plenty of room to reach the whole thing and even get the roller in for most of it. I put the foam over the deadener in the doors as well with plenty of room. I'll post some pics tomorrow of that.sirrus wrote: ↑Wed Apr 01, 2020 10:13 pm Good progress!
How much material did it take for the floor? And how difficult was it with doors? We’re you able to cover the whole door on the inside? Are you going to put foam in the doors?
Lot of questions- I’m still in a waiting stage, between it raining and being 40 degrees outside and my hand slowly recovering after surgery
1974 Cherokee 360/T15
1979 Cherokee - parts rig/ future project?
1979 Cherokee - parts rig/ future project?
-
sirrus
- Vendor
- Posts: 717
- Joined: Fri Sep 13, 2019 11:13 pm
- Location: Hillsboro, OR
Re: 74' Cherokee First Jeep
I was concerned about doors and how hard would it be and whether I would be able to put foam in there. Sounds like it shouldn’t be that difficult thanks
thanks Sometimes we reinvent the wheel not to have more wheels but to have more inventors
1988 Grand Wagoneer - AMC 360 with ProFlo4 MPFI, TF727, NP229 FOR SALE
2021 JLU Willys EcoDiesel - new shiny toy
1988 Grand Wagoneer - AMC 360 with ProFlo4 MPFI, TF727, NP229 FOR SALE
2021 JLU Willys EcoDiesel - new shiny toy
-
 Trosskyll
- Posts: 54
- Joined: Sat Oct 26, 2019 7:02 pm
Re: 74' Cherokee First Jeep
- Nice job you are making of the inside! I am impressed. Thanks for posting about the sound deadening as I was wondering if I should consider it for my restoration, so I will look into it more closely. One of my concerns is about trying to remove it, or at least a section of it in the future if ever the need for repair crops up? You might say if I do the resto' right the first time, then it won't be my problem... Great to see your work in progress
'76 Cherokee Chief AMC304, TH400, QT, Dana 44F, Dana 60 R. = Under restoration right now 
'82 J20 AMC258 4.2, T18a, NP208, Dana 44F, Dana 60 R. = 3x J20 truck waiting for restoration next
'82 J20 AMC258 4.2, T18a, NP208, Dana 44F, Dana 60 R. = 3x J20 truck waiting for restoration next
-
volkswaben
Topic author - Posts: 57
- Joined: Fri Sep 16, 2016 9:45 am
Re: 74' Cherokee First Jeep
Thanks! It probably would be possible to remove it, but not easily. It uses a sticky tar like backing.Trosskyll wrote: ↑Wed Apr 01, 2020 11:21 pm - Nice job you are making of the inside! I am impressed. Thanks for posting about the sound deadening as I was wondering if I should consider it for my restoration, so I will look into it more closely. One of my concerns is about trying to remove it, or at least a section of it in the future if ever the need for repair crops up? You might say if I do the resto' right the first time, then it won't be my problem... Great to see your work in progress
1974 Cherokee 360/T15
1979 Cherokee - parts rig/ future project?
1979 Cherokee - parts rig/ future project?
-
volkswaben
Topic author - Posts: 57
- Joined: Fri Sep 16, 2016 9:45 am
Re: 74' Cherokee First Jeep
Started getting the insulation in on the doors and roof.

This foam REALLY likes to stick to the aluminum of the deadener, so I'd suggest you have it exactly where you want before sticking it down. It will just tear if you try to readjust it.

This foam REALLY likes to stick to the aluminum of the deadener, so I'd suggest you have it exactly where you want before sticking it down. It will just tear if you try to readjust it.
1974 Cherokee 360/T15
1979 Cherokee - parts rig/ future project?
1979 Cherokee - parts rig/ future project?