Blacksmith forging project thread idea (pic heavy)
-
 Southern Gorilla
- Posts: 573
- Joined: Wed Jul 04, 2012 4:46 pm
- Location: Arlington, TX
Re: Blacksmith forging project thread idea (pic heavy)
Reading this thread now has me thinking I need some wrought iron accessories and decorations for my Cherokee. Maybe some ornate window cranks with turned wood knobs. Iron toggle switches!
Having seller's regret.
-
 Florida83FSJCherokee
Topic author - Posts: 196
- Joined: Sat Mar 09, 2013 7:53 pm
- Location: Lakeland , Central Florida
Re: Blacksmith forging project thread idea (pic heavy)
Had to take a little break from my Jeeping and do some side work to pay for the jeeping...Luckily, I have made it back to the fun part since I dont have to spend every minute on the side projects.
I havent kept up with this since it been so busy but heres some highlights from the last few months
Serviced the horses feet at the "Fancy Chicken Coup Farm" , you should see the rest of the place..over the top to say the least!
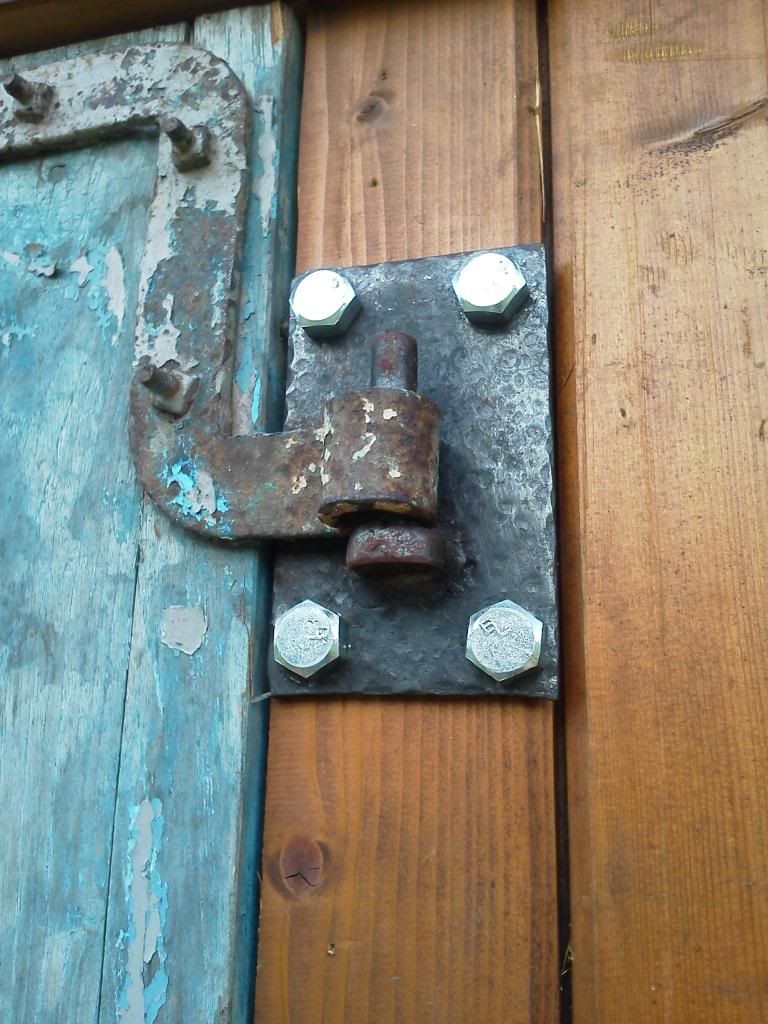
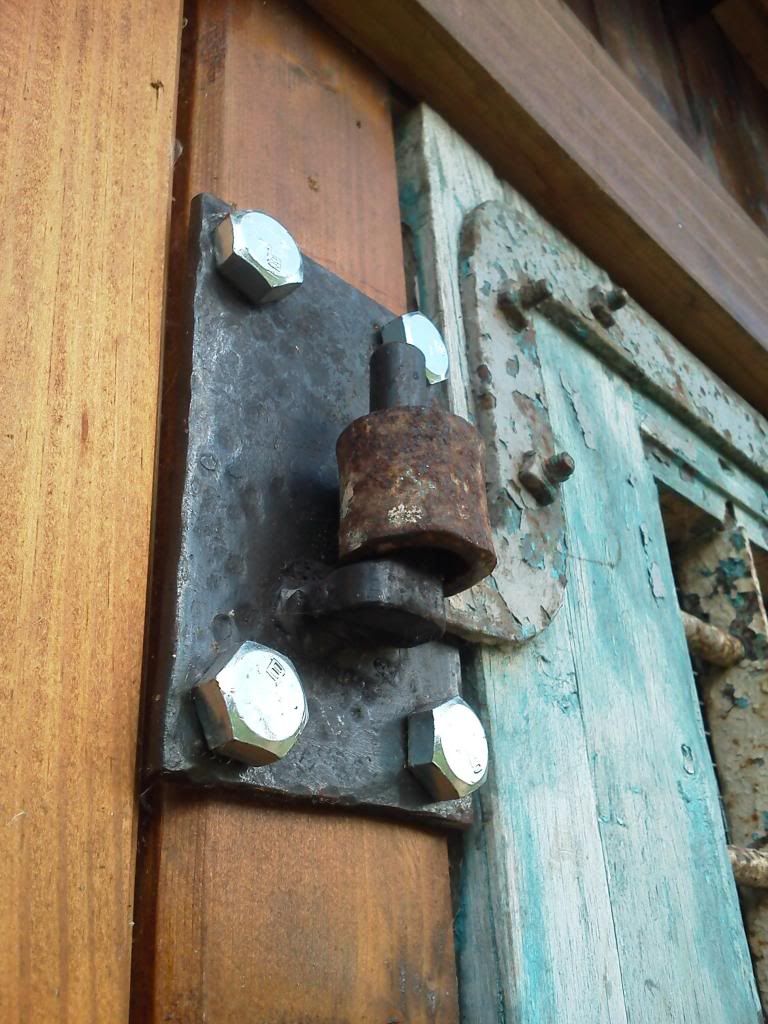
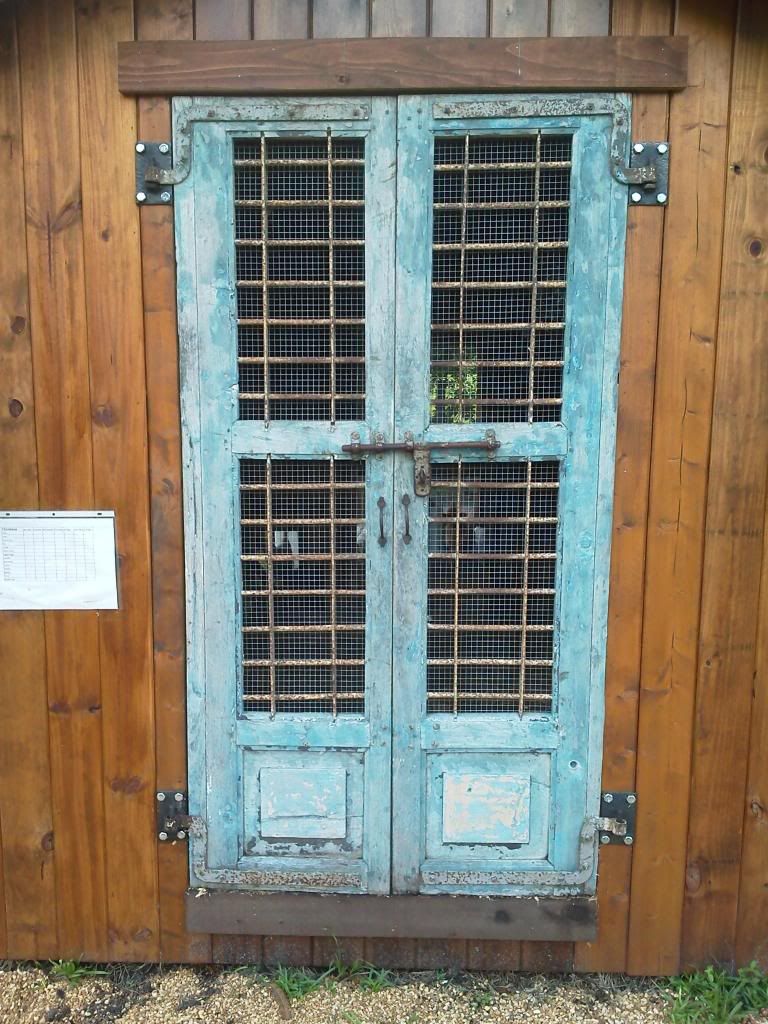
Just wanted to update the pintel photos now that they have had a couple months in the elements to rough them up a bit:
The faux wrought Iron looks pretty good next to the worn out rustic stuff... another 6 months and they are going to really look great!
Must be a 4-H project for one of her kids. The sheet on the left is time specific for each chicken and the eggs collected as well as water and feed records! Intense...
The owners of this place just finished building a huge new house and ask me to make a bunch of pieces for the inside decor. Hopefully, I can accomodate the requested items because I could really use the extra loot. The Belt Sander and sheet metal brake I need are not exactly "important" items as far as the wife is concerned.
I havent kept up with this since it been so busy but heres some highlights from the last few months
Serviced the horses feet at the "Fancy Chicken Coup Farm" , you should see the rest of the place..over the top to say the least!
Just wanted to update the pintel photos now that they have had a couple months in the elements to rough them up a bit:
The faux wrought Iron looks pretty good next to the worn out rustic stuff... another 6 months and they are going to really look great!


Must be a 4-H project for one of her kids. The sheet on the left is time specific for each chicken and the eggs collected as well as water and feed records! Intense...
The owners of this place just finished building a huge new house and ask me to make a bunch of pieces for the inside decor. Hopefully, I can accomodate the requested items because I could really use the extra loot. The Belt Sander and sheet metal brake I need are not exactly "important" items as far as the wife is concerned.
Education through restoration thread link:
http://www.fsjnetwork.com/forum/viewtop ... =12&t=1366
Blacksmithing thread link:
http://www.fsjnetwork.com/forum/viewtop ... f=6&t=1381
http://www.fsjnetwork.com/forum/viewtop ... =12&t=1366
Blacksmithing thread link:
http://www.fsjnetwork.com/forum/viewtop ... f=6&t=1381
-
Florida83FSJCherokee
Topic author - Posts: 196
- Joined: Sat Mar 09, 2013 7:53 pm
- Location: Lakeland , Central Florida
Re: Blacksmith forging project thread idea (pic heavy)
Ok, So i havent posted any new projects in a while but Its not for lack of production. The "Doghouse" has been in full fabrication mode for the last few weeks as I try to get ready for the October/Novemeber street markets here in lakeland Florida. (even had to put the Jeep resto on hold, BEEP is serious! )
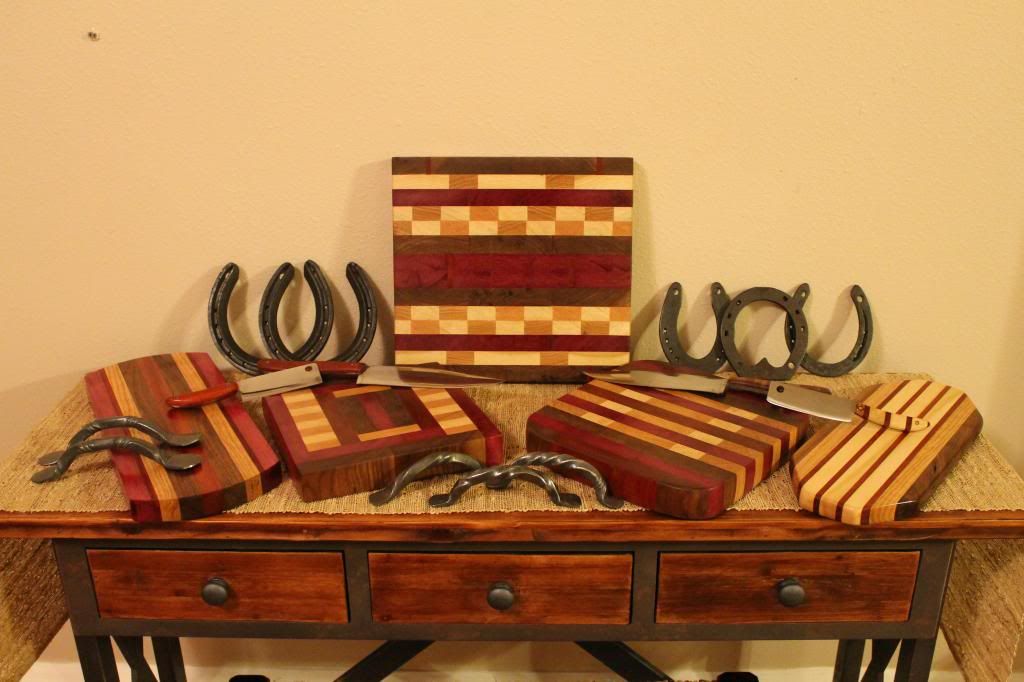
Heres some of the stuff thats been finished.
New cutting/Serving boards
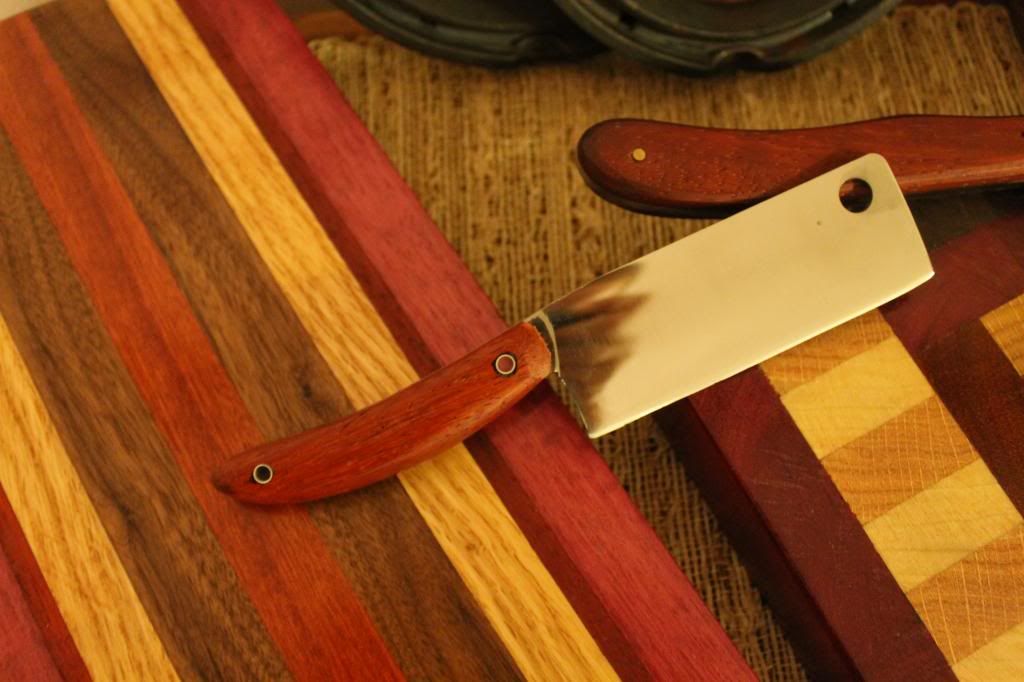
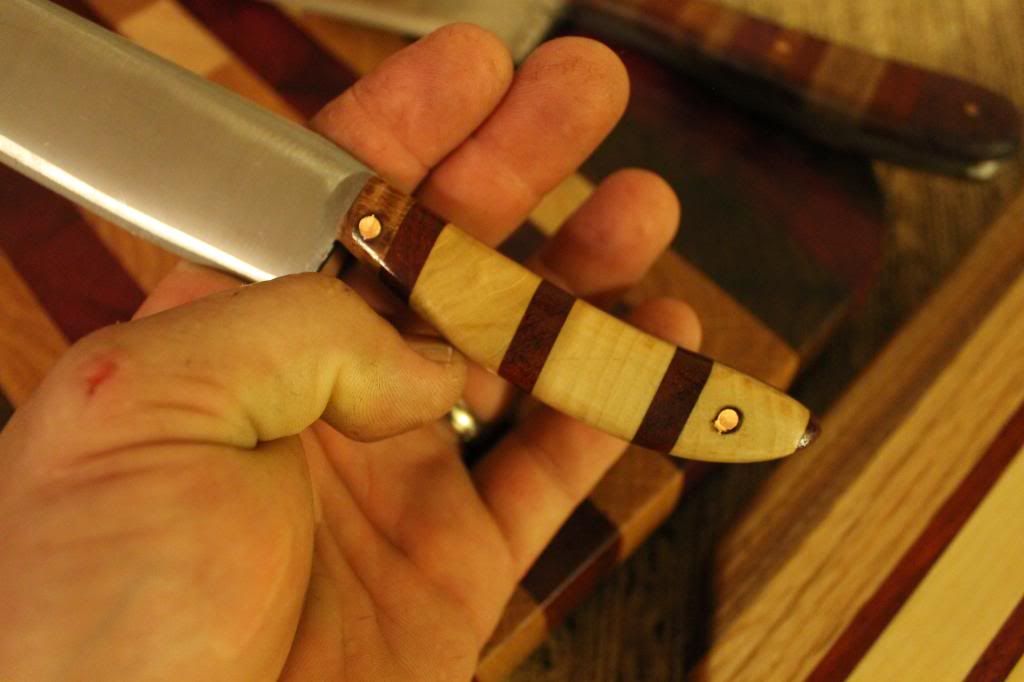
New knife work
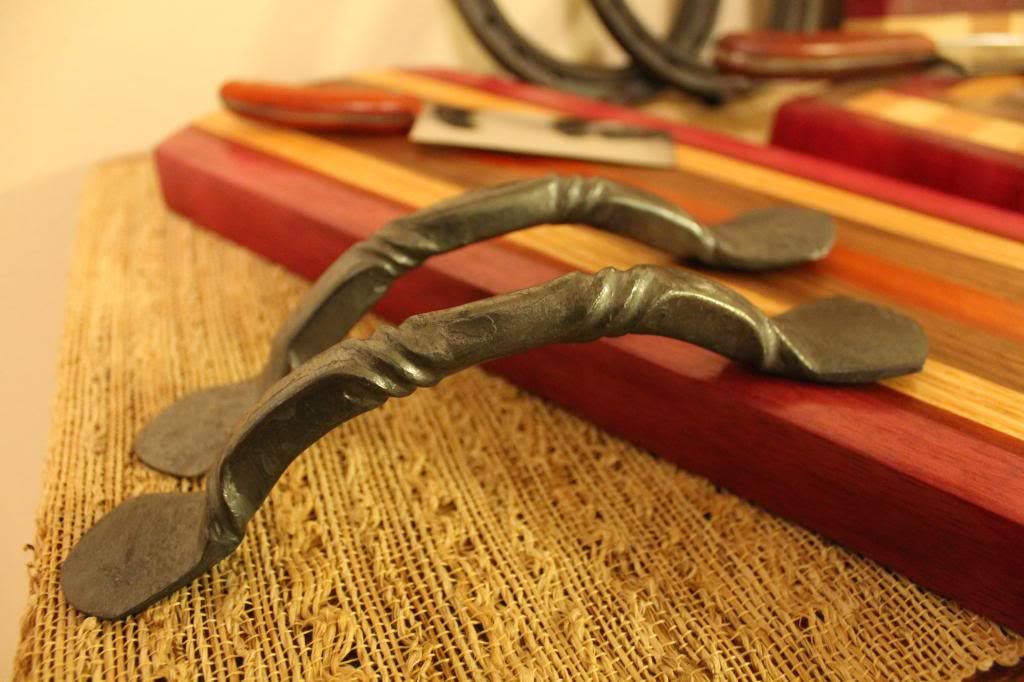
Hand forged and Turned handles (this will be a fun post to look at)
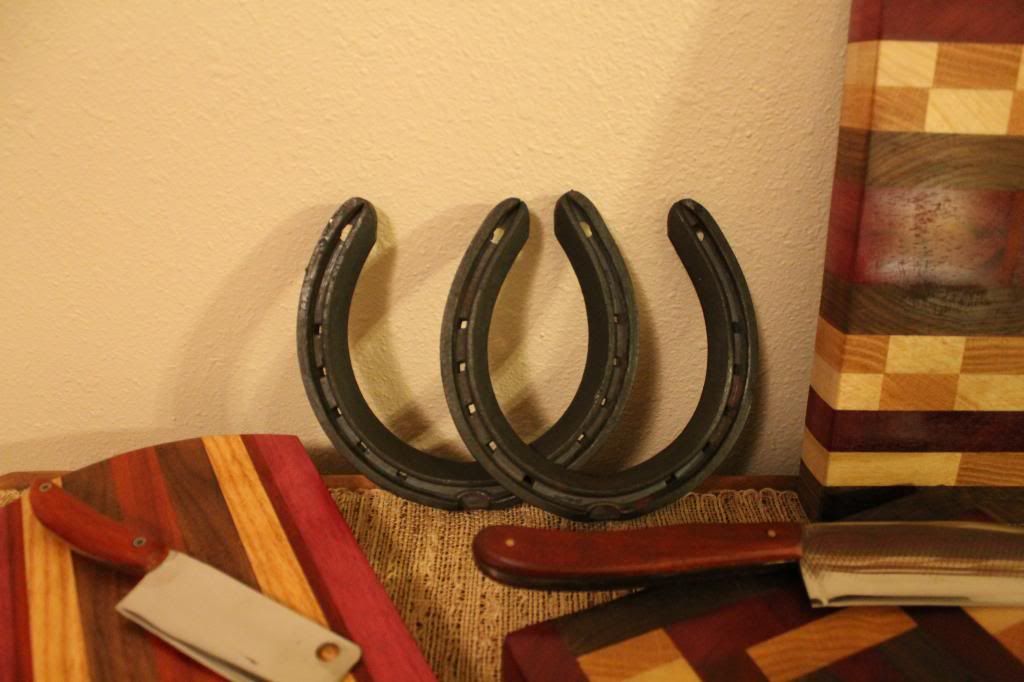
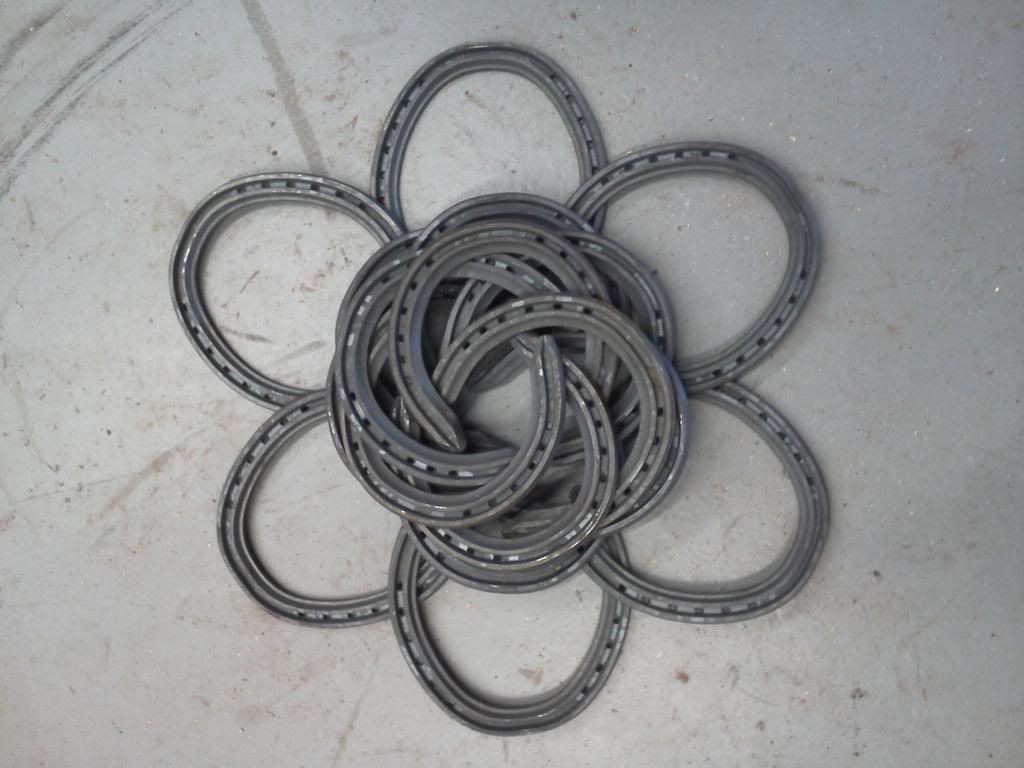
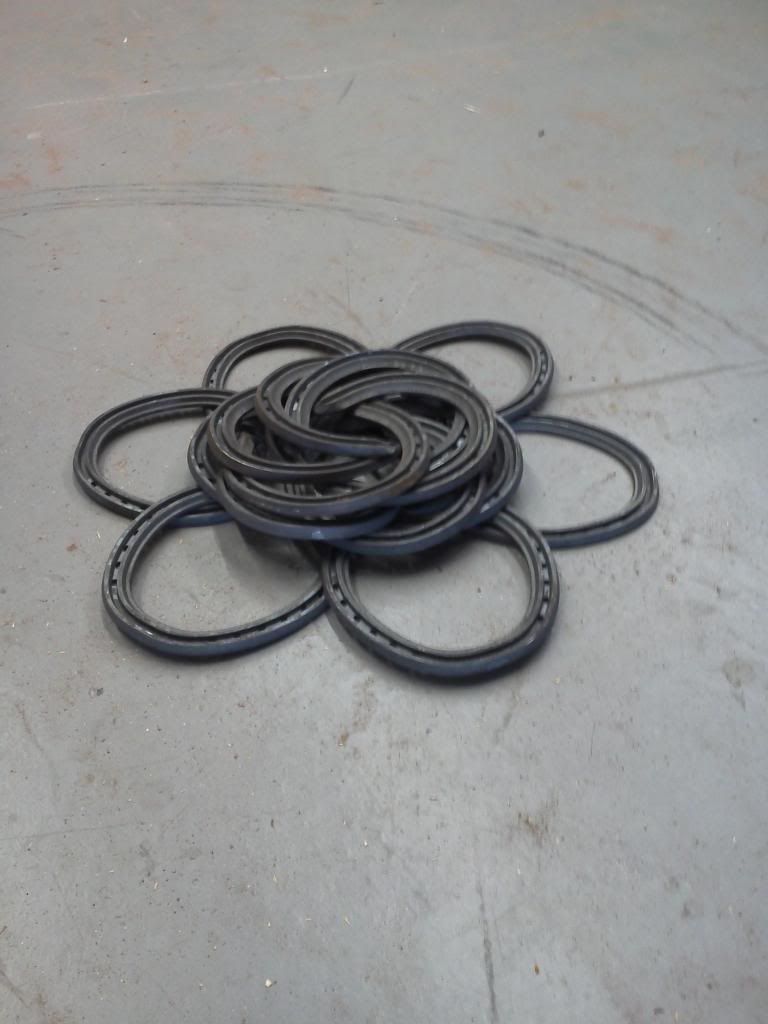
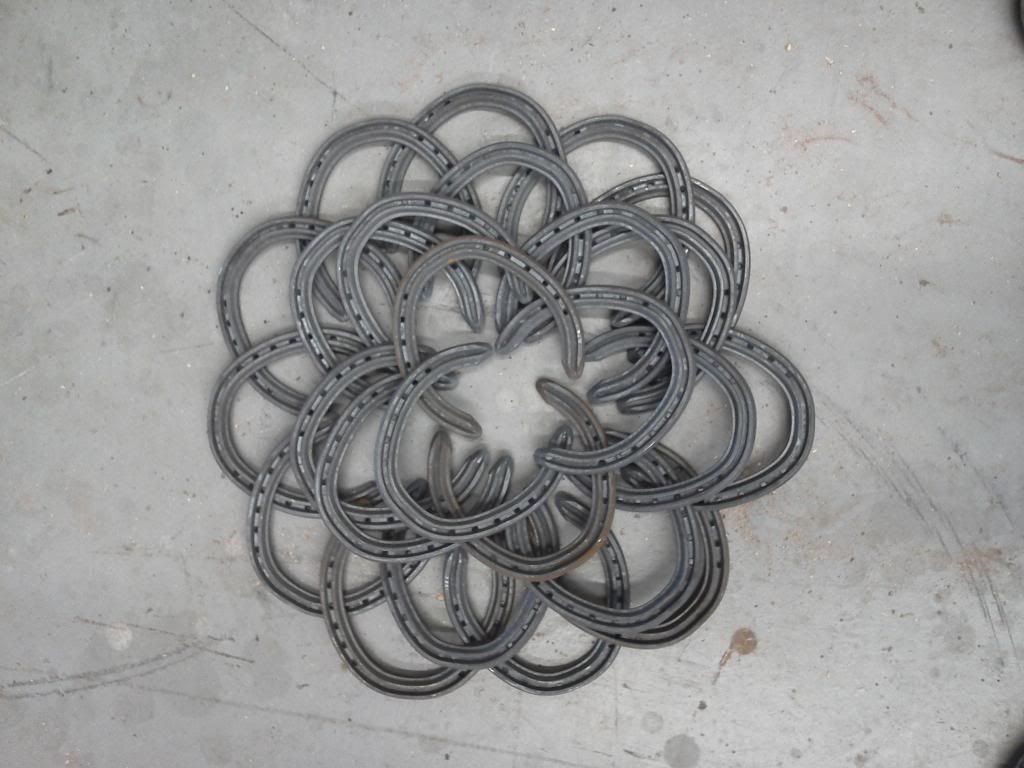
Handmade Good luck Horseshoes (Not shown as finished in these pics but close to it)
New Shop Sign layout
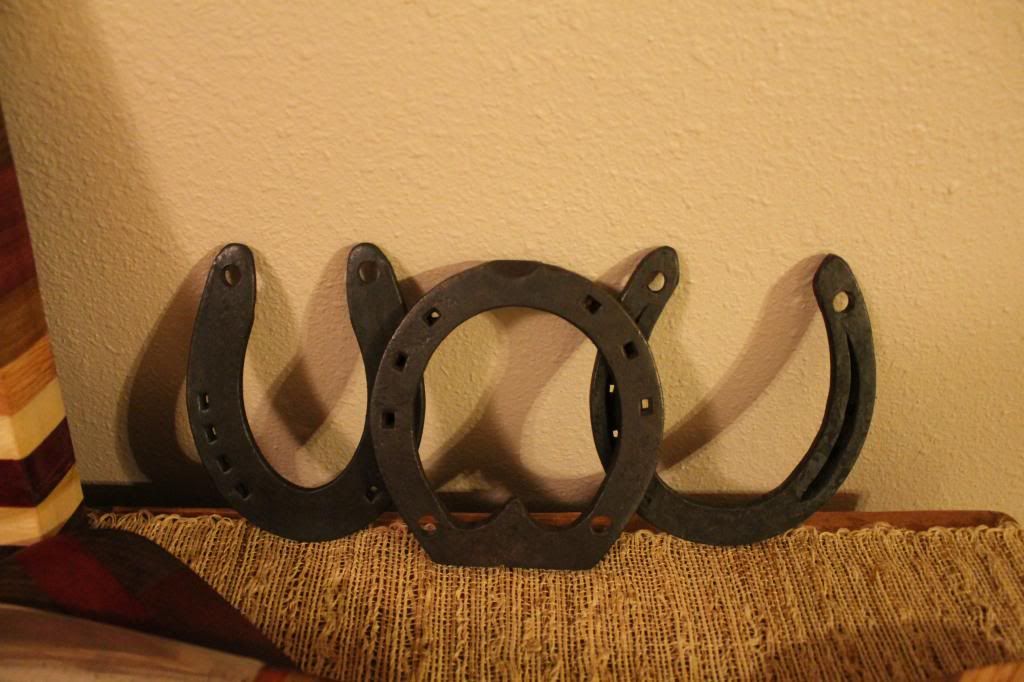
and some wall pendant ideas that will be finished this week
Some of the inventory

Over the next few evenings Ill try to get the individual post put up. I have detailed postings for the truned handle forge work, the mini chefs knife and cheese knife build, and some general details about the cutting boards.
For tonight I have a cool Fun post to share as I made a brand for use on my wood working items.
It looks like this
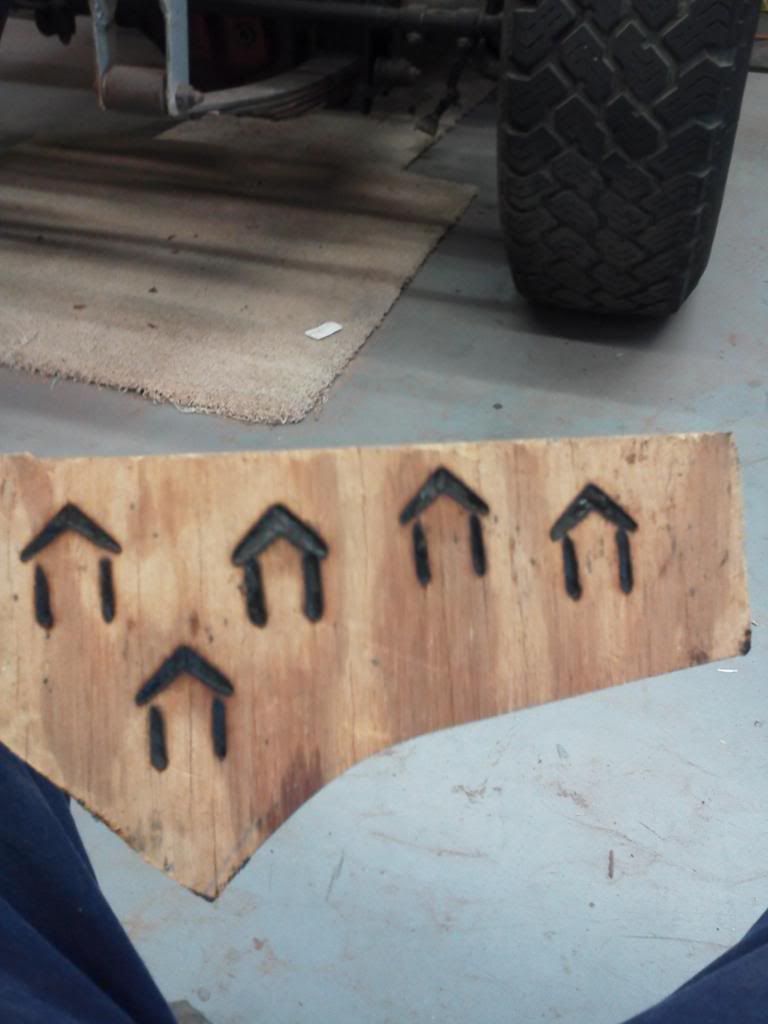
So since my "mark" is established on all the finished products in the shop I thought it would be Fun to include it in the Shops Sign design. I finished the forging of the recycled horseshoes today and will post an update when I get the sign completed.
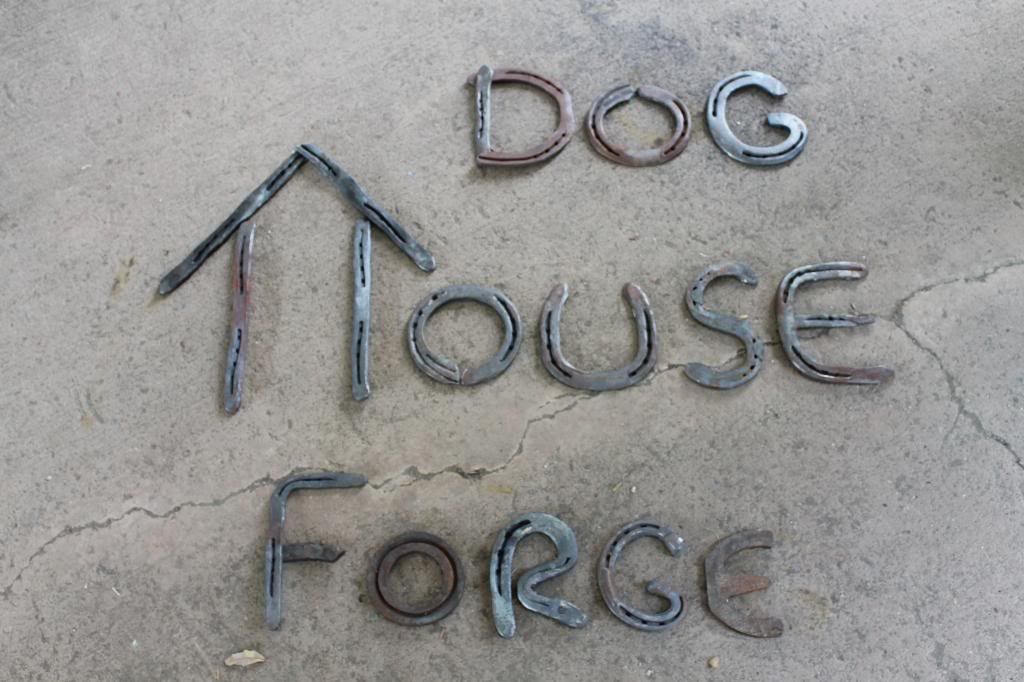
These are going to be welded this week some time but this is the basic idea,
So, there is alot coming your way from the Doghouse in the near future. Keep checking in and Ill do my best to answer and questions you guys have.
Should have the handle forging demo posted sometime tomorrow night or tuesday.
Thanks!!!
JP
Heres some of the stuff thats been finished.
New cutting/Serving boards
New knife work
Hand forged and Turned handles (this will be a fun post to look at)
Handmade Good luck Horseshoes (Not shown as finished in these pics but close to it)
New Shop Sign layout
and some wall pendant ideas that will be finished this week
Some of the inventory


Over the next few evenings Ill try to get the individual post put up. I have detailed postings for the truned handle forge work, the mini chefs knife and cheese knife build, and some general details about the cutting boards.
For tonight I have a cool Fun post to share as I made a brand for use on my wood working items.
It looks like this

So since my "mark" is established on all the finished products in the shop I thought it would be Fun to include it in the Shops Sign design. I finished the forging of the recycled horseshoes today and will post an update when I get the sign completed.

These are going to be welded this week some time but this is the basic idea,


So, there is alot coming your way from the Doghouse in the near future. Keep checking in and Ill do my best to answer and questions you guys have.
Should have the handle forging demo posted sometime tomorrow night or tuesday.
Thanks!!!
JP
Education through restoration thread link:
http://www.fsjnetwork.com/forum/viewtop ... =12&t=1366
Blacksmithing thread link:
http://www.fsjnetwork.com/forum/viewtop ... f=6&t=1381
http://www.fsjnetwork.com/forum/viewtop ... =12&t=1366
Blacksmithing thread link:
http://www.fsjnetwork.com/forum/viewtop ... f=6&t=1381
-
Florida83FSJCherokee
Topic author - Posts: 196
- Joined: Sat Mar 09, 2013 7:53 pm
- Location: Lakeland , Central Florida
Re: Blacksmith forging project thread idea (pic heavy)
Forging and Tuning Door pulls and Handles for the bigger cutting boards.
Ive played with this stuff in the past but never really had any practical uses for it. I suppose the reason was that I wasnt creating anything to attach them to.
My wife suggested that the bigger cutting boards be fitted with hand forged handles. I thought it was a good idea but figured it would be much cheaper, easier, and faster to buy some handles from the craft store and use them instead... Then the brain started spinning and i realized... Your setting up a both full of handforged and hand built items and calling the thing "Doghouse Forge"but your gonna fit the high dollar cutting boards with china made replicas of hand forged items??? exactly, that is totally unexceptable...
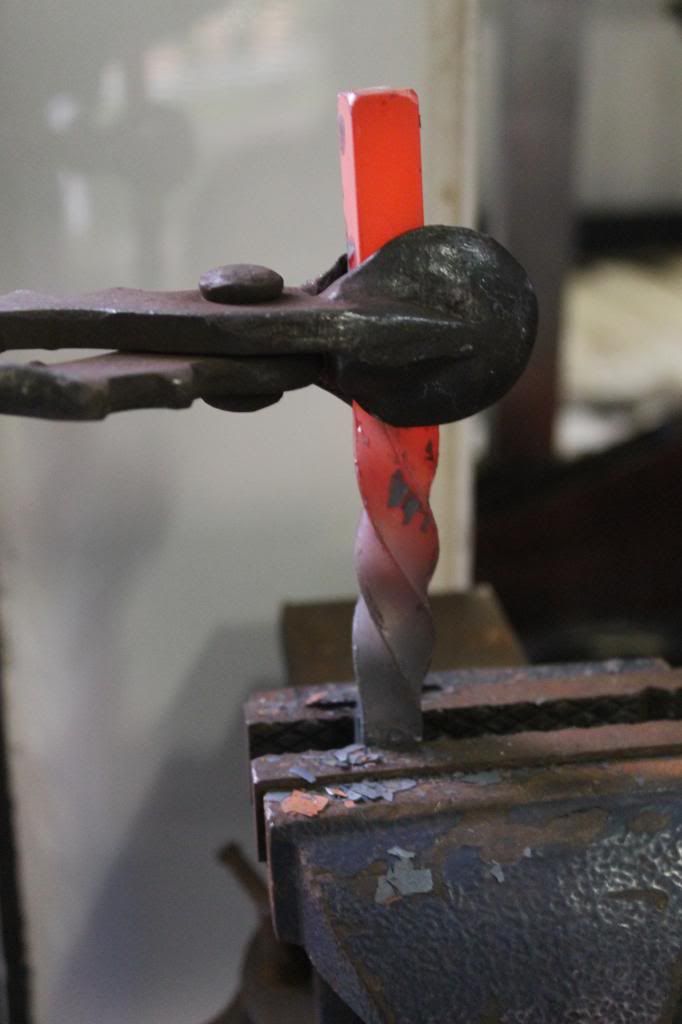
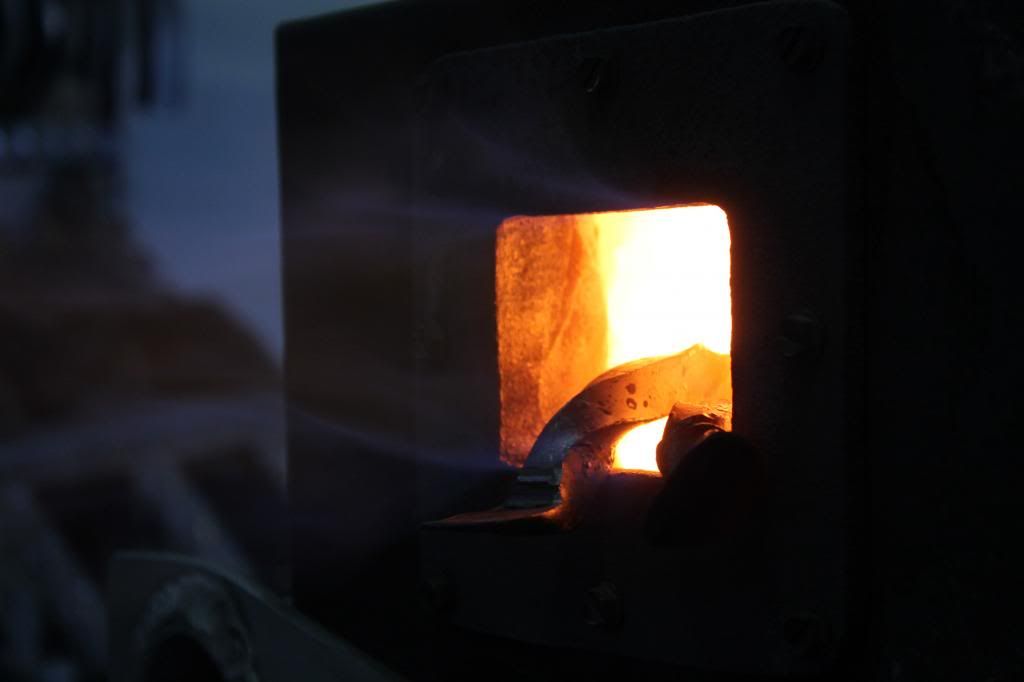
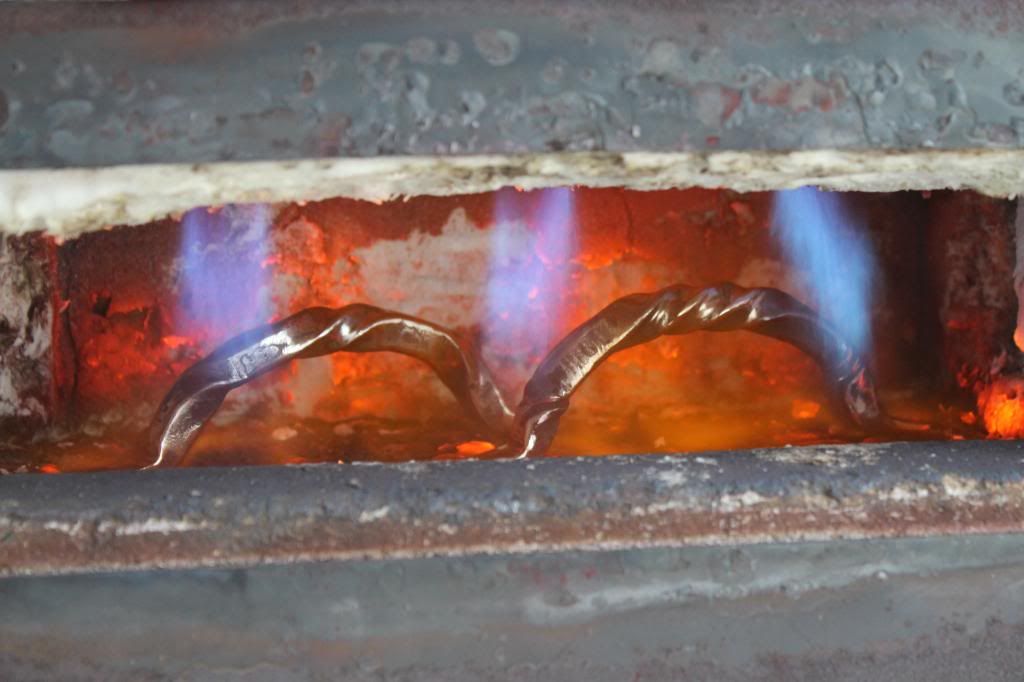
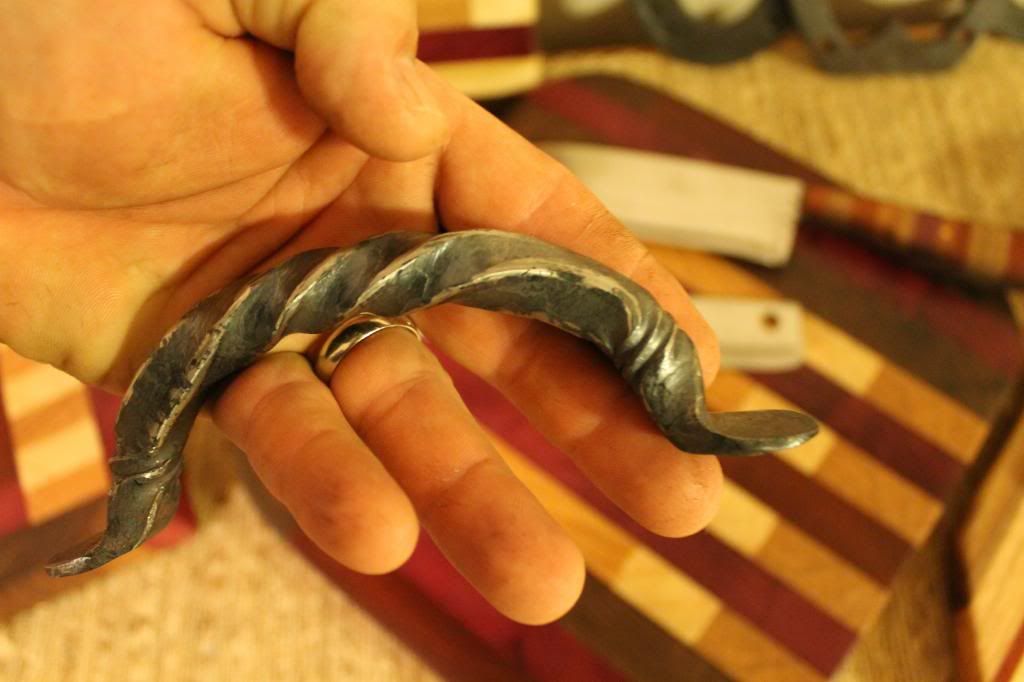
So out came the vice and some old tongs... let the twisting begin:
Like most things, the planning is more important than the actuall application. If you dont lay out where to lock the handles into the vice for each twist you will not get them symetrical. A little off is ok considering they are not machiene made but you cant have 1" left on the left and 2" left on the right...
Its also very important to pay attention to how fast you turn your tongs, and to move them up the stock at the same rate of twist. What i mean by that is the faster you turn the tongs the tighter the twist will lock into the steel. If you turn your stock half a turn and then move your tongs up 1/4" before turning the second half you will space out the twist. Likewise if you turn two full twist with your tongs in the same place you will get a twist that basicly doesnt move. So like most forging practices the tong placement and technique is more important than the "dumb" hand applying the force.
Mark out where you want the twist to begin
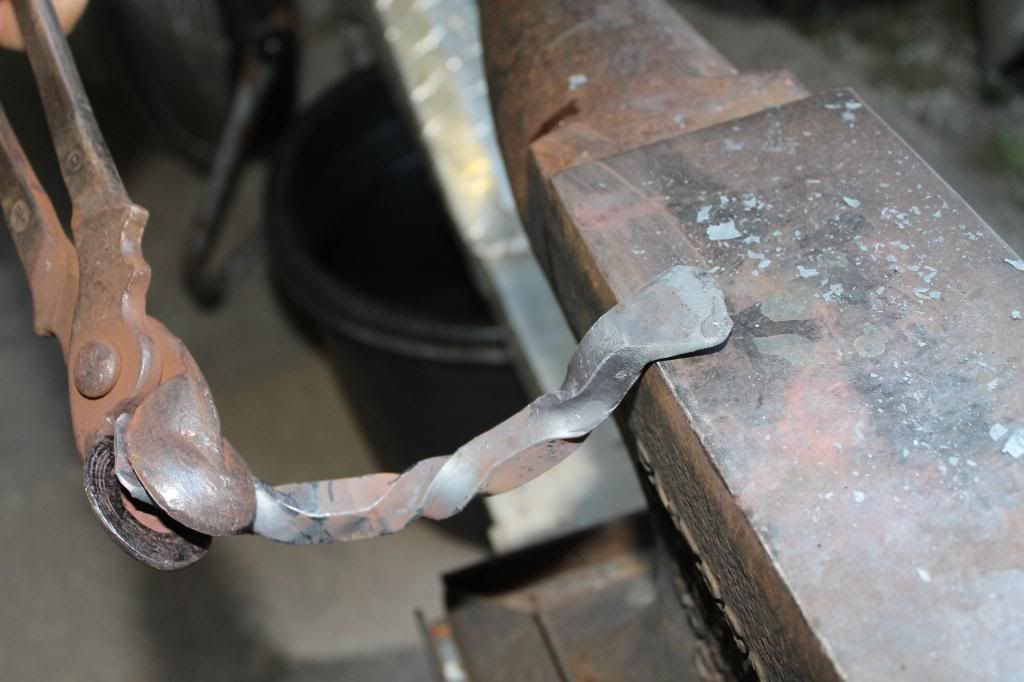
lock the tongs squarly onto the stock and slowly and evenly push or pull the direction your wanting your twist to go.
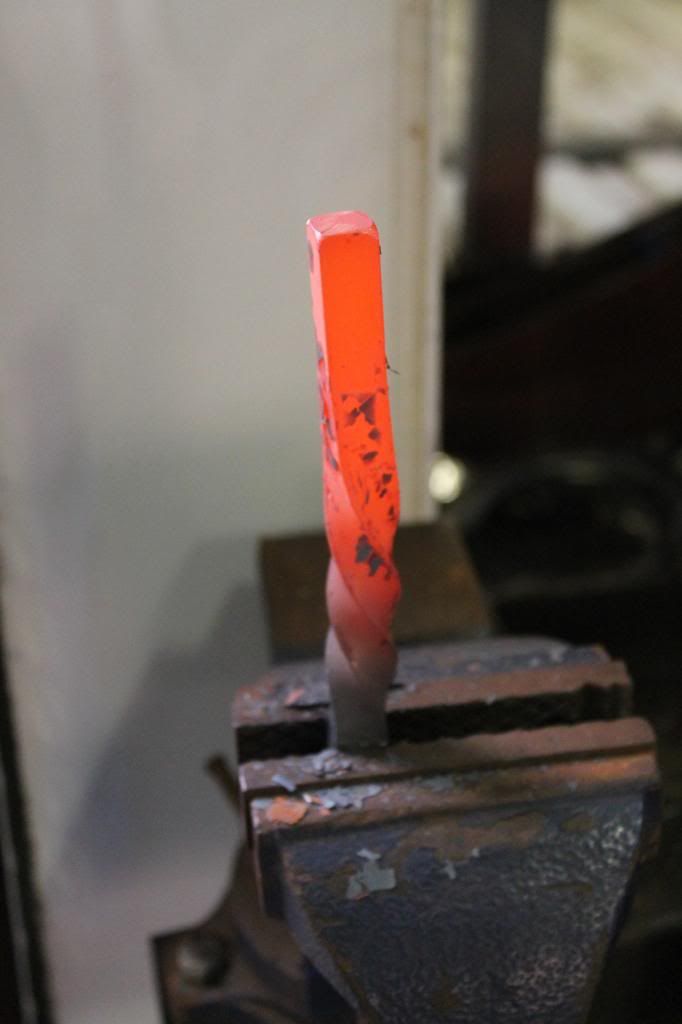
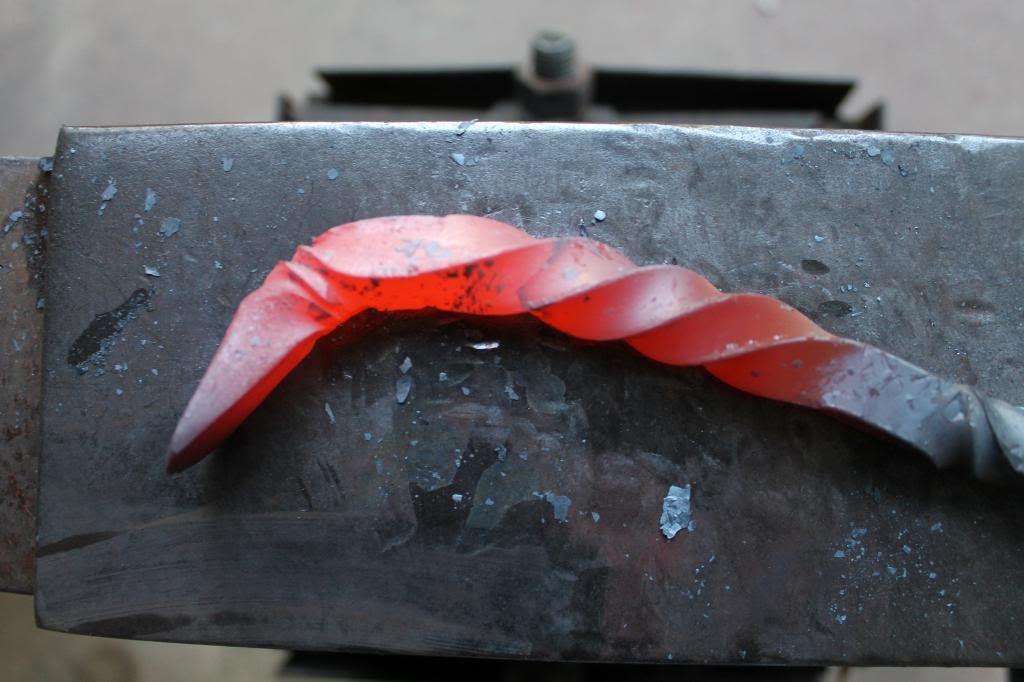
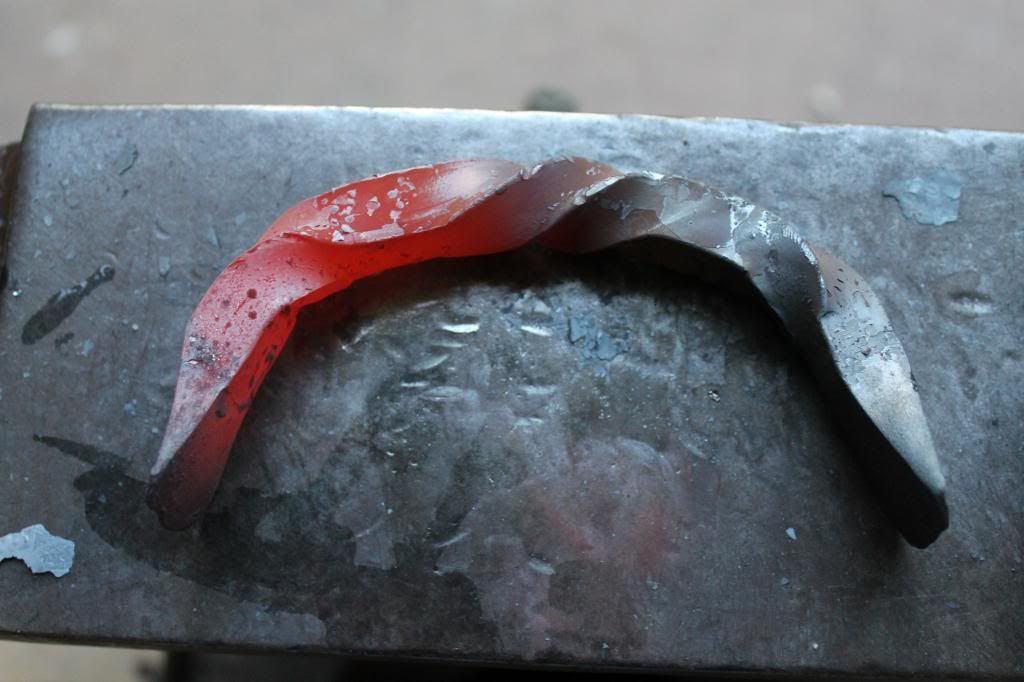
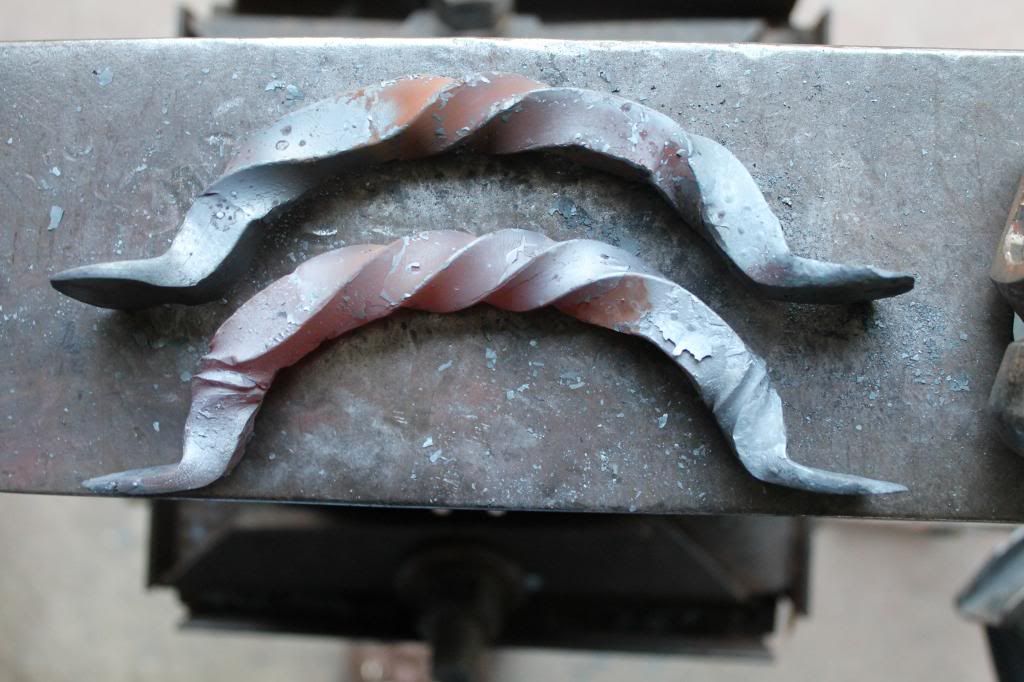
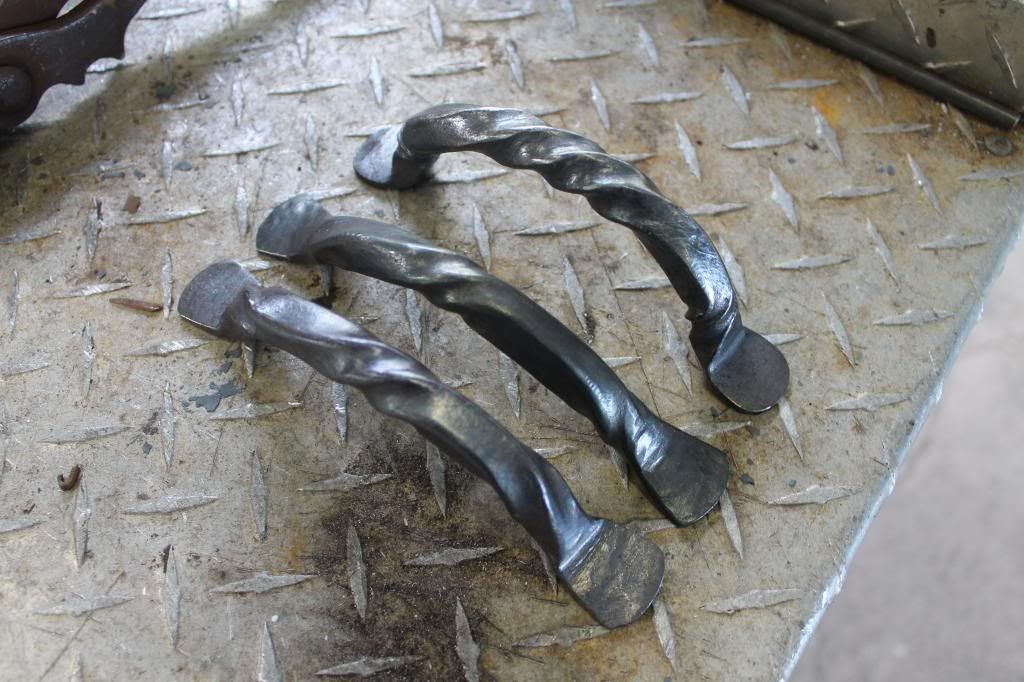
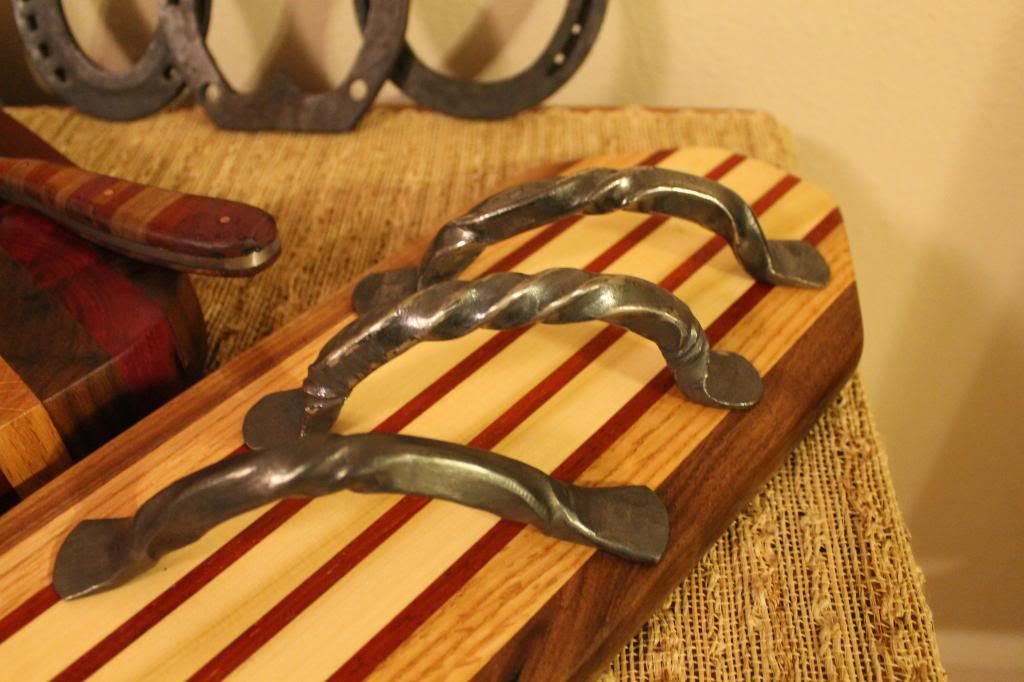
here I have done the center in a double twist and done each end in opposite half twist to accentuate the flow. The middel section was created by moving the tongs up a 1/4 in per 1/2 turn. (this is the most basic twisting style and its simple so its easy to replicate)
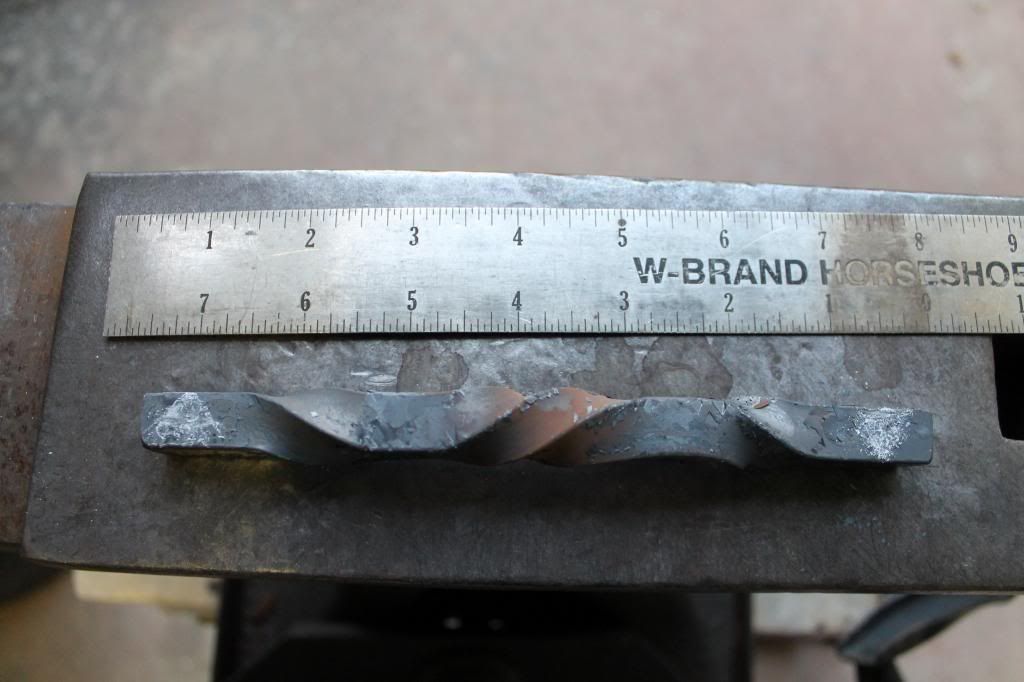
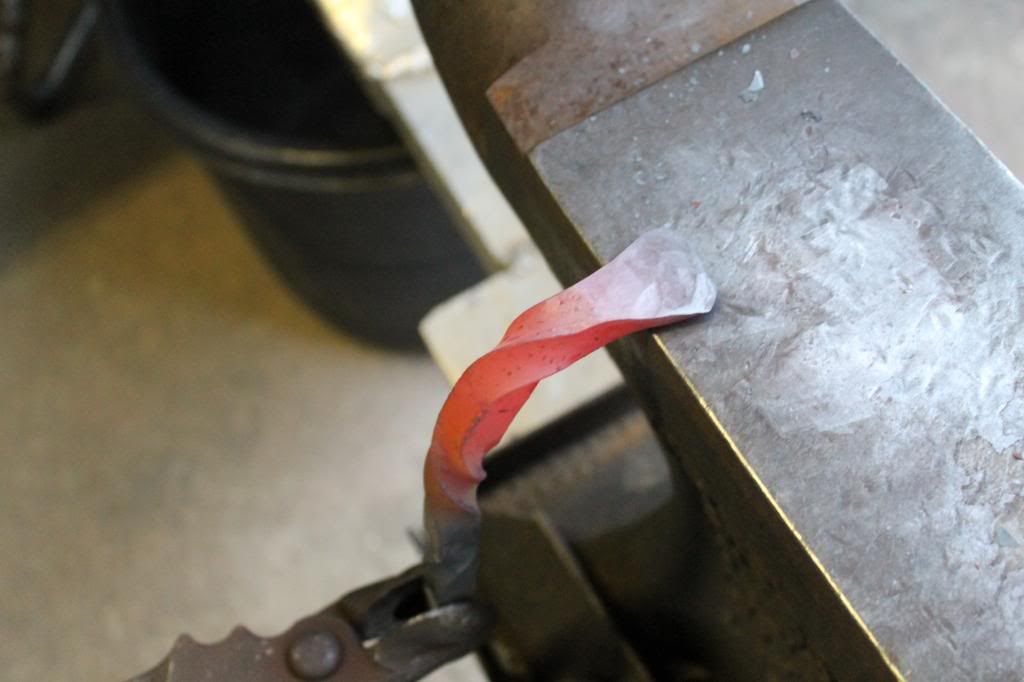
This is a twiple twist with the tongs moved every 1/3 turn. Slightly tighter but still flowing through itself. It also has the oppositional twist at the lower sections to assit the eye in seeing the flow in the center
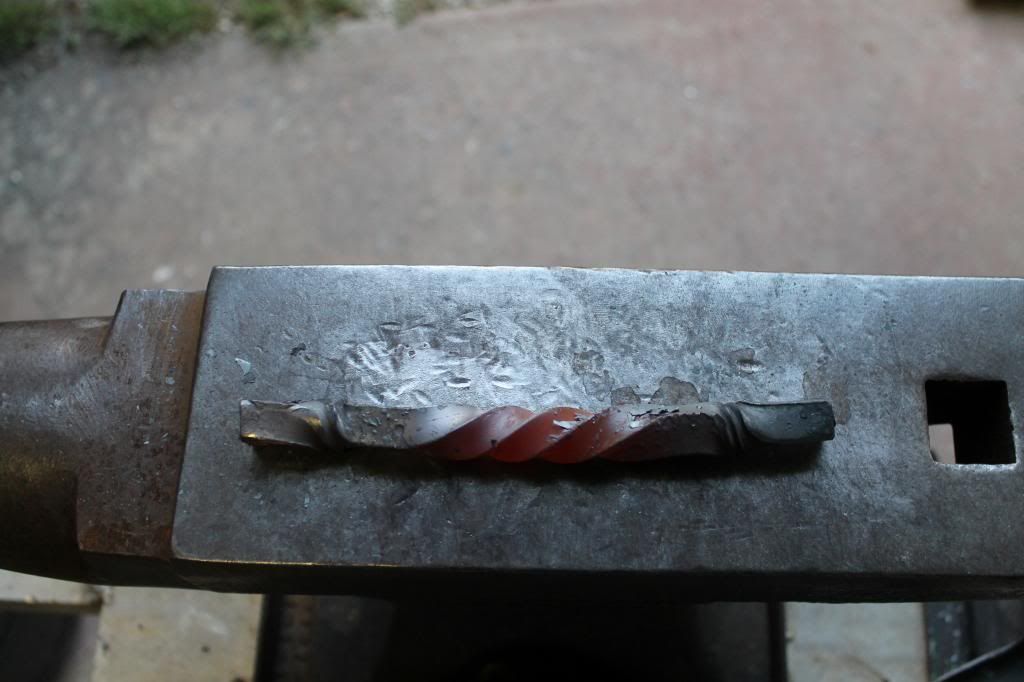
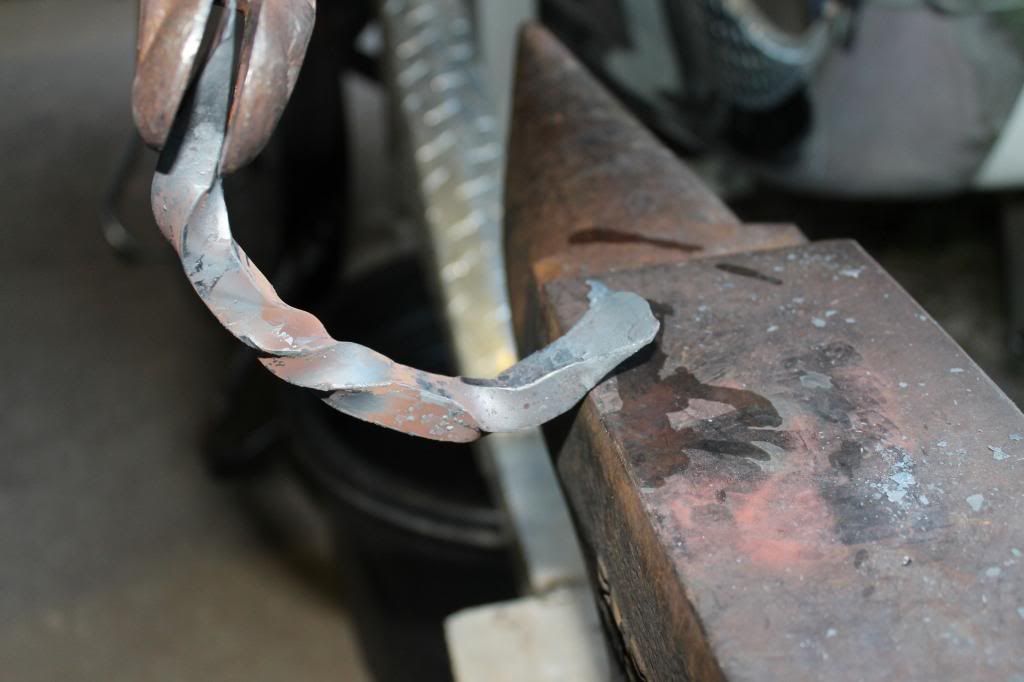
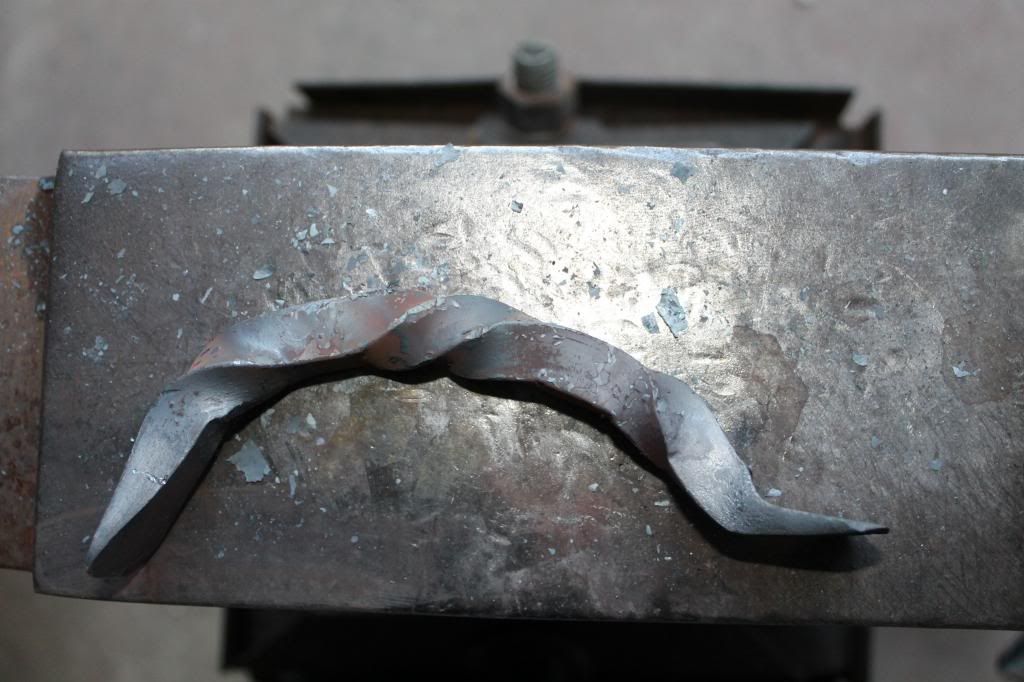
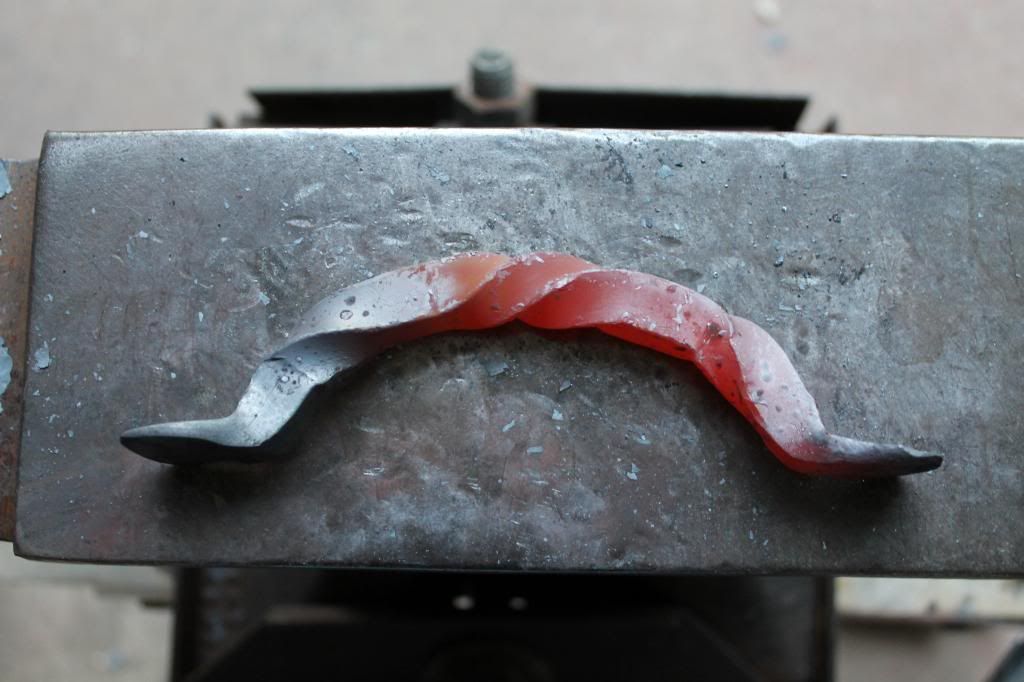
This one has a tripple twist, half oppostional twist, and then a final stationary double twist to accentuate what will be the lowest section before the mounting tabs are drawn out.
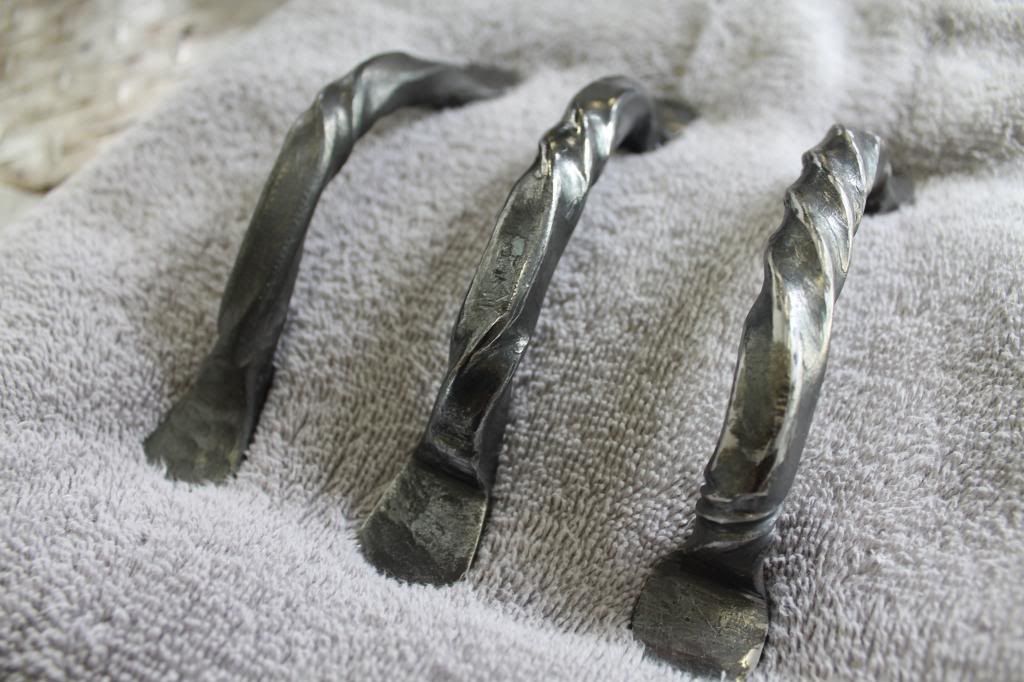
To draw out the mounting tabs that will either be drilled for a screw hole or get "all thread" welded to the back for drawer pulls you strike the end with overlapping blows. Its important to...kinda...glance your hammer?.. of the end, almost rolling it off the steel and away from yourself as you strike it. this pushes the metal outward instead of just making a squashed blob. When your doing this you can watch the shape and adjust your blows to move a little metal into whichever areas you need additional material.
once the tabs are drawn out, flip the handle over ( never strike the top, or viewable surface) and turn the stock just like you would a toe bend in a horseshoe (see first post).
use the horn to fine tune your deminsions
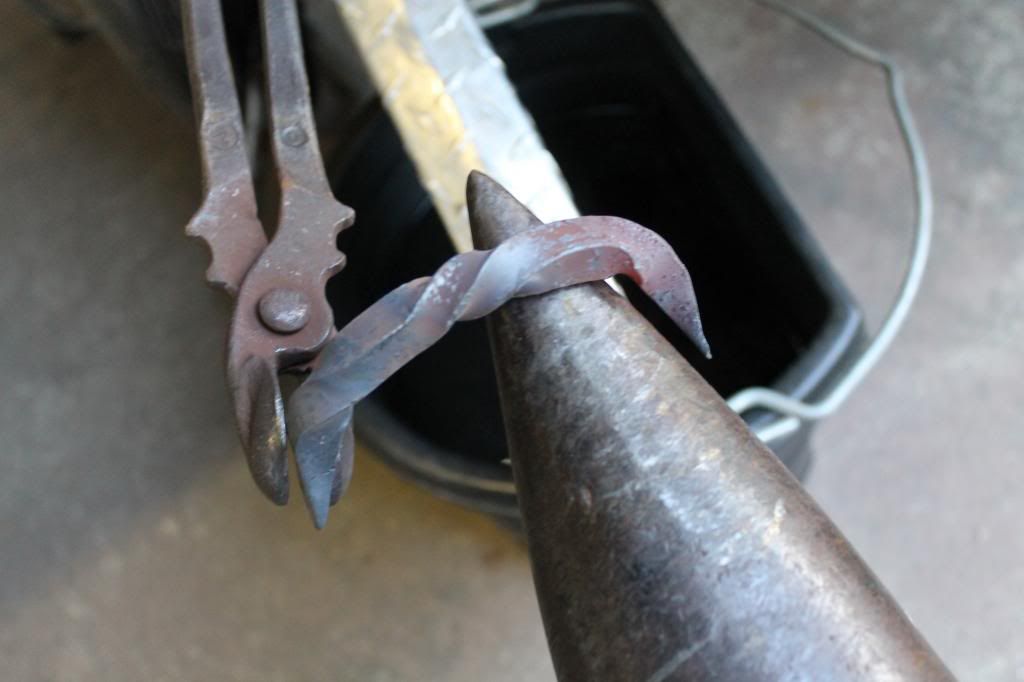
you should end up with something like this
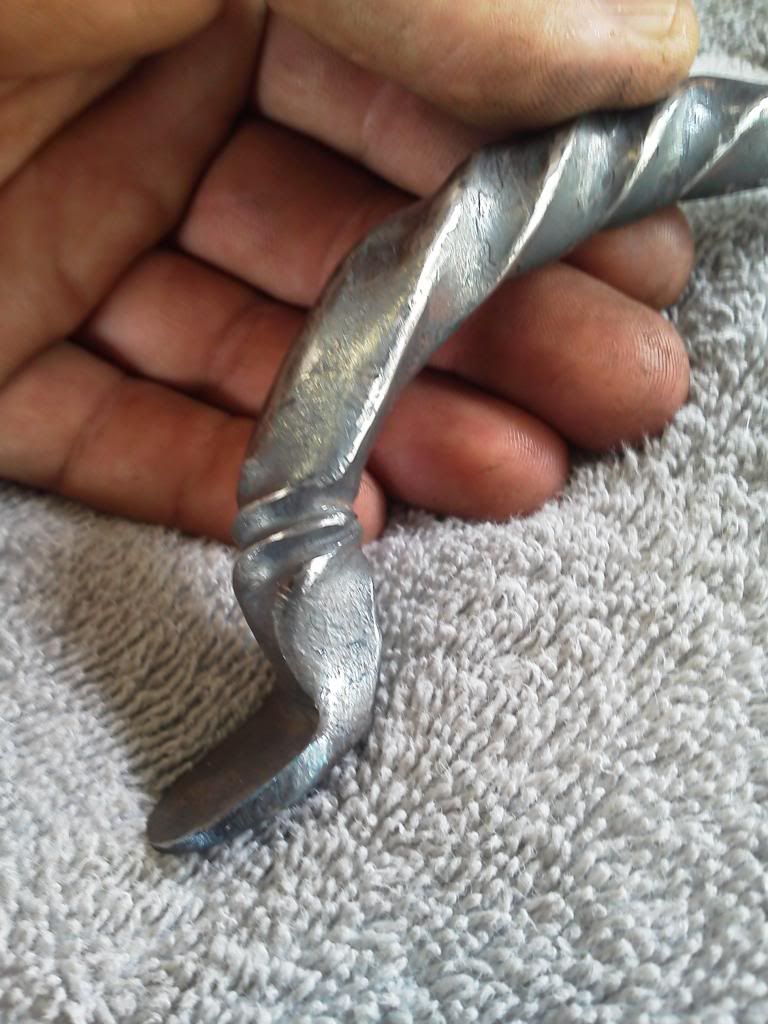
for the next step we need to move the handle back to this position. (this part should be done at an orange heat but for the sake of photgraphing i did it in stages between heats)
You then drive your stright down onto the under side of the tab and at the same time lower your tong hand.
its important to keep the handle in the same place and not alow it to chatter about. Everytime the edge gets moved it will place an unsightly crease. You dont want "creases" you want one! nice tight line that divides the handle from the tab.
this is what you should come up with:
repeat to the other side:
A little time in the fire and a couple more rounds of the above process
NOW! to get them not to look so "hammered".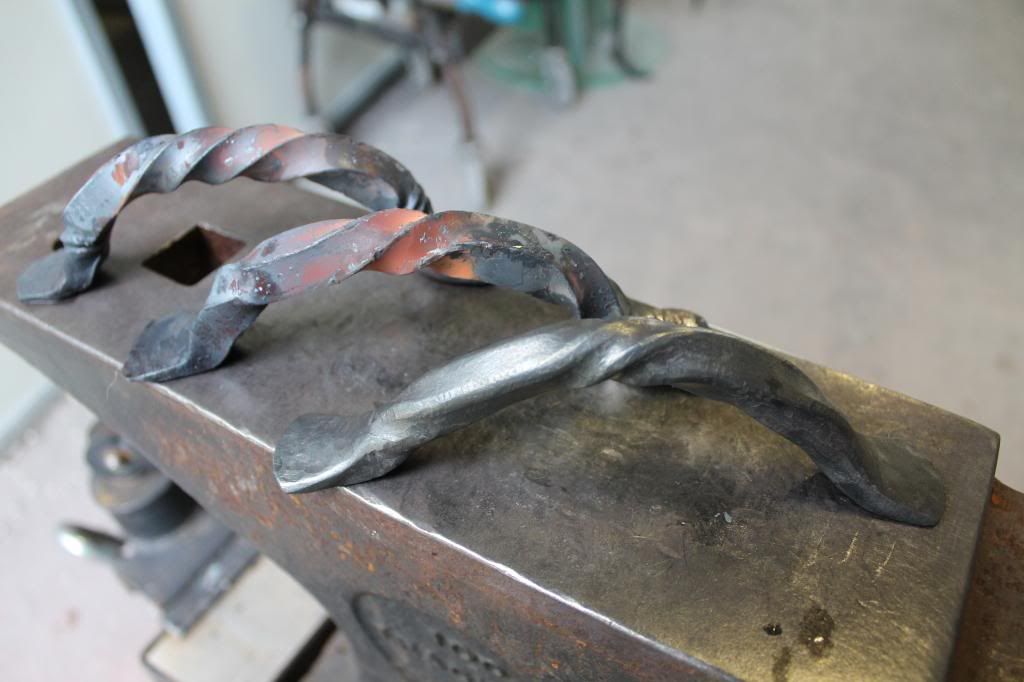
Ive played with this stuff in the past but never really had any practical uses for it. I suppose the reason was that I wasnt creating anything to attach them to.
My wife suggested that the bigger cutting boards be fitted with hand forged handles. I thought it was a good idea but figured it would be much cheaper, easier, and faster to buy some handles from the craft store and use them instead... Then the brain started spinning and i realized... Your setting up a both full of handforged and hand built items and calling the thing "Doghouse Forge"but your gonna fit the high dollar cutting boards with china made replicas of hand forged items??? exactly, that is totally unexceptable...
So out came the vice and some old tongs... let the twisting begin:
Like most things, the planning is more important than the actuall application. If you dont lay out where to lock the handles into the vice for each twist you will not get them symetrical. A little off is ok considering they are not machiene made but you cant have 1" left on the left and 2" left on the right...
Its also very important to pay attention to how fast you turn your tongs, and to move them up the stock at the same rate of twist. What i mean by that is the faster you turn the tongs the tighter the twist will lock into the steel. If you turn your stock half a turn and then move your tongs up 1/4" before turning the second half you will space out the twist. Likewise if you turn two full twist with your tongs in the same place you will get a twist that basicly doesnt move. So like most forging practices the tong placement and technique is more important than the "dumb" hand applying the force.
Mark out where you want the twist to begin

lock the tongs squarly onto the stock and slowly and evenly push or pull the direction your wanting your twist to go.


here I have done the center in a double twist and done each end in opposite half twist to accentuate the flow. The middel section was created by moving the tongs up a 1/4 in per 1/2 turn. (this is the most basic twisting style and its simple so its easy to replicate)

This is a twiple twist with the tongs moved every 1/3 turn. Slightly tighter but still flowing through itself. It also has the oppositional twist at the lower sections to assit the eye in seeing the flow in the center

This one has a tripple twist, half oppostional twist, and then a final stationary double twist to accentuate what will be the lowest section before the mounting tabs are drawn out.

To draw out the mounting tabs that will either be drilled for a screw hole or get "all thread" welded to the back for drawer pulls you strike the end with overlapping blows. Its important to...kinda...glance your hammer?.. of the end, almost rolling it off the steel and away from yourself as you strike it. this pushes the metal outward instead of just making a squashed blob. When your doing this you can watch the shape and adjust your blows to move a little metal into whichever areas you need additional material.

once the tabs are drawn out, flip the handle over ( never strike the top, or viewable surface) and turn the stock just like you would a toe bend in a horseshoe (see first post).

use the horn to fine tune your deminsions

you should end up with something like this

for the next step we need to move the handle back to this position. (this part should be done at an orange heat but for the sake of photgraphing i did it in stages between heats)
You then drive your stright down onto the under side of the tab and at the same time lower your tong hand.

its important to keep the handle in the same place and not alow it to chatter about. Everytime the edge gets moved it will place an unsightly crease. You dont want "creases" you want one! nice tight line that divides the handle from the tab.
this is what you should come up with:

repeat to the other side:

A little time in the fire and a couple more rounds of the above process


NOW! to get them not to look so "hammered".

Education through restoration thread link:
http://www.fsjnetwork.com/forum/viewtop ... =12&t=1366
Blacksmithing thread link:
http://www.fsjnetwork.com/forum/viewtop ... f=6&t=1381
http://www.fsjnetwork.com/forum/viewtop ... =12&t=1366
Blacksmithing thread link:
http://www.fsjnetwork.com/forum/viewtop ... f=6&t=1381
-
Florida83FSJCherokee
Topic author - Posts: 196
- Joined: Sat Mar 09, 2013 7:53 pm
- Location: Lakeland , Central Florida
Re: Blacksmith forging project thread idea (pic heavy)
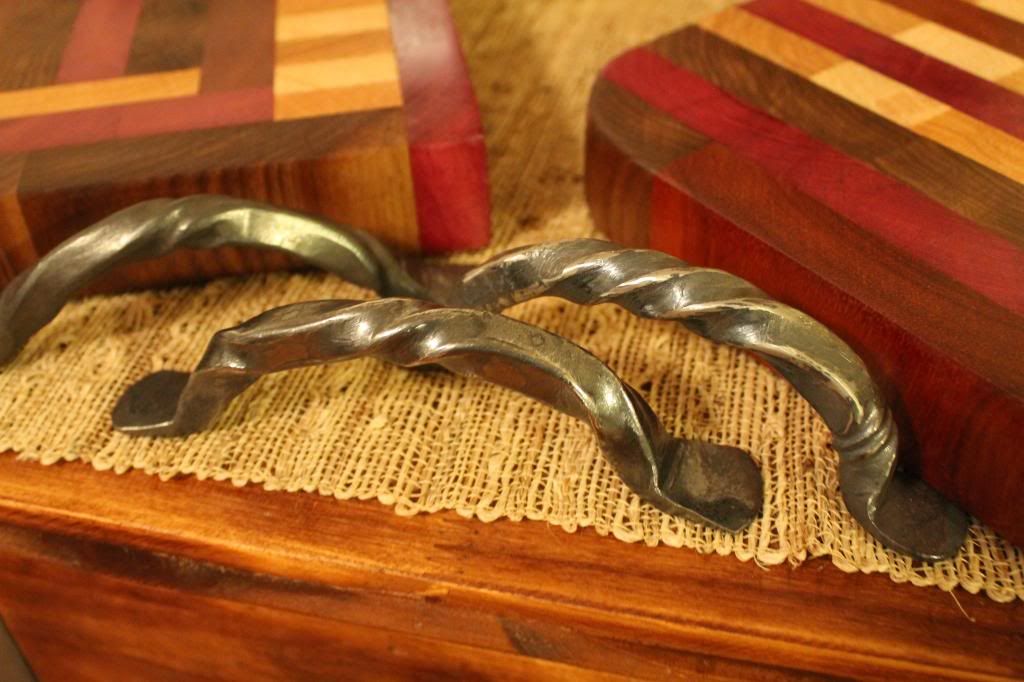
In the previous pic the first or lower handle has been "softend" and the upper to are straight out of the fire. In order to get the look of the lower handle I used my belt sander and took all the hard edges off the twist and curves. its important to work into each twist and actually roll the handle though it along the belt. This accentuates the curves and since you have removed all the hard edges it makes them flow nicer and cleaner.
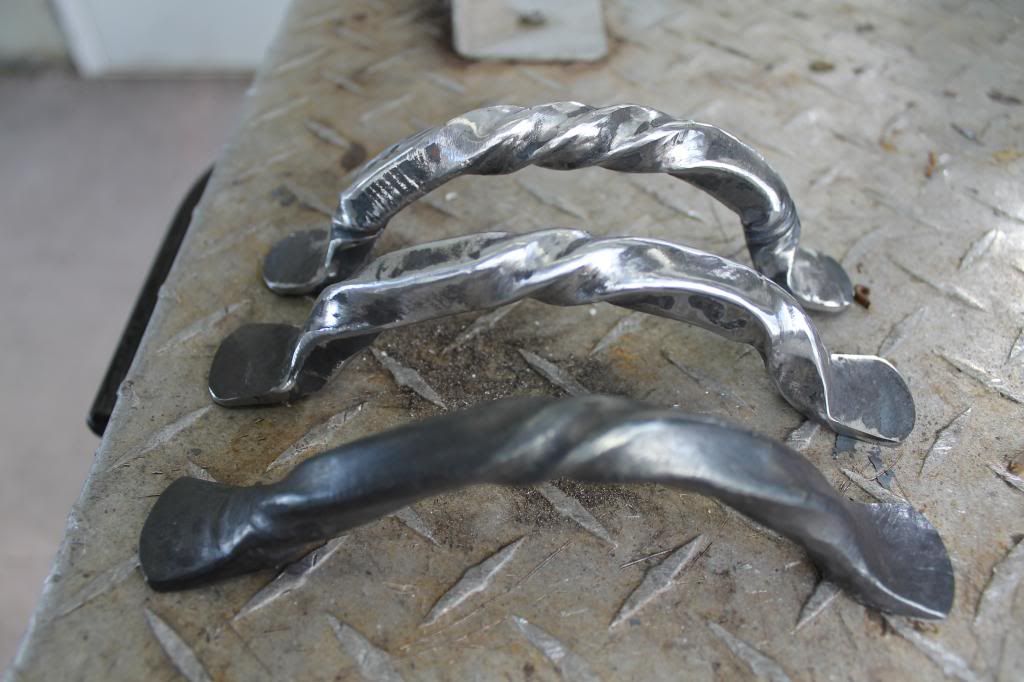
Once your happy with the flow they are ready to be block brushed
reheat to dull heat and make sure all the fresh shiney areas you just made are heated to the point of blackening a little bit. You want an even color before you start brushing.
here they are after a nice heavy brushing. (previous post show the block brush if you dont know what im talking about)
I took a sanding sponge and knocked the edges off to add a little shine to the curves once they were finished being brushed.
So you can oil them at a dull heat to make them darker or you can spray them with clear coat to maintain the shine you created. I chose t do a light coat of clear. (people like shiney stuff)
This set wasnt shown in the previous photos but they are for the large cutting board in the center of the display. I will update the photos once I have fastend them to it.
So thats how you turn handles... pretty easy to do, just mark your spacing and use a soapstone to draw arrows that remind you which direction each section is supposed to go. Its gets confusing when your in the heat of the moment trying to get the vice clamped down and your tongs set, all before it cools to much to twist.
This is something you guys can definatly do with a torch and some large vice grips. just start with a little thinner stock than I did. Try 1/4" square instead of 1/2".
One last thing to remeber... if you twist round stock it just looks like it did before you twisted it (dont worry its not the dumbest thing ive tried before).
thats the end of the second post. Il start putting the final section together and get it up shortly.
Thanks
JP

Once your happy with the flow they are ready to be block brushed
reheat to dull heat and make sure all the fresh shiney areas you just made are heated to the point of blackening a little bit. You want an even color before you start brushing.

here they are after a nice heavy brushing. (previous post show the block brush if you dont know what im talking about)

I took a sanding sponge and knocked the edges off to add a little shine to the curves once they were finished being brushed.


So you can oil them at a dull heat to make them darker or you can spray them with clear coat to maintain the shine you created. I chose t do a light coat of clear. (people like shiney stuff)


This set wasnt shown in the previous photos but they are for the large cutting board in the center of the display. I will update the photos once I have fastend them to it.
So thats how you turn handles... pretty easy to do, just mark your spacing and use a soapstone to draw arrows that remind you which direction each section is supposed to go. Its gets confusing when your in the heat of the moment trying to get the vice clamped down and your tongs set, all before it cools to much to twist.
This is something you guys can definatly do with a torch and some large vice grips. just start with a little thinner stock than I did. Try 1/4" square instead of 1/2".
One last thing to remeber... if you twist round stock it just looks like it did before you twisted it (dont worry its not the dumbest thing ive tried before).
thats the end of the second post. Il start putting the final section together and get it up shortly.
Thanks
JP
Education through restoration thread link:
http://www.fsjnetwork.com/forum/viewtop ... =12&t=1366
Blacksmithing thread link:
http://www.fsjnetwork.com/forum/viewtop ... f=6&t=1381
http://www.fsjnetwork.com/forum/viewtop ... =12&t=1366
Blacksmithing thread link:
http://www.fsjnetwork.com/forum/viewtop ... f=6&t=1381
-
Florida83FSJCherokee
Topic author - Posts: 196
- Joined: Sat Mar 09, 2013 7:53 pm
- Location: Lakeland , Central Florida
Re: Blacksmith forging project thread idea (pic heavy)
For the final edition of the night we will be making a hand forged steel rose.
These are great, once you see the process your all going to be doing it. Its super easy and doesnt require a forge.
If you dont have access to the band saw or belt sander you can look on ebay under (blacksmith blanks) and find sets that are precut and finished.
So as far as the market place goes I expect these to be a big seller. They sell from $35 a piece to $280/ dozen. Time wise they arnt bad but cutting the templates takes a bit. Im going to cut a set out and have my uncle use the lazer jet? (some badass thing that cuts stuff) and do the basic forge work and assembly at the shop. Then while im sitting at the market on saturday mornings drinking my coffee and eating bengiets i will do the artistic part right there in the booth for people to see and hopefully they will take home a few or order a bunch!
To begin:
22guage steel, various metal rod, some scroll tongs (hognose tongs work as well), my templates, and a brass brush for later...

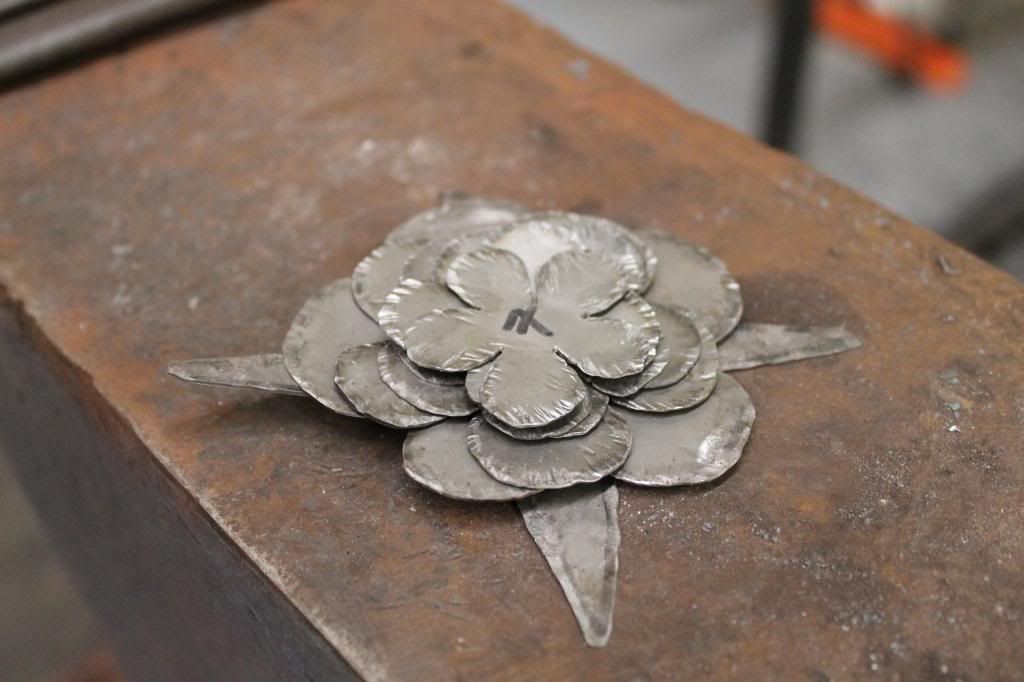
most template sets come with 5 sections but i like an additional smaller section in the center. It helps to fill the space and conceal your rivit or fold over location.
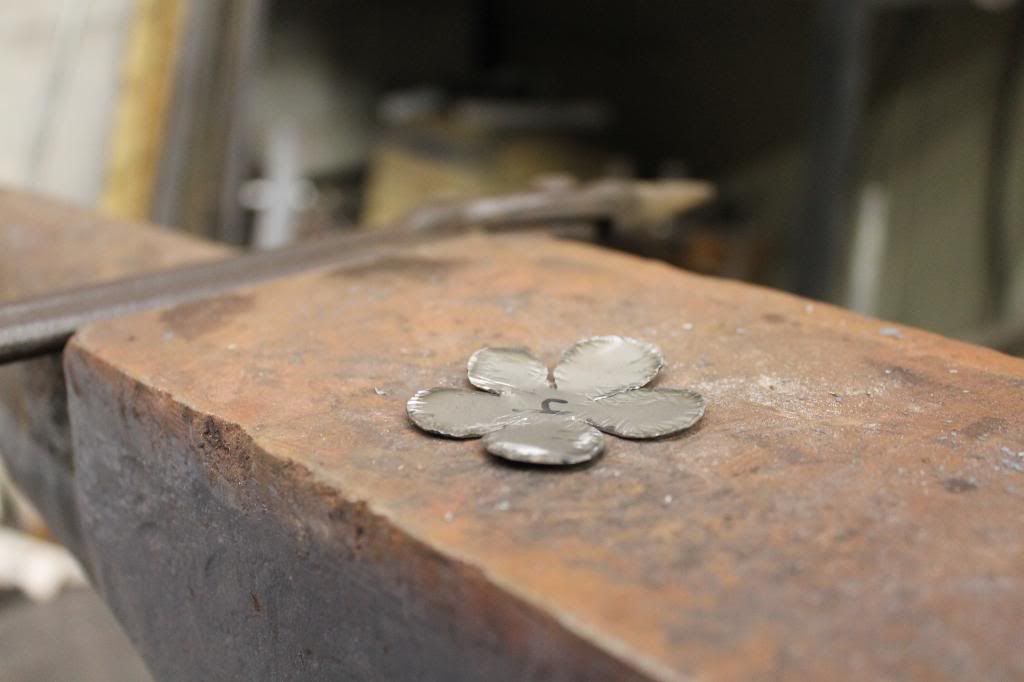
So this set was googled and printed at home, then cut out and numbered accordingly. The "star" is going to become the rose hips...

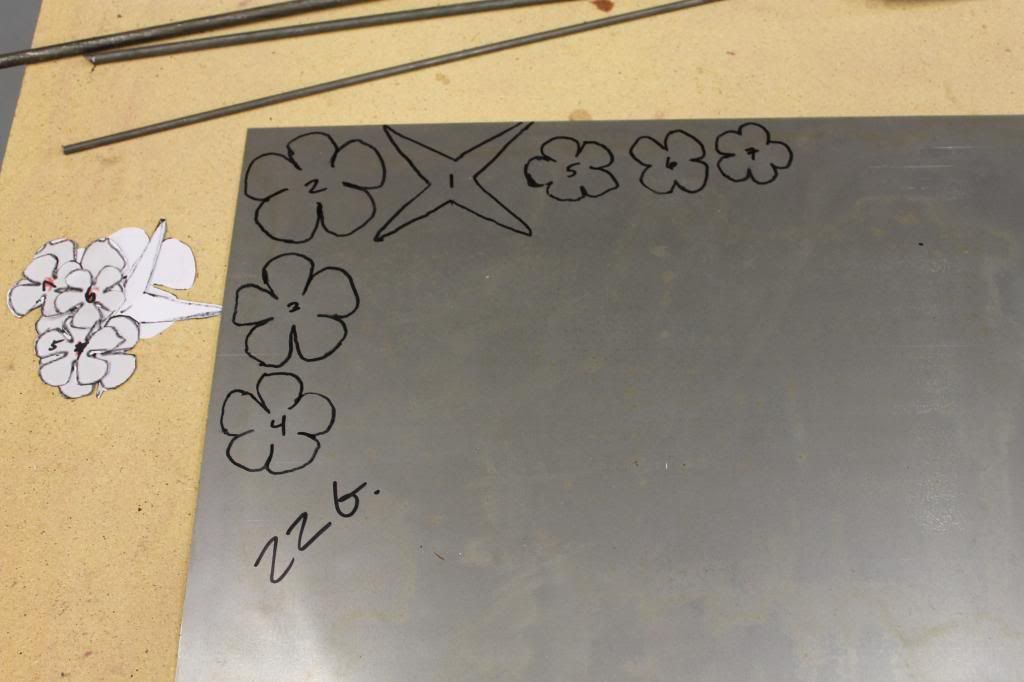
Band saw and belt sander to cut out and round up the shapes.

I like to use a 320grit belt and taper the edges. Obviously 22guage isnt very thick to begin with but we are talking about a rose petal so the fine edge will pay out in spades later in this process.
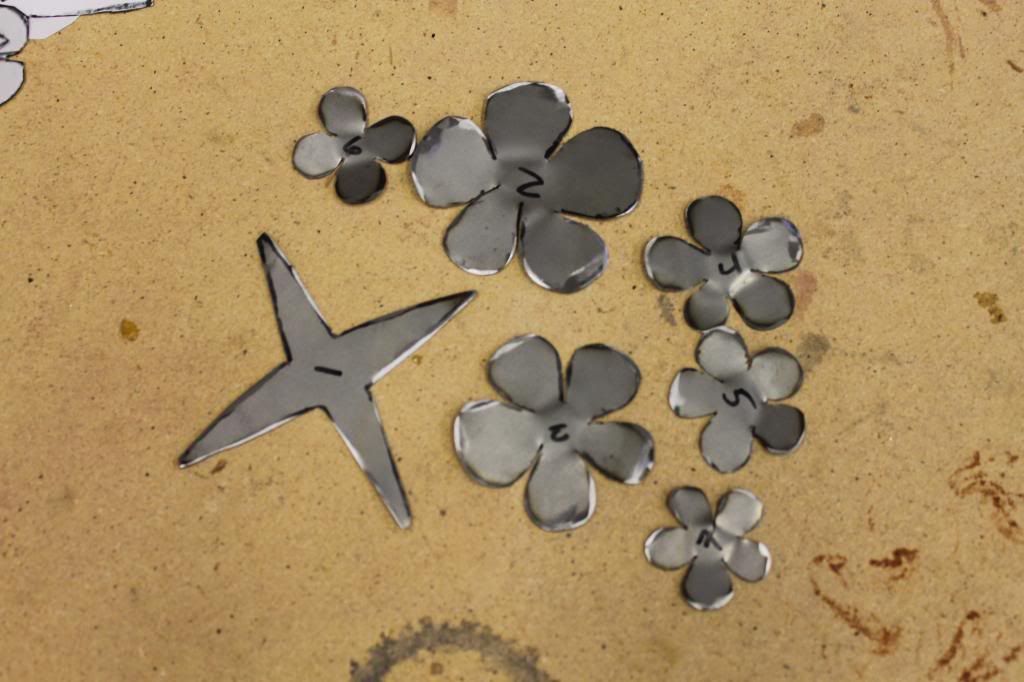
For this step i simply use the edge of my ball pien hammer. chip away at all the edges on the pattern and then soften the edges by driving flat blows after the chipping is finished. You dont want to flatten so hard that you remove all your detail but you dont want it looking haggered.
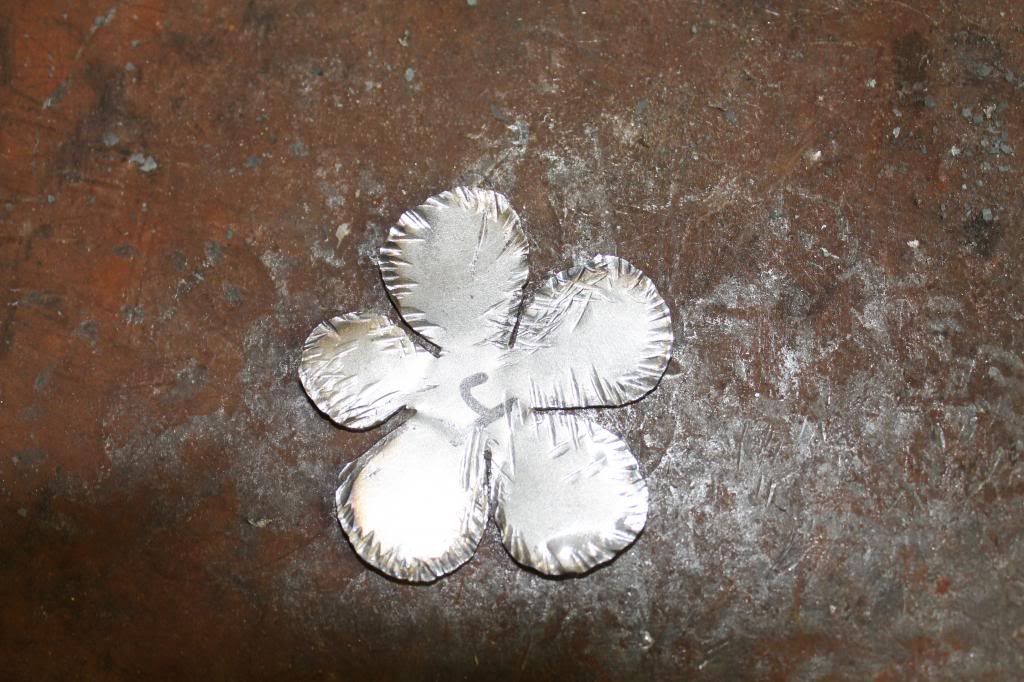
do this to all the sections including the rose hips
Now to bring the 3D into the flower
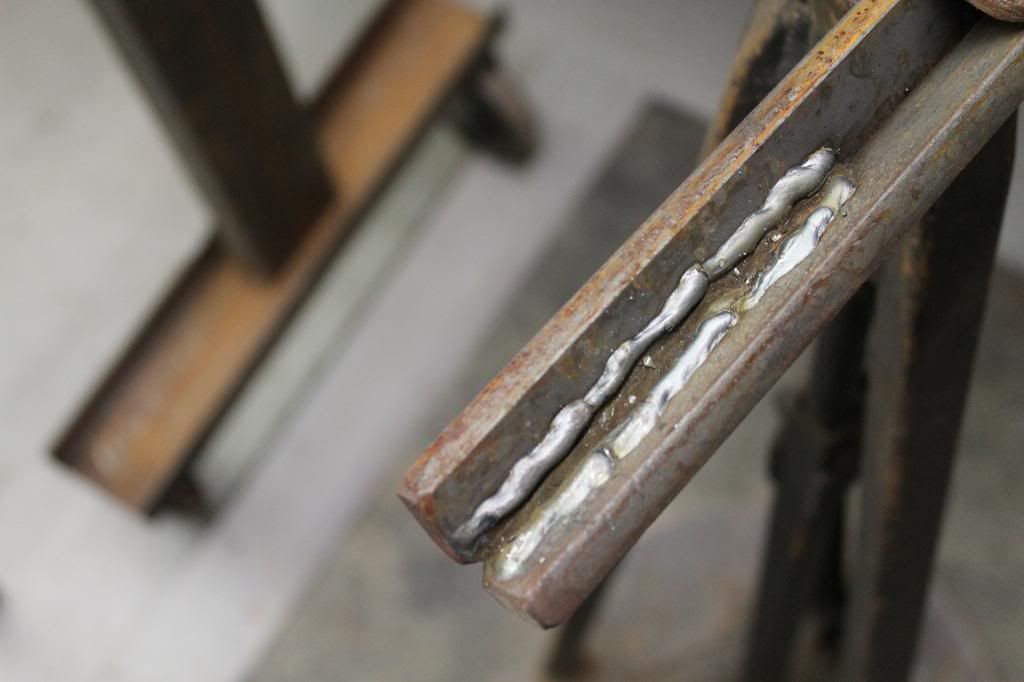
The rose hips are the curled outer covering of the rose bud that fold downward after the rose blooms. They are concave and curved at the same time. This isnt the easiest thing to achieve from 22 guage steel so i built a little jig to help me
weld together some bar stock in a "V" and then run a couple scraggly weld lines down the inner bottom sides of the stock. They need to be random because you dont want each section of the rosehips to be identical.
place each section of the "star" into the jig and use a tack type hammer or cross pien and drive the metal into the jig. I place each section in a different spot so they are all unique.
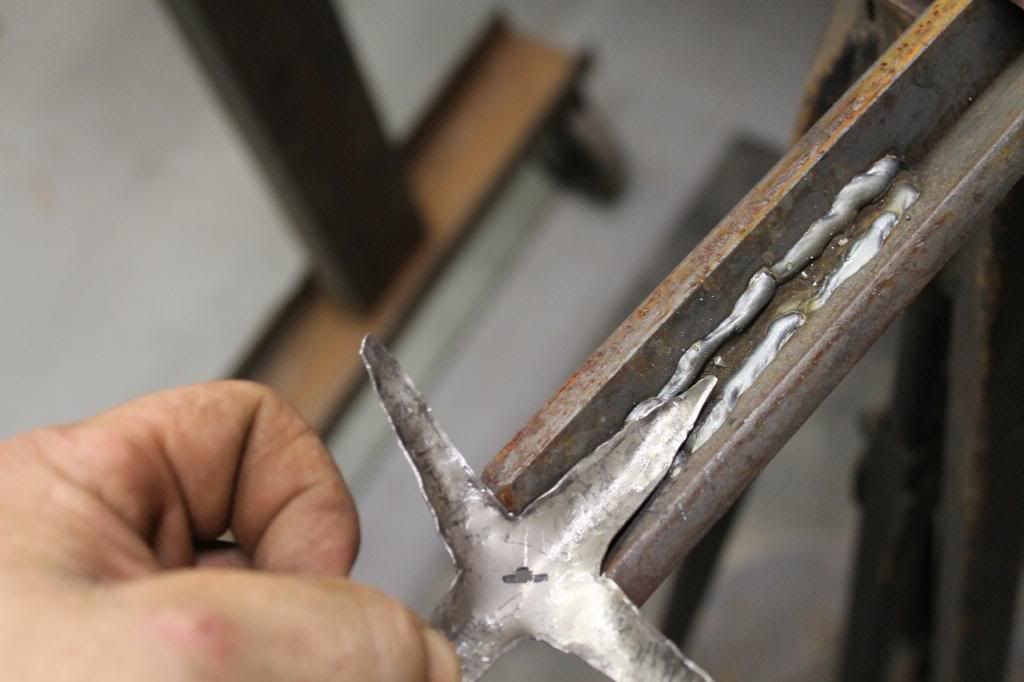
you should get something like this, once your happy with it set it aside and we will get back to it in a moment
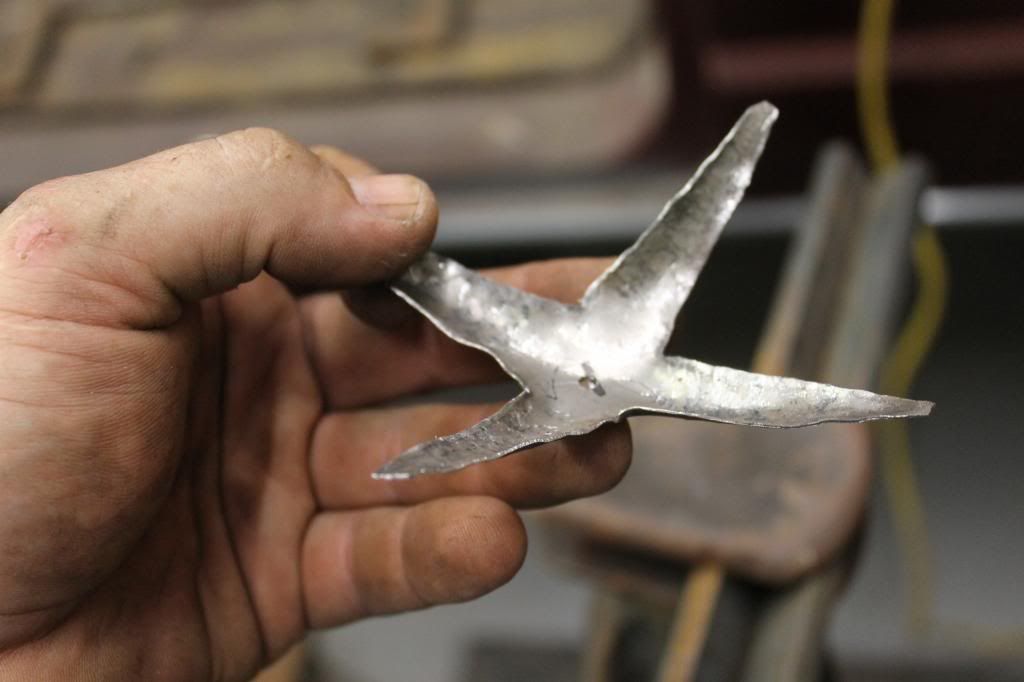
now a real blacksmith has "swages" for everything but Im a Farrier so I have a crap load of horseshoes hanging on walls instead. But... i also have a jeep, and therefore...alot of tools to fix said jeep, and those tools were very usefull to get the petals to "cup" the way the needed to to.
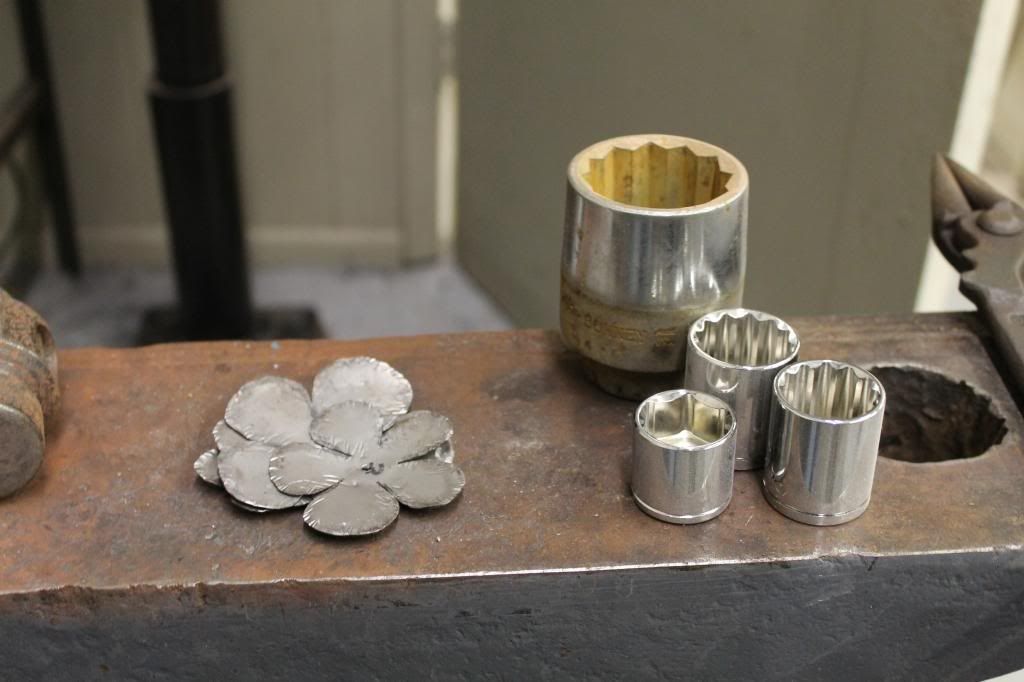
you get the idea
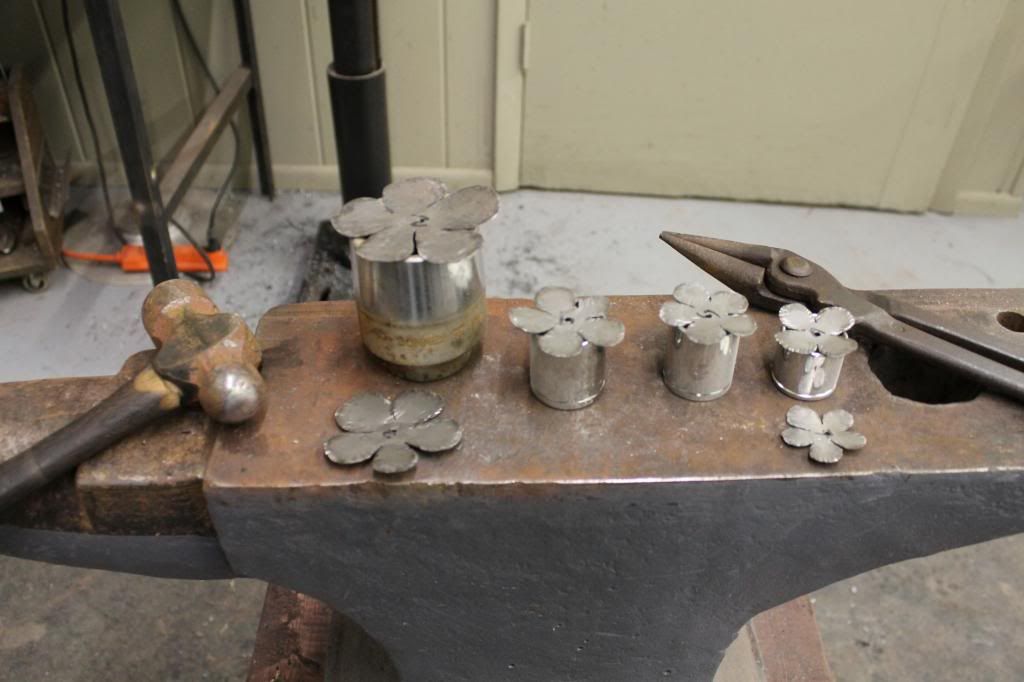
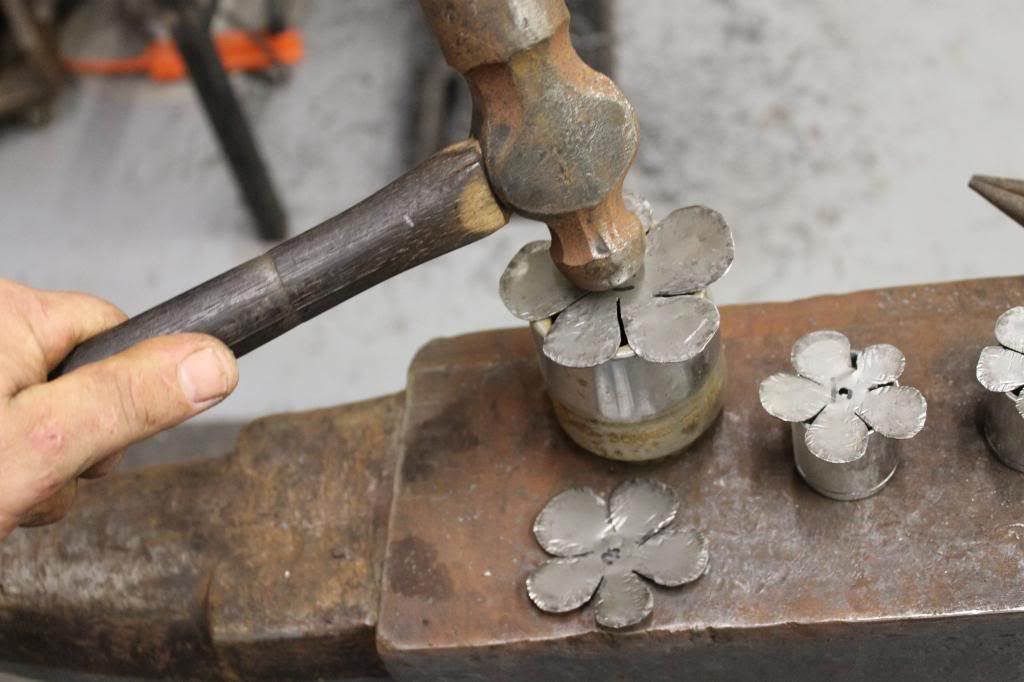
and you should come up with something like this, the only other step to do to these is to drill an 1/8" hole in the centers.

So set those with the rose hips and move onto the stem,
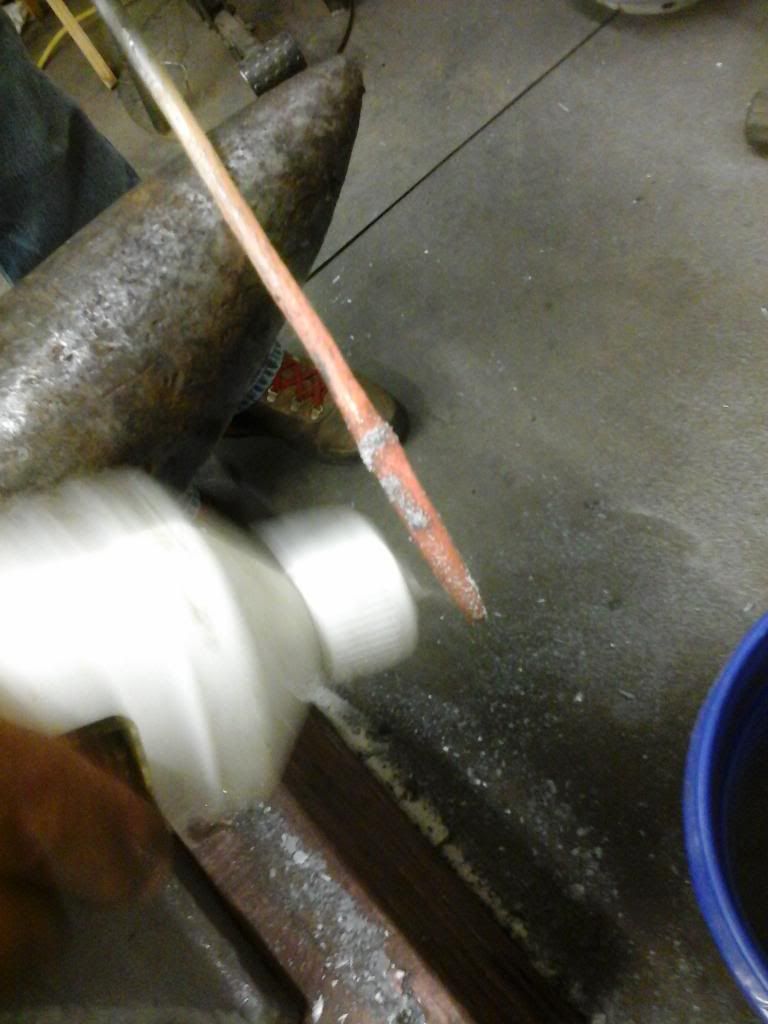
I forge down the entire stem and forge out the tip. this takes the perfection away from the round stock and the tip being tappered alows me to attach the petals. You need it to be roughly 1/8" to get the petals onto the stem but you need the tapper so that when you set them onto it later and drive them downward the conical shape secures/wedges them in place.
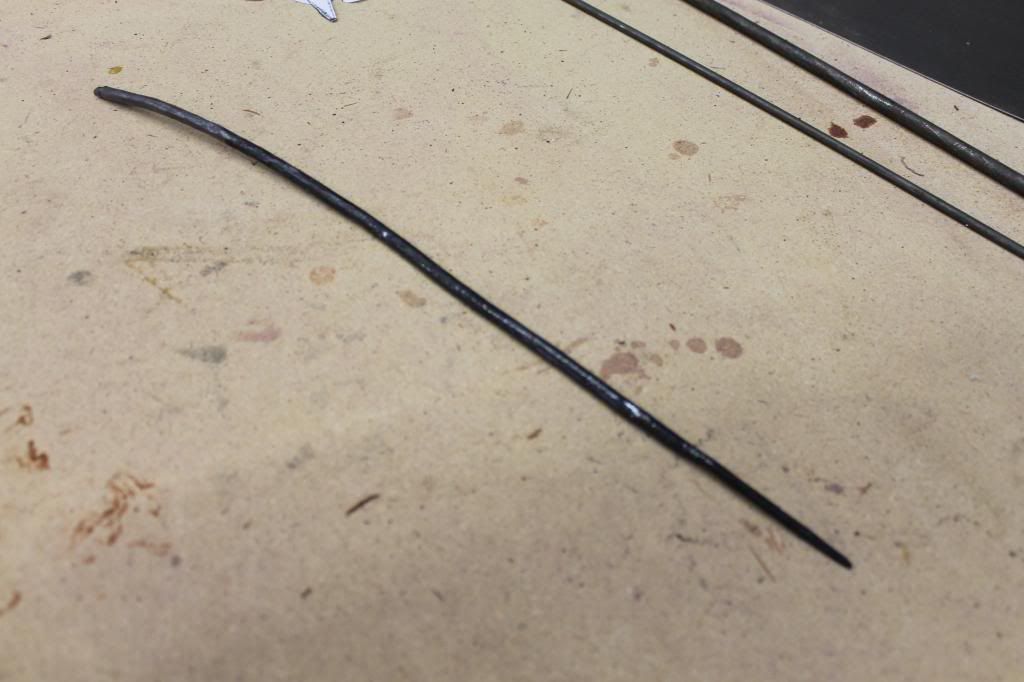
These are great, once you see the process your all going to be doing it. Its super easy and doesnt require a forge.
If you dont have access to the band saw or belt sander you can look on ebay under (blacksmith blanks) and find sets that are precut and finished.
So as far as the market place goes I expect these to be a big seller. They sell from $35 a piece to $280/ dozen. Time wise they arnt bad but cutting the templates takes a bit. Im going to cut a set out and have my uncle use the lazer jet? (some badass thing that cuts stuff) and do the basic forge work and assembly at the shop. Then while im sitting at the market on saturday mornings drinking my coffee and eating bengiets i will do the artistic part right there in the booth for people to see and hopefully they will take home a few or order a bunch!
To begin:
22guage steel, various metal rod, some scroll tongs (hognose tongs work as well), my templates, and a brass brush for later...

most template sets come with 5 sections but i like an additional smaller section in the center. It helps to fill the space and conceal your rivit or fold over location.
So this set was googled and printed at home, then cut out and numbered accordingly. The "star" is going to become the rose hips...


Band saw and belt sander to cut out and round up the shapes.

I like to use a 320grit belt and taper the edges. Obviously 22guage isnt very thick to begin with but we are talking about a rose petal so the fine edge will pay out in spades later in this process.

For this step i simply use the edge of my ball pien hammer. chip away at all the edges on the pattern and then soften the edges by driving flat blows after the chipping is finished. You dont want to flatten so hard that you remove all your detail but you dont want it looking haggered.


do this to all the sections including the rose hips

Now to bring the 3D into the flower
The rose hips are the curled outer covering of the rose bud that fold downward after the rose blooms. They are concave and curved at the same time. This isnt the easiest thing to achieve from 22 guage steel so i built a little jig to help me
weld together some bar stock in a "V" and then run a couple scraggly weld lines down the inner bottom sides of the stock. They need to be random because you dont want each section of the rosehips to be identical.

place each section of the "star" into the jig and use a tack type hammer or cross pien and drive the metal into the jig. I place each section in a different spot so they are all unique.

you should get something like this, once your happy with it set it aside and we will get back to it in a moment

now a real blacksmith has "swages" for everything but Im a Farrier so I have a crap load of horseshoes hanging on walls instead. But... i also have a jeep, and therefore...alot of tools to fix said jeep, and those tools were very usefull to get the petals to "cup" the way the needed to to.

you get the idea


and you should come up with something like this, the only other step to do to these is to drill an 1/8" hole in the centers.


So set those with the rose hips and move onto the stem,
I forge down the entire stem and forge out the tip. this takes the perfection away from the round stock and the tip being tappered alows me to attach the petals. You need it to be roughly 1/8" to get the petals onto the stem but you need the tapper so that when you set them onto it later and drive them downward the conical shape secures/wedges them in place.

Education through restoration thread link:
http://www.fsjnetwork.com/forum/viewtop ... =12&t=1366
Blacksmithing thread link:
http://www.fsjnetwork.com/forum/viewtop ... f=6&t=1381
http://www.fsjnetwork.com/forum/viewtop ... =12&t=1366
Blacksmithing thread link:
http://www.fsjnetwork.com/forum/viewtop ... f=6&t=1381
-
Florida83FSJCherokee
Topic author - Posts: 196
- Joined: Sat Mar 09, 2013 7:53 pm
- Location: Lakeland , Central Florida
Re: Blacksmith forging project thread idea (pic heavy)
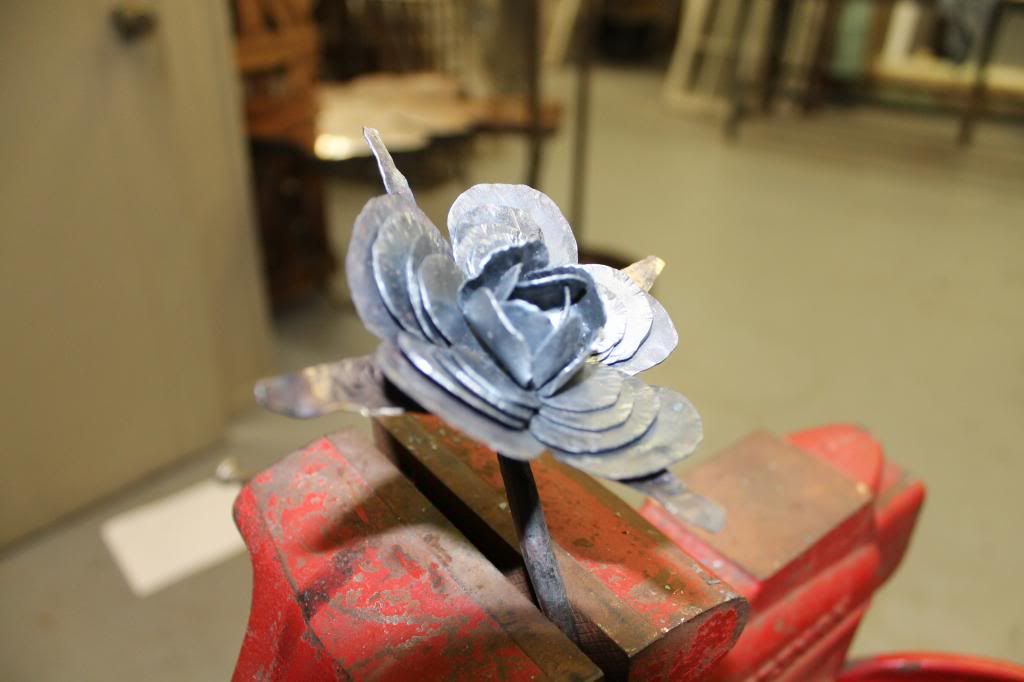
Ok, you can now slide each layer of the rose onto the stem. starting with the hips and fininshing with the inner most layer.
Once they are on I use a round tiped rod and push the layers into each other and down onto the stem as tightly as possible. Its less important how much stem you have coming out the top because you can just cut off the excess but each layer of the rose needs to be tight against the previous.
So as stated above, cut off the excess stem coming thought the top and leave yourself about a 1/4". Heat the stem top to red hot and use the hog nose pliers to fold it over and down into the center of the pedal stack. I like to twist it a little so i get the top nice and snug. (your going to tweak on this thing for a while, twisting and pulling it so the tighter you start with the nicer the end result)
folded over
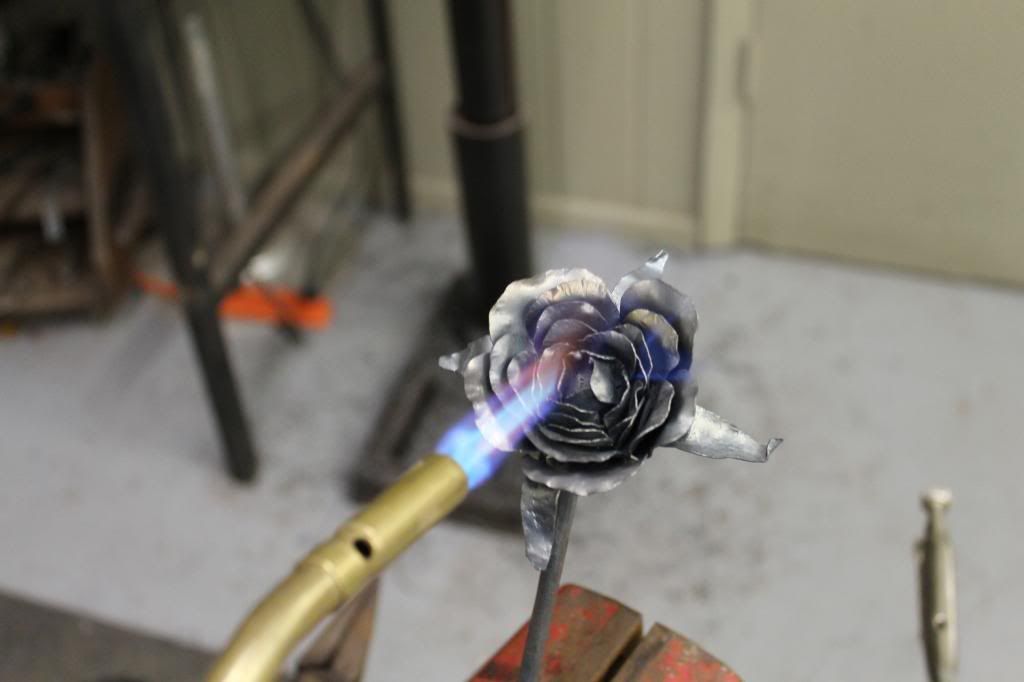
you will probably recognize the small propane burner torch, you can use a Oxy/Act torch but the 22 guage is so thin the smaller torch is easier to use in my opinion. It would suck to scald the metal or burn a hole in it after all this work.
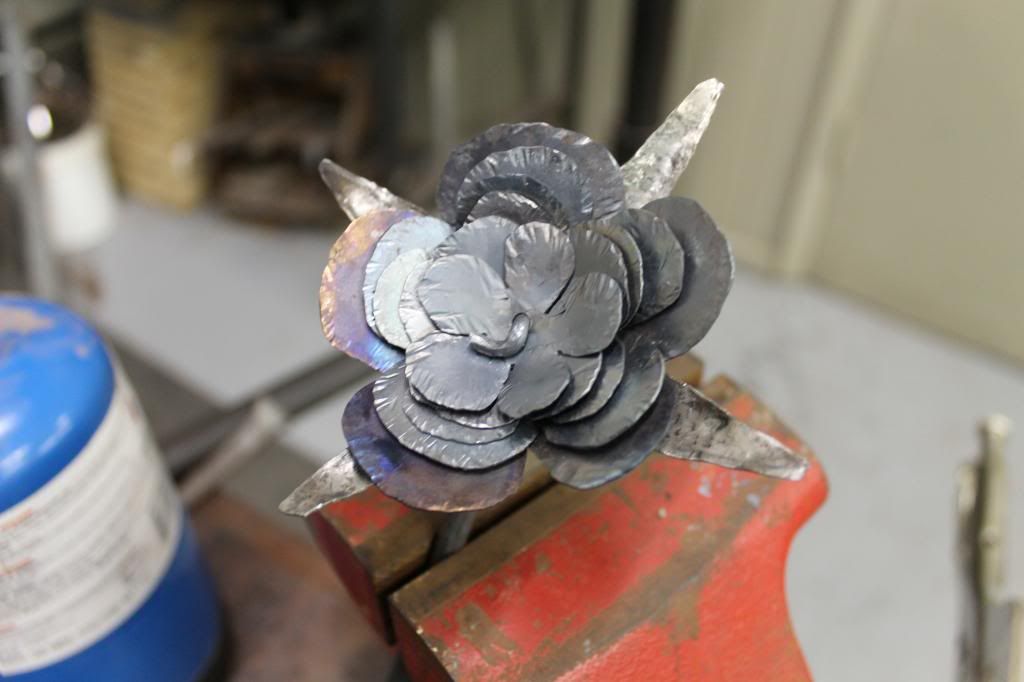
Now comes the artistic part...there is no right way, there is only the creators way...Your rose can and will look like you imagine it to so have fun with this part and dont be affraid to try stuff. You can always bend it back and start again.
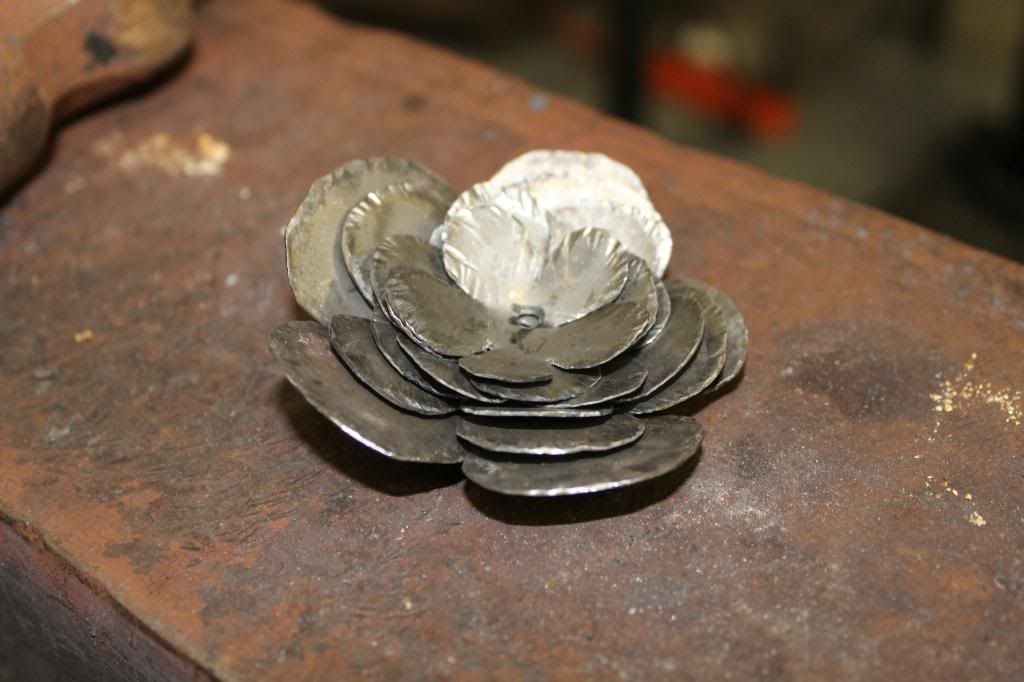
For myself... i start in the center and fold the hole rose up like a loose bud. then I reverse and work from the outside inward bending the tops of the petals outward and downward to literally bloomm the rose. I do try to overlap each petal into the next when possible...
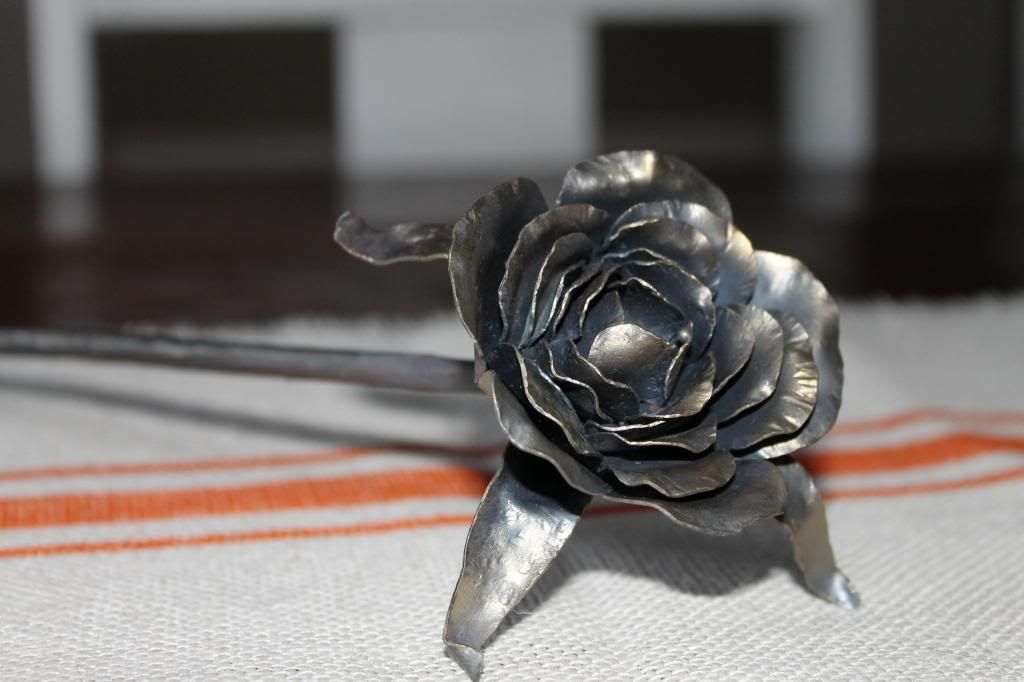
this is what it looks like:
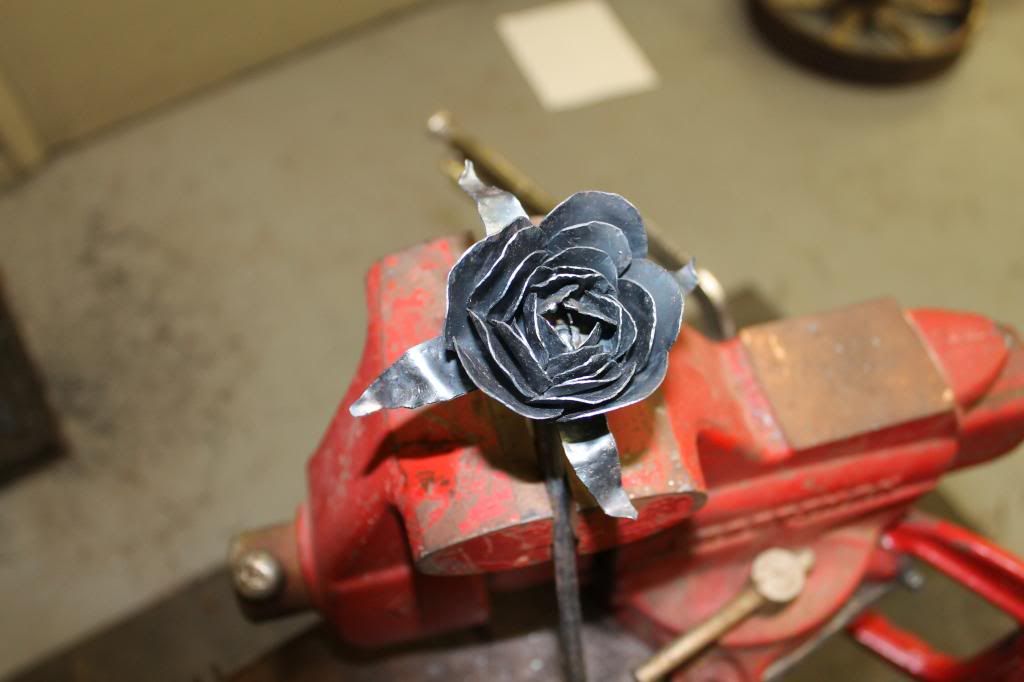
at this point its all pulled into the bud and i fold the tips outward
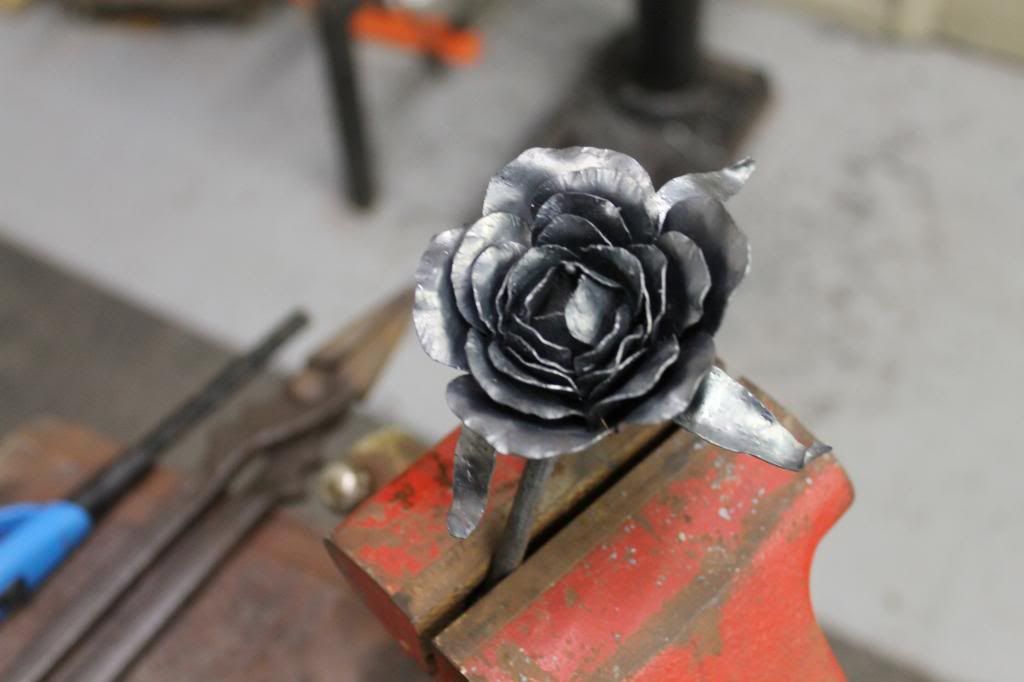
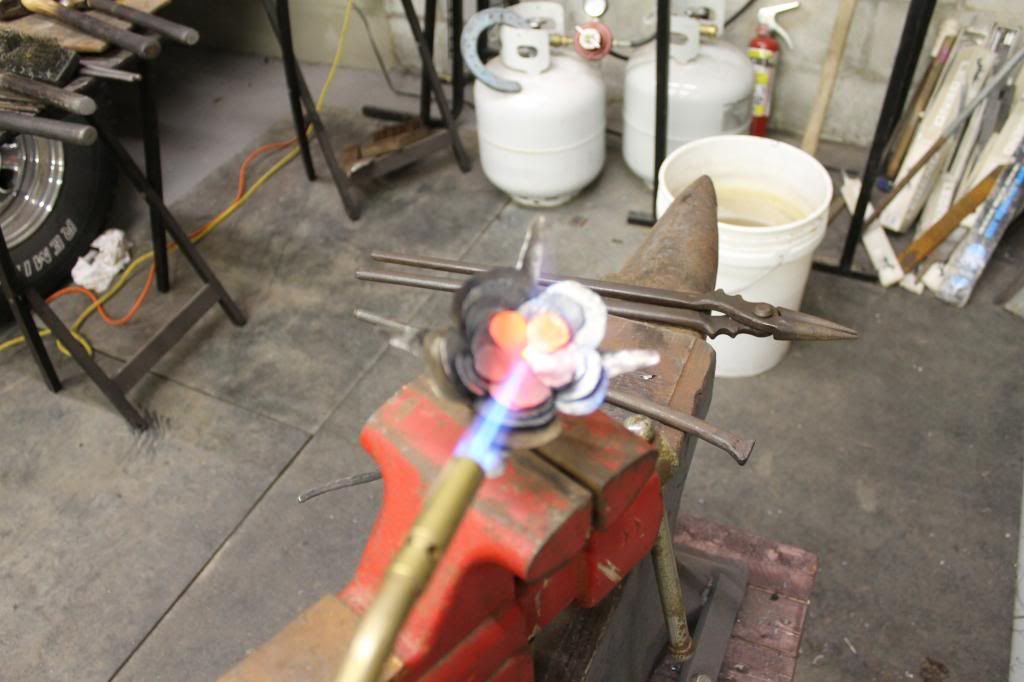
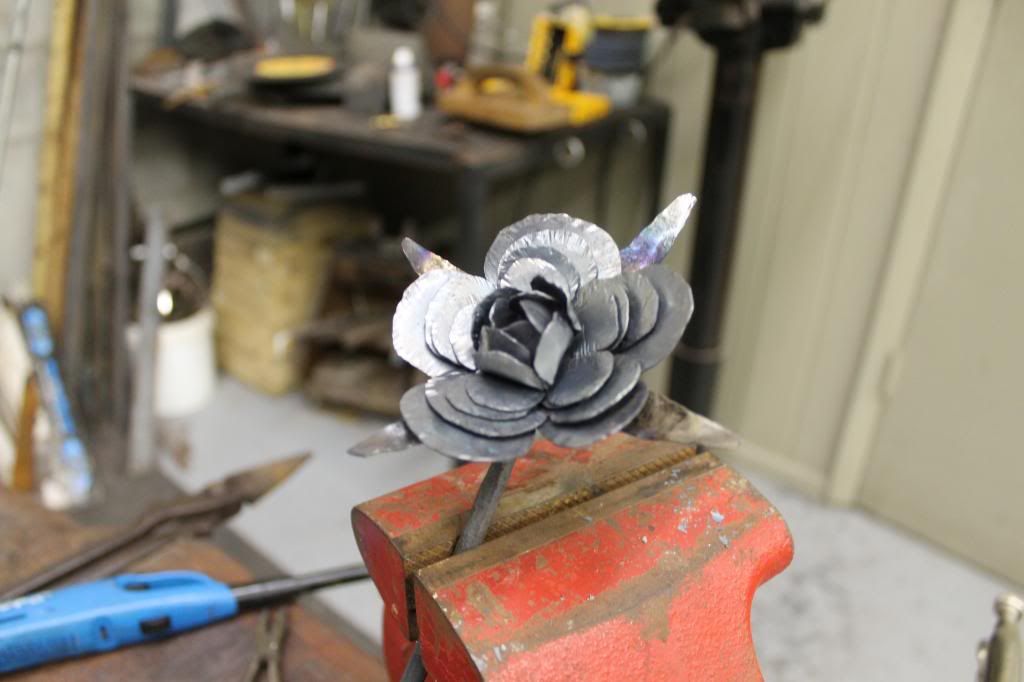
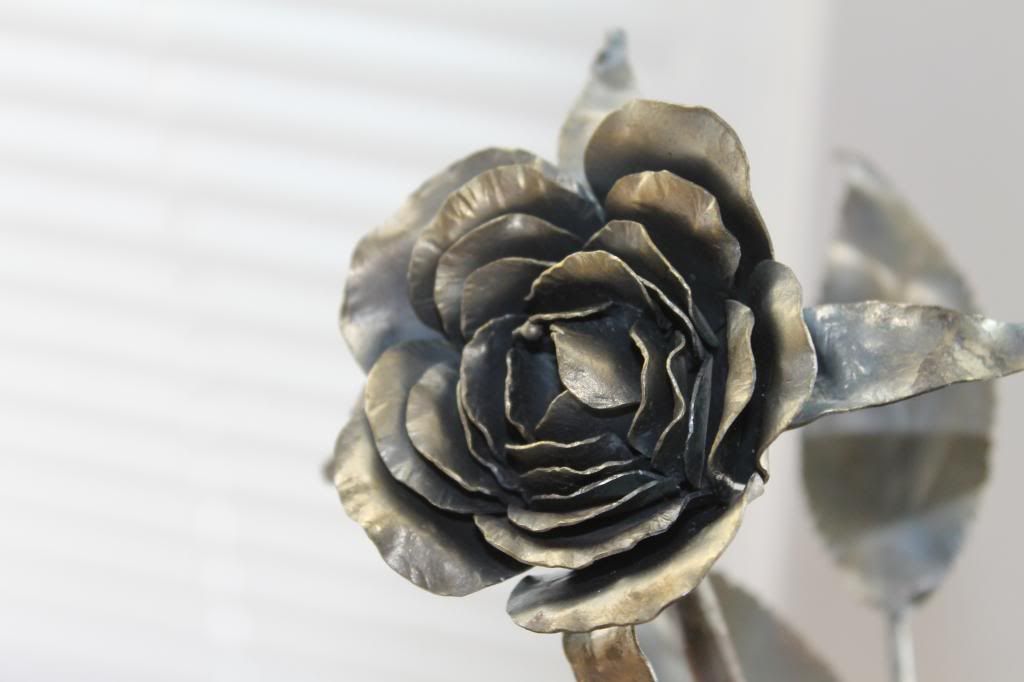
So when your happy with it, you need to brush it just like every other forge project. I use a small wire brush and gently rub each petal as much as i can reach untill the nice shine its brought out in the blackend steel.
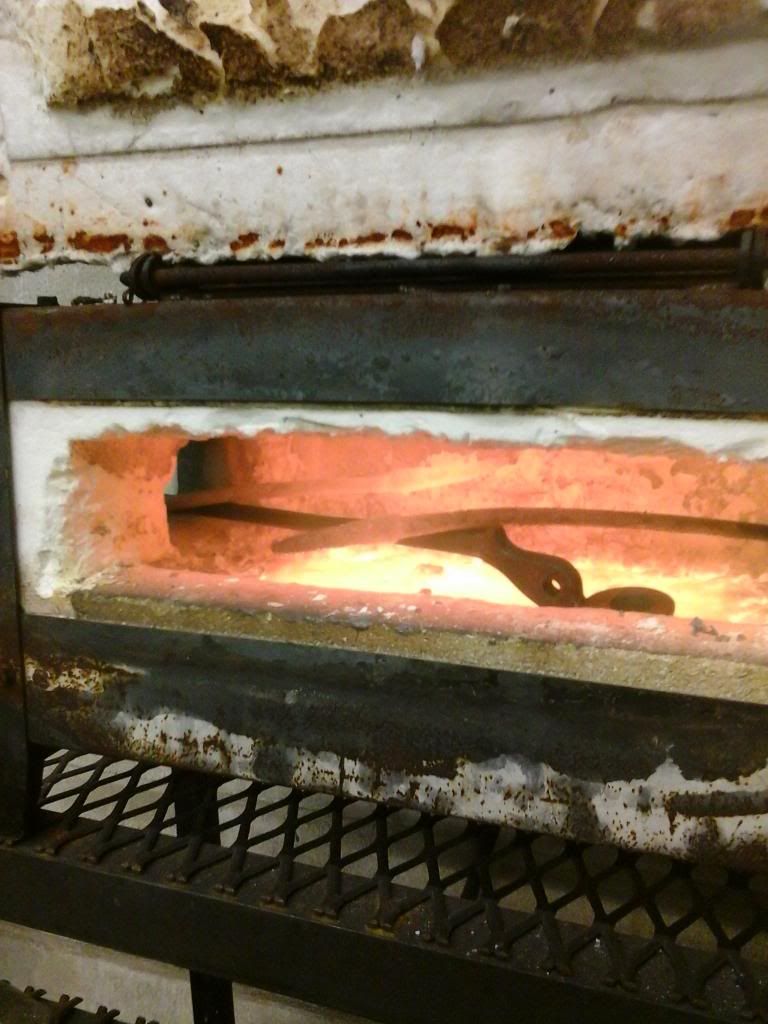
Since I have a forge I heated mine up equally so i had a uniform pallet to brush from.
you can see how as i brush the heat gets sucked out of the petals and the slag and carbon isnt able to rebuild so you get a nice sheen.
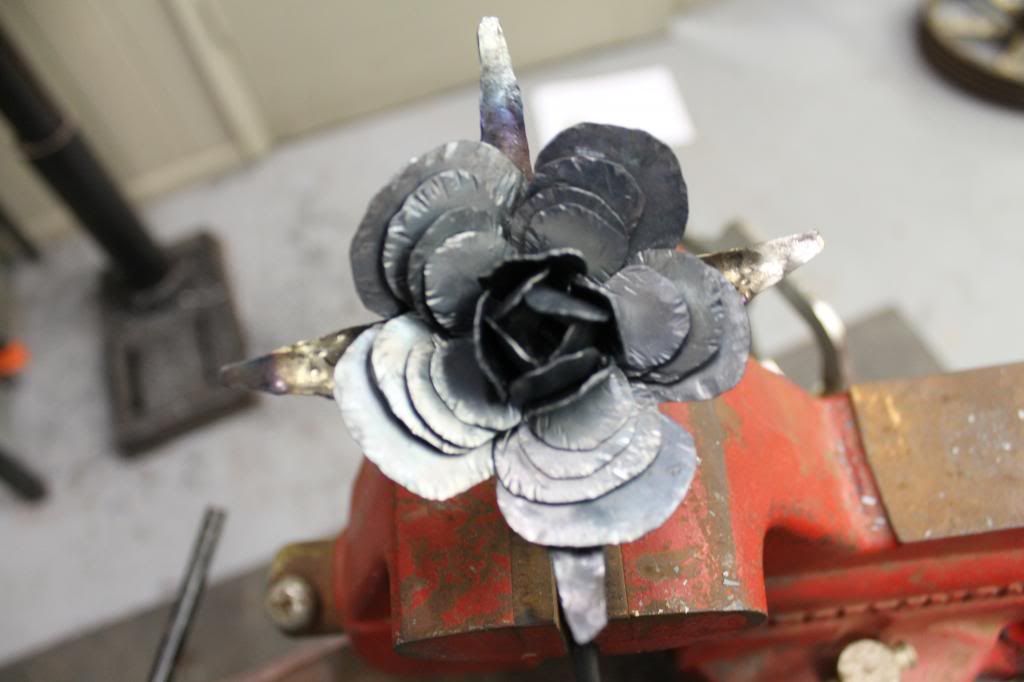
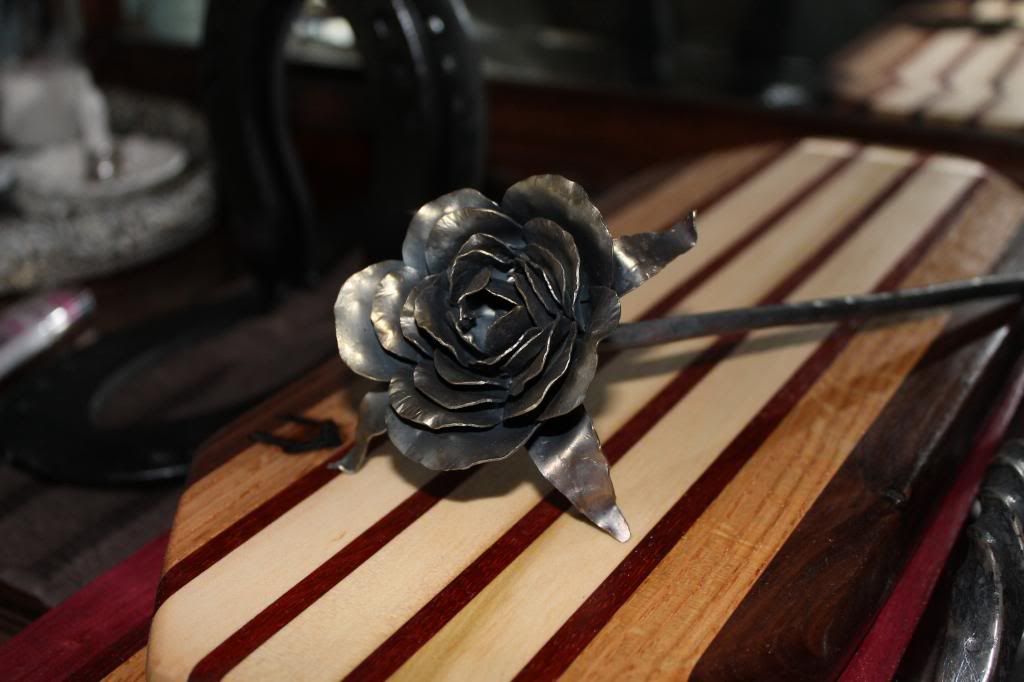
once its all brushed you can clear coat it if your happy with the steel look or for an added touch use a brass brush to highlight it.
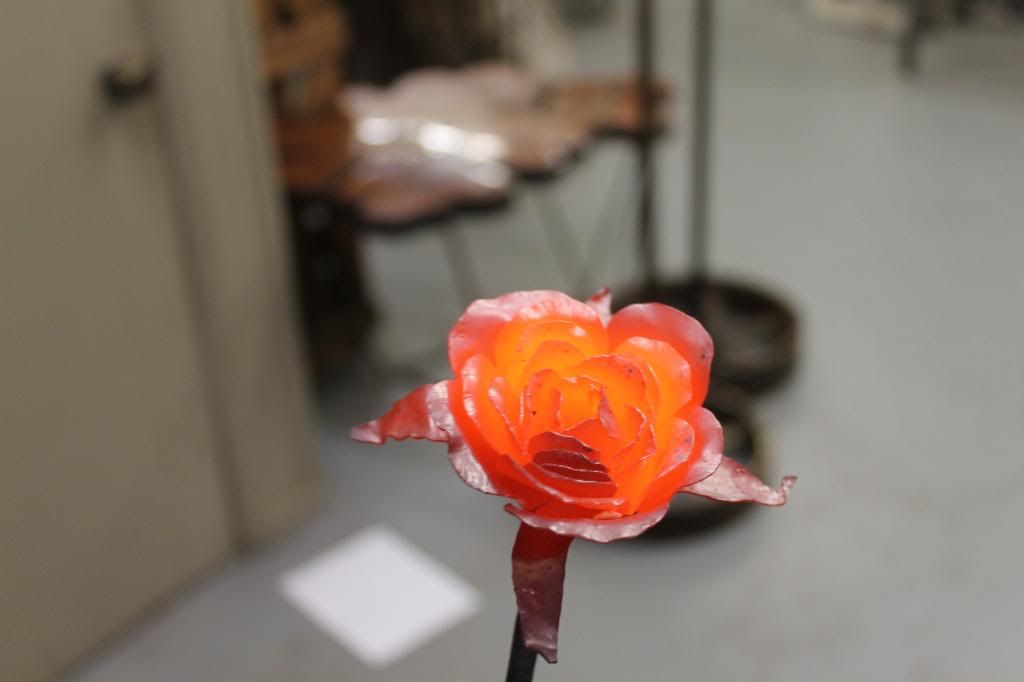
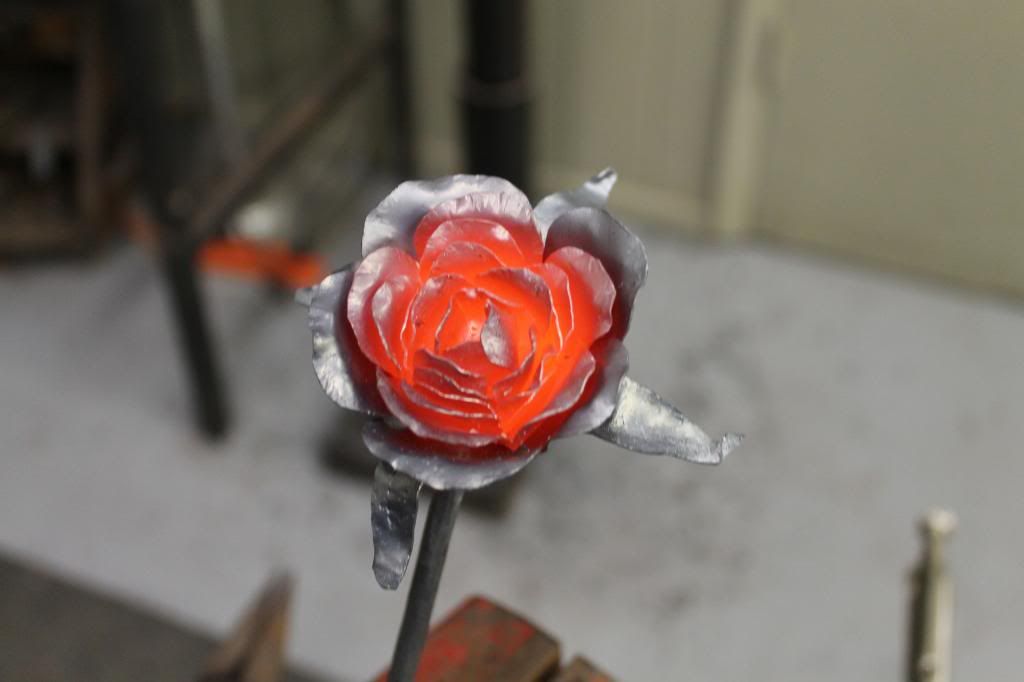
Heat the steel just a little, dont scald it. (you just spent however long brushing it!)
then brush the edges with the brass brush, it will leave its mark on the steel.
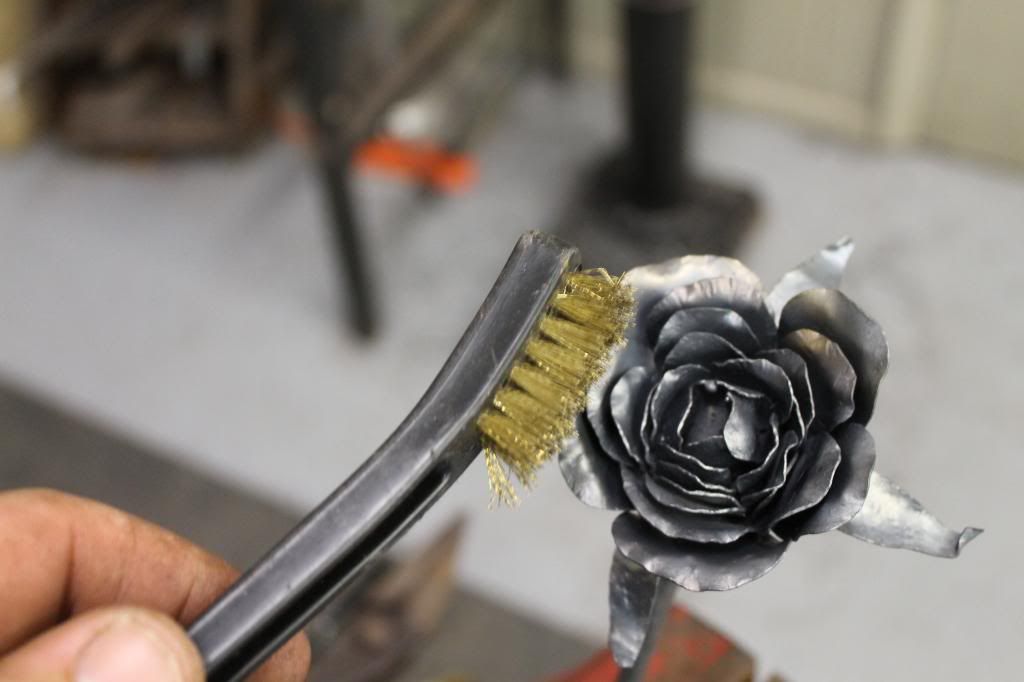
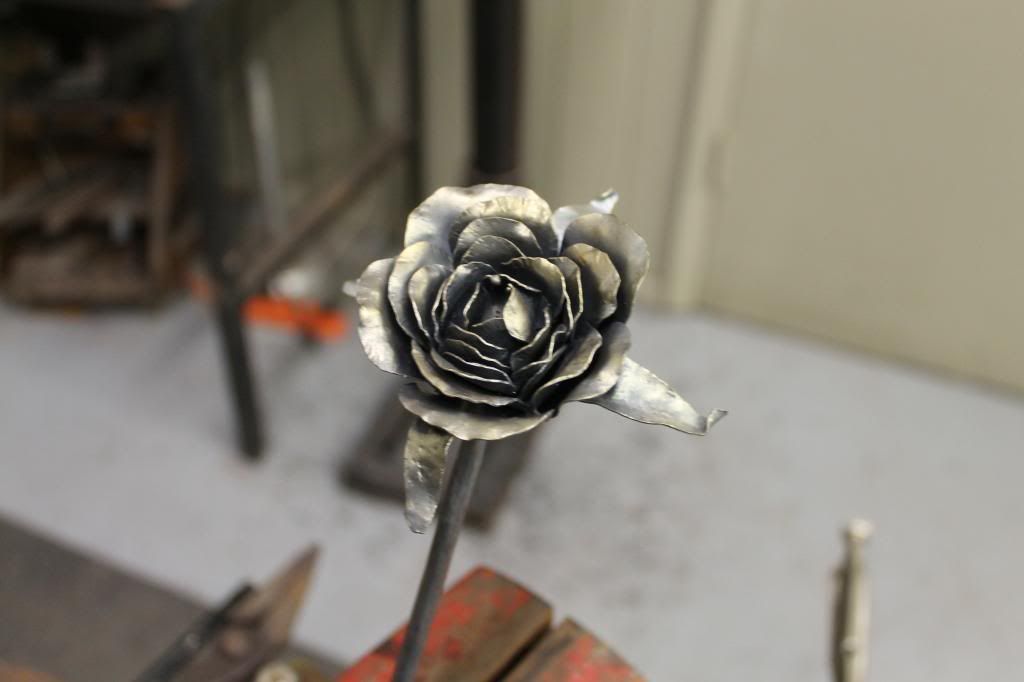
A little tip...take the torch and lightly! move it around over the brassed areas and it will make it shine! i think it makes it gold in color...
Last but certainly not least...put a drop of rose oil in the center, and give it to your girl! (panties drop!):lol: sorry, varsity blues joke...
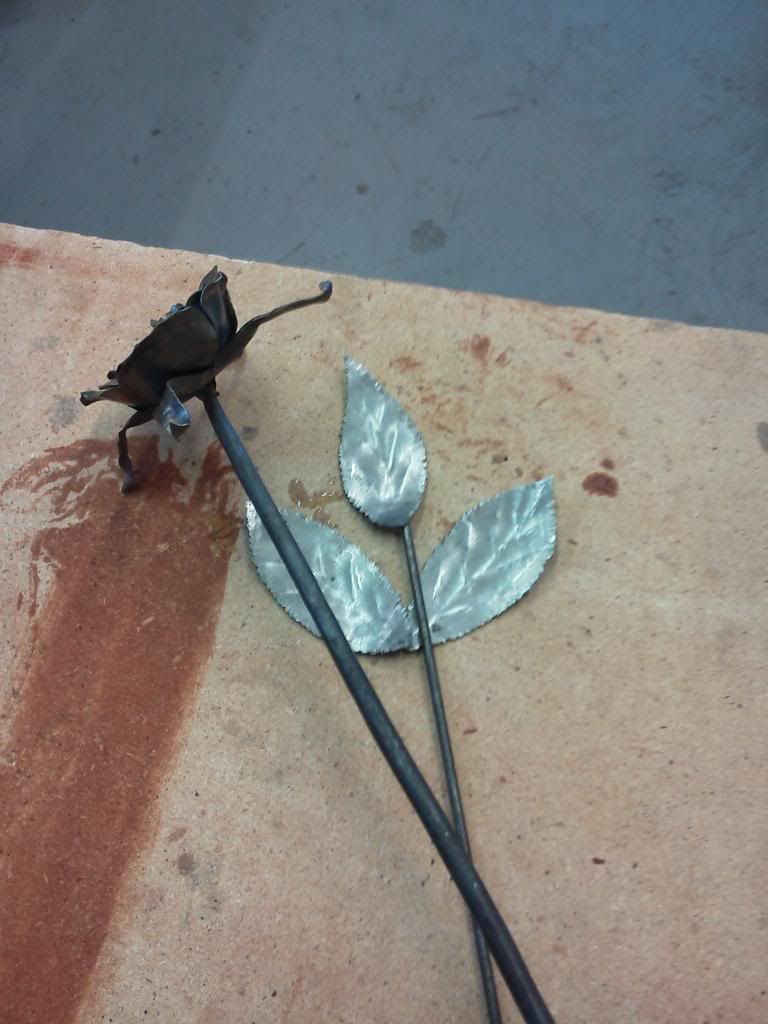
So thats how to make a rose.... this one still needs to have its leaves attached but i ran out of time before I got them made. Once i do Ill update the thread with how to make them as well. Its not necessary but I fell like it really completes it to have a small branch and 3 leaves below the flower. It makes a handy method for creating a tripod for holding up the flower as well if you position them right...
So, i believe a side from a few updates this catches us up.
Thanks for checking it out and i appreciate all the comments or suggestions to improve the work or method of working...
have a great weekend from the Doghouse!
JP

Once they are on I use a round tiped rod and push the layers into each other and down onto the stem as tightly as possible. Its less important how much stem you have coming out the top because you can just cut off the excess but each layer of the rose needs to be tight against the previous.
So as stated above, cut off the excess stem coming thought the top and leave yourself about a 1/4". Heat the stem top to red hot and use the hog nose pliers to fold it over and down into the center of the pedal stack. I like to twist it a little so i get the top nice and snug. (your going to tweak on this thing for a while, twisting and pulling it so the tighter you start with the nicer the end result)

folded over

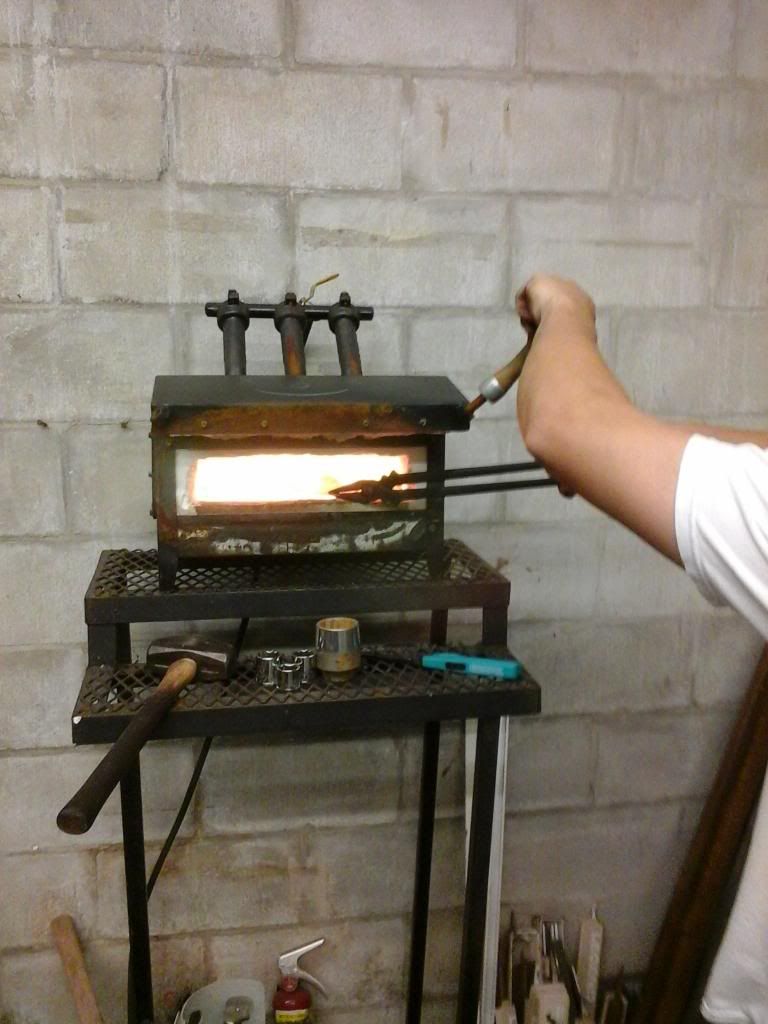
you will probably recognize the small propane burner torch, you can use a Oxy/Act torch but the 22 guage is so thin the smaller torch is easier to use in my opinion. It would suck to scald the metal or burn a hole in it after all this work.
Now comes the artistic part...there is no right way, there is only the creators way...Your rose can and will look like you imagine it to so have fun with this part and dont be affraid to try stuff. You can always bend it back and start again.
For myself... i start in the center and fold the hole rose up like a loose bud. then I reverse and work from the outside inward bending the tops of the petals outward and downward to literally bloomm the rose. I do try to overlap each petal into the next when possible...
this is what it looks like:


at this point its all pulled into the bud and i fold the tips outward

So when your happy with it, you need to brush it just like every other forge project. I use a small wire brush and gently rub each petal as much as i can reach untill the nice shine its brought out in the blackend steel.
Since I have a forge I heated mine up equally so i had a uniform pallet to brush from.

you can see how as i brush the heat gets sucked out of the petals and the slag and carbon isnt able to rebuild so you get a nice sheen.

once its all brushed you can clear coat it if your happy with the steel look or for an added touch use a brass brush to highlight it.
Heat the steel just a little, dont scald it. (you just spent however long brushing it!)

then brush the edges with the brass brush, it will leave its mark on the steel.


A little tip...take the torch and lightly! move it around over the brassed areas and it will make it shine! i think it makes it gold in color...
Last but certainly not least...put a drop of rose oil in the center, and give it to your girl! (panties drop!):lol: sorry, varsity blues joke...


So thats how to make a rose.... this one still needs to have its leaves attached but i ran out of time before I got them made. Once i do Ill update the thread with how to make them as well. Its not necessary but I fell like it really completes it to have a small branch and 3 leaves below the flower. It makes a handy method for creating a tripod for holding up the flower as well if you position them right...
So, i believe a side from a few updates this catches us up.
Thanks for checking it out and i appreciate all the comments or suggestions to improve the work or method of working...
have a great weekend from the Doghouse!
JP

Education through restoration thread link:
http://www.fsjnetwork.com/forum/viewtop ... =12&t=1366
Blacksmithing thread link:
http://www.fsjnetwork.com/forum/viewtop ... f=6&t=1381
http://www.fsjnetwork.com/forum/viewtop ... =12&t=1366
Blacksmithing thread link:
http://www.fsjnetwork.com/forum/viewtop ... f=6&t=1381
-
Florida83FSJCherokee
Topic author - Posts: 196
- Joined: Sat Mar 09, 2013 7:53 pm
- Location: Lakeland , Central Florida
Re: Blacksmith forging project thread idea (pic heavy)
Thanks Guys! I appreciate the comments and Im glad the post are appreciated,
I feel bad that Im getting such praise for an unfinished project though.
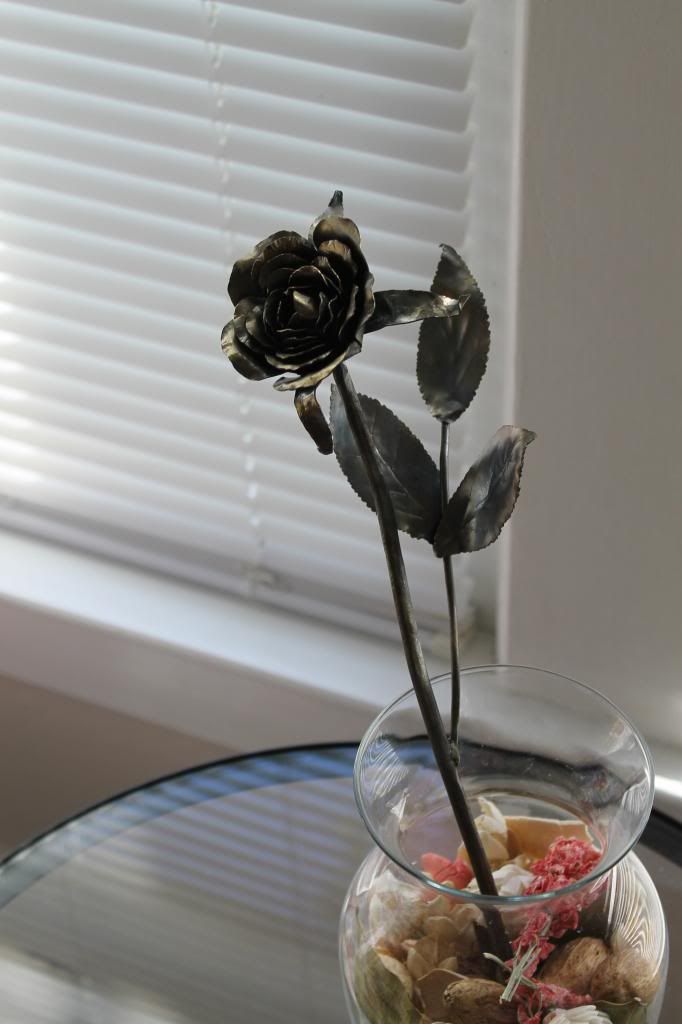
Sunday, I finished the leaves and stem work so here is the update to the rose I promised.
So same 22 guage
Cut out rough leaf pattern
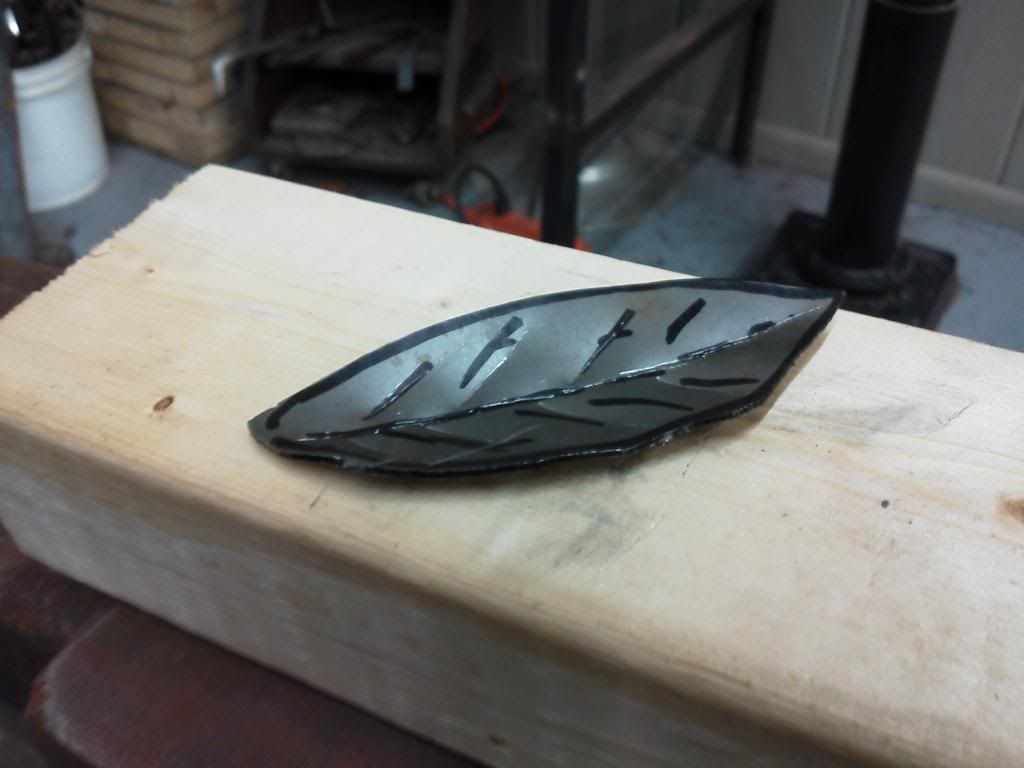
Marked the veins with a sharpy
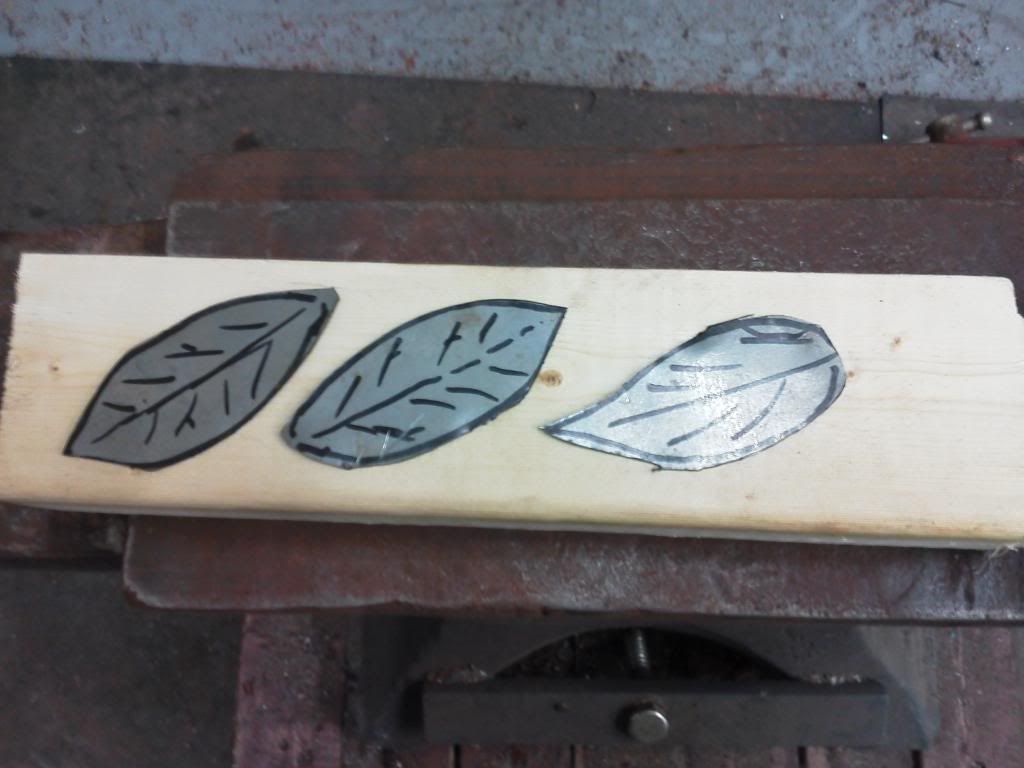
Perform the next few steps on a soft peice of wood. It will allow the metal to sink and expand when struck and will allow it to concave into itself a little bit.
I mark the back of my leaves because the technique I have developed for getting them life like looks better if you build them from the backside.
Use a dull/rounded fuller (look in the first post for detailed info on fullers/fullering) and lightly run your marks. Rose leafs viens are staggered and the center line gets lighter towards the tip of the leaf.

when your done it will look something like this
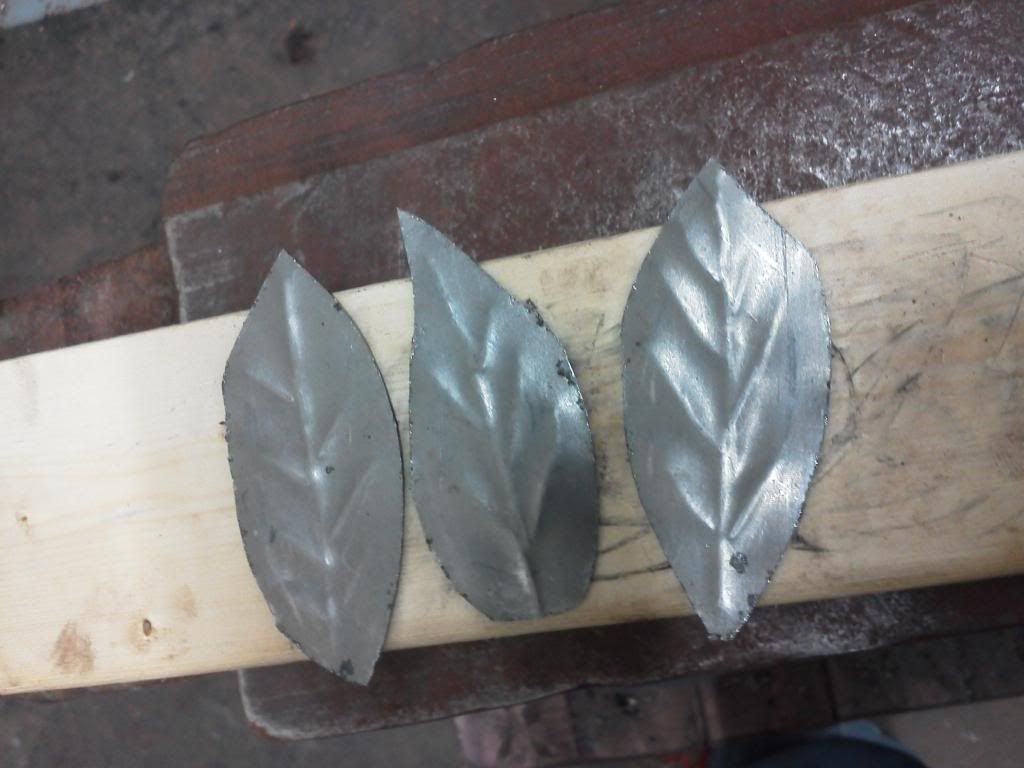
now the cool part...simply flip them over...and...
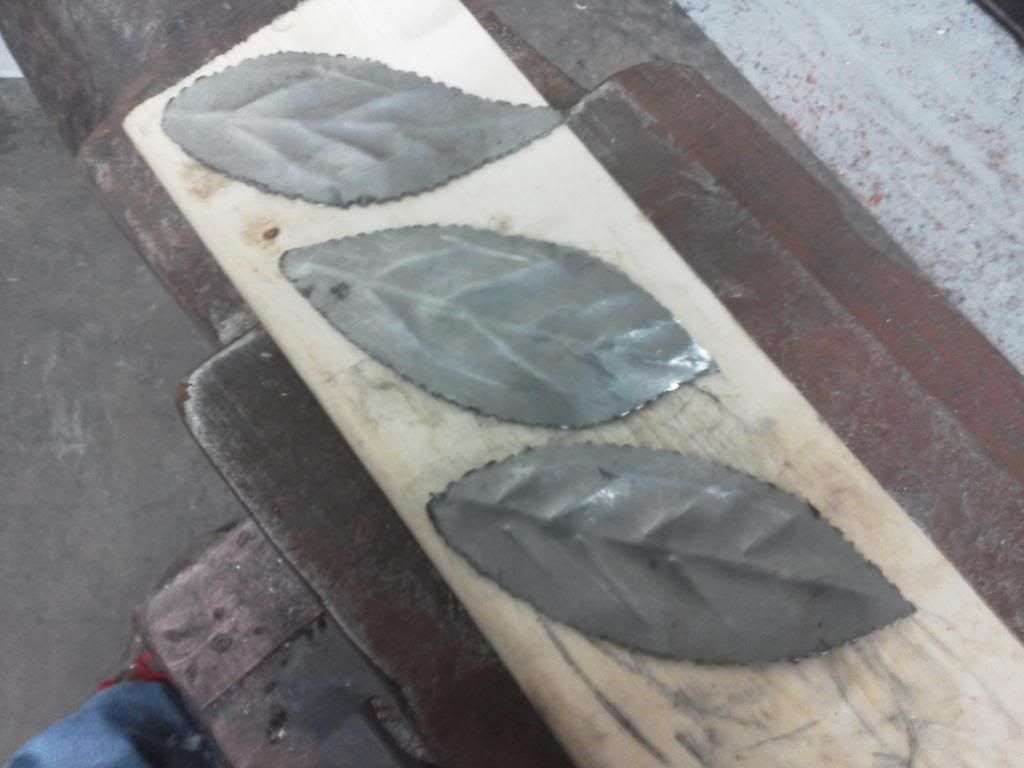
At this point i go to the belt sander and put the exact shape into each leaf, and then use the edge of the belt to add the jagged edegs that rose leafs have.
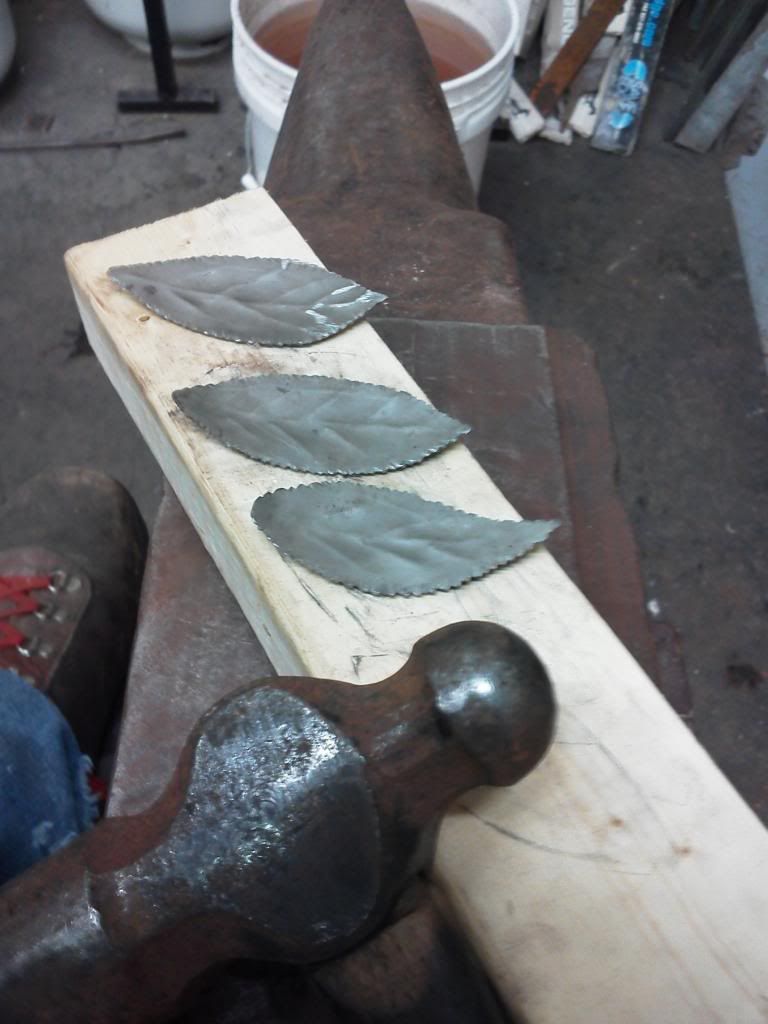
Now to soften the leaves use the ball pein hammer and gently create the countour and smooth out the main ridges. I like to flip them over and do each side a few times. Finishing with my topside. Remember your going to have the torch work to get the flow and curves you want so this step is really about getting the veins and edges a life like as possible. Nothing ruins a flower like crappy unrealistic leaves.
I use 1/8" round rod to make the leaves stem and lay it all out to adjust for length and placement. Then cut the stem at an angle and spot weld to the main stem. The leaves are spot welded from the back to the rod as well. I always overhang a little bit of the leaf at the bottom so you can wrap it around the stem and really blend its origin into the metal instead of it just laying on top of it. Use a dremel or other sander/grinder and blend the stem welds and the back of the leaves to as minimal as possible.
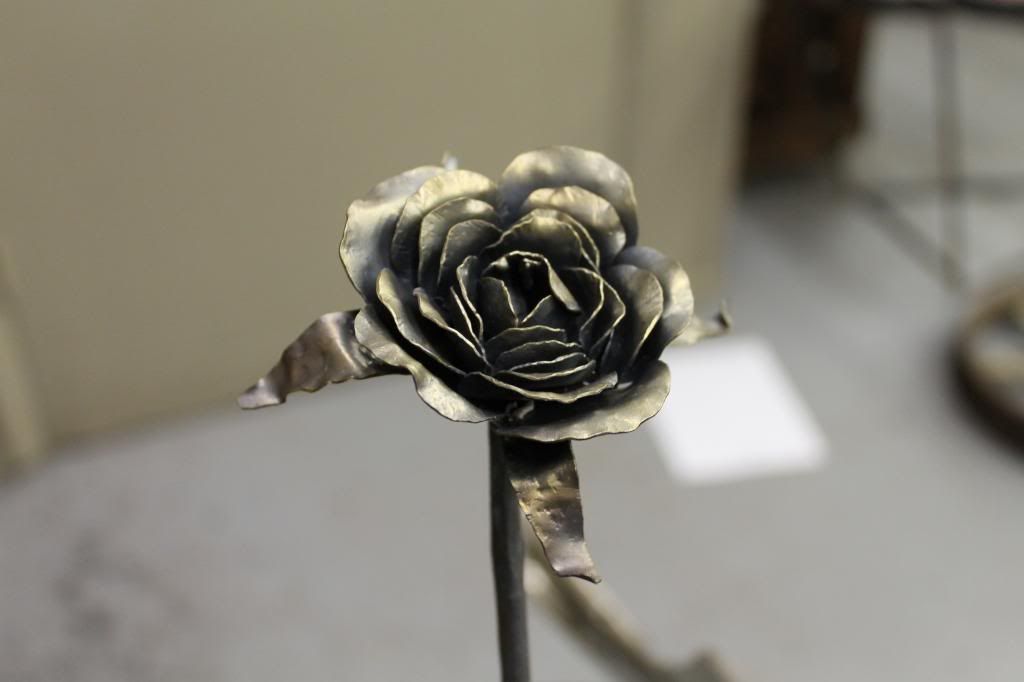
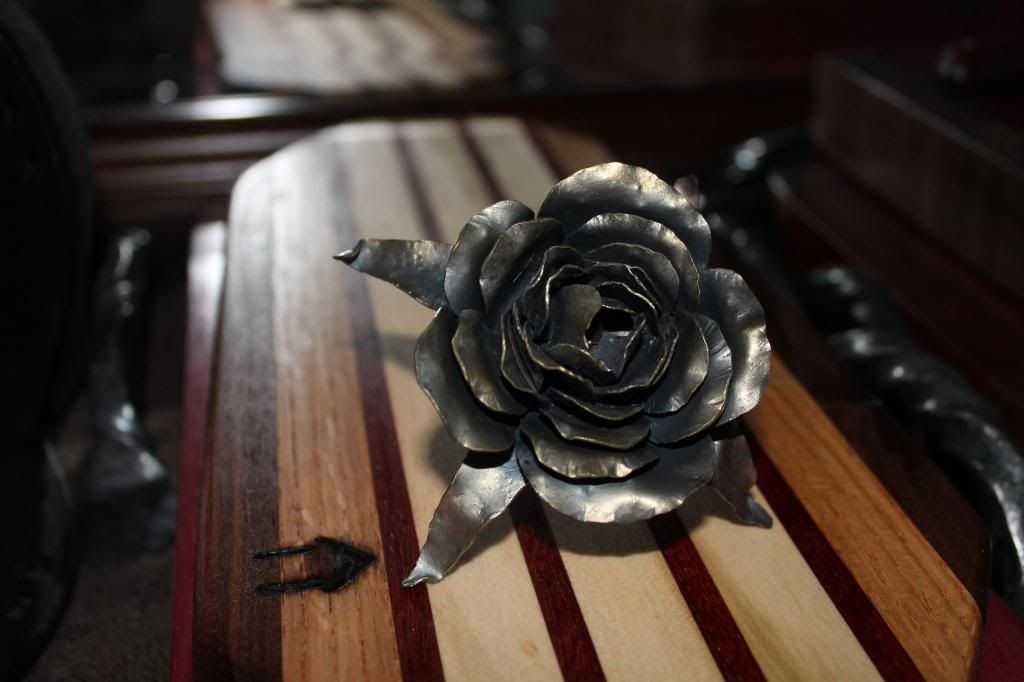
torch work done, overlap done, and the shape finished
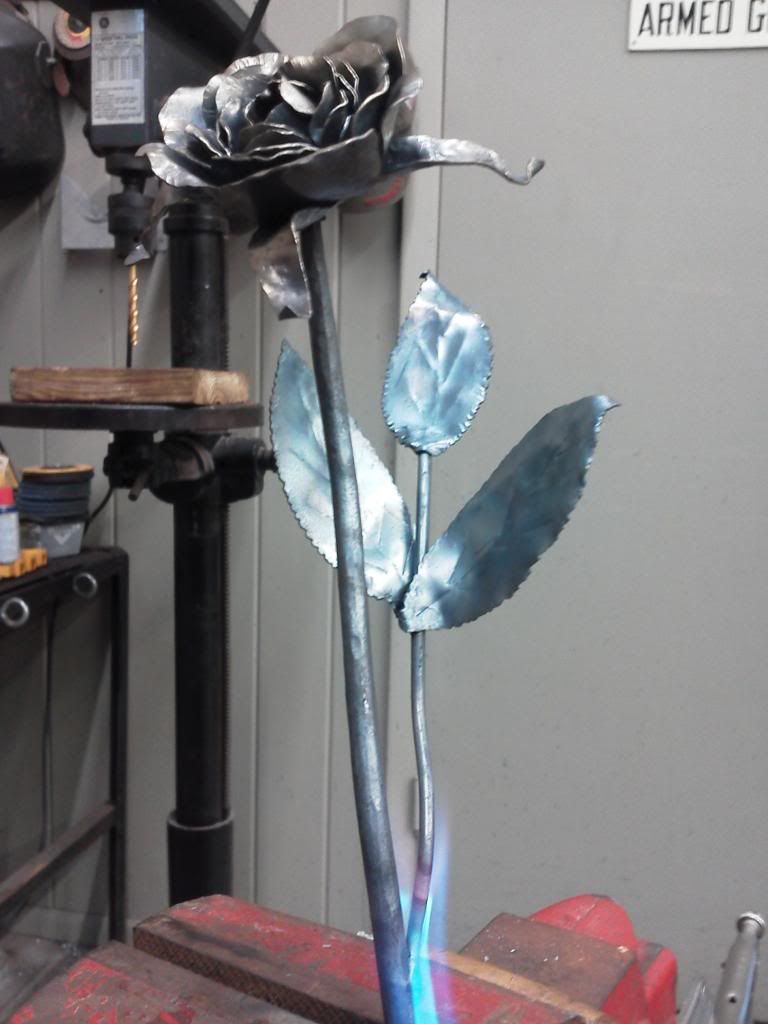
the brass brush work added
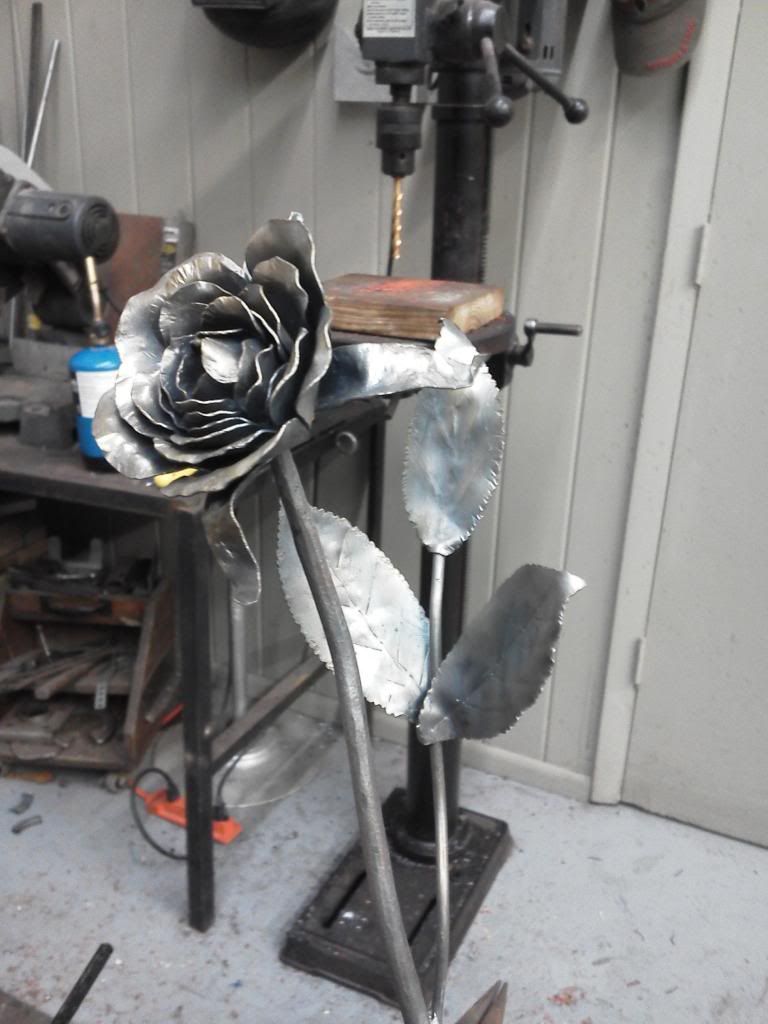
And finished
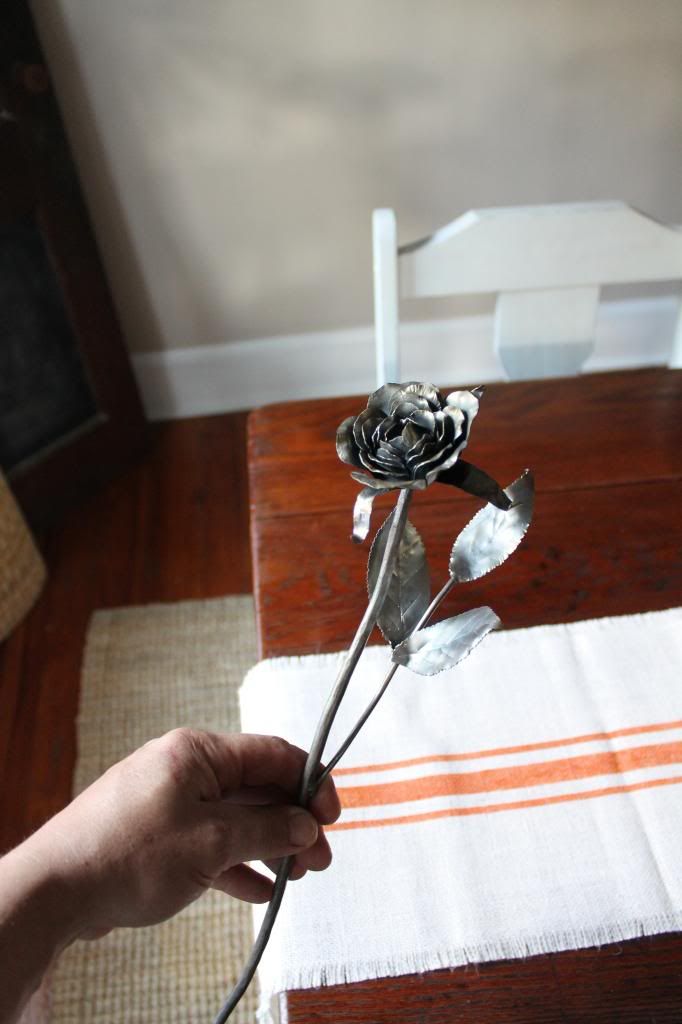
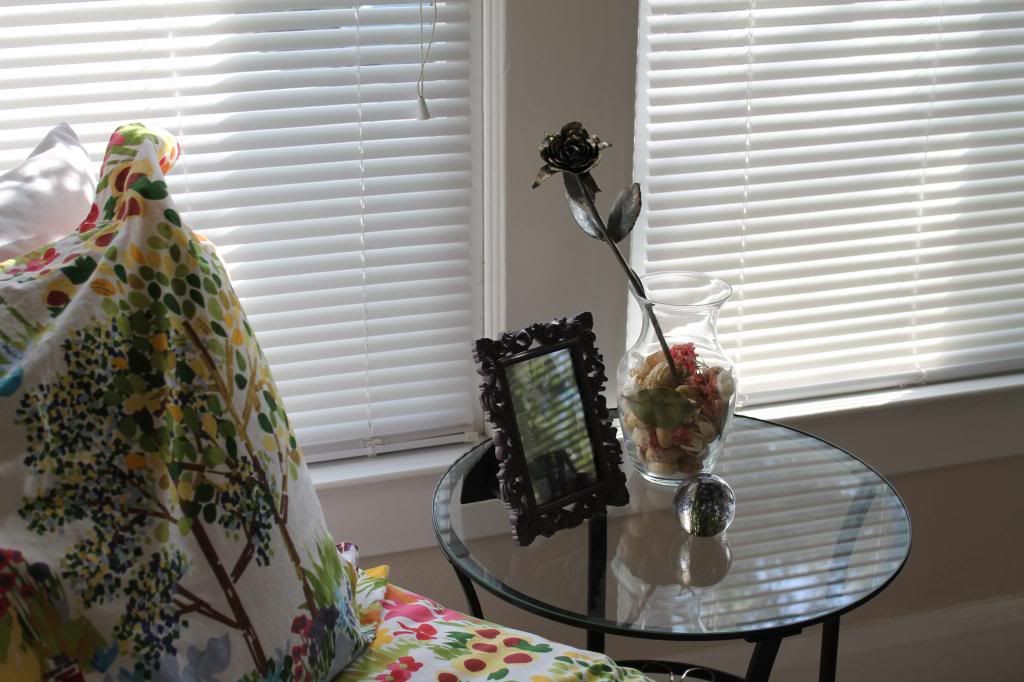
My wife decided that this was going to be her rose...I explained how I needed it as a display for the booth this weekend and put it in the pile of stuff thats going to be taken to market. When I came home later that afternoon she had reclaimed it... What are you gonna do.??? woman had my steel rose for a few hours and its already living in popuri... :headscrat
Well, I have to admit she styled it nicely
Allright, that completes that project so on to the next.
Thanks again for the comments! They are much appreciated and encouraging.
JP
I feel bad that Im getting such praise for an unfinished project though.
Sunday, I finished the leaves and stem work so here is the update to the rose I promised.
So same 22 guage
Cut out rough leaf pattern
Marked the veins with a sharpy

Perform the next few steps on a soft peice of wood. It will allow the metal to sink and expand when struck and will allow it to concave into itself a little bit.
I mark the back of my leaves because the technique I have developed for getting them life like looks better if you build them from the backside.
Use a dull/rounded fuller (look in the first post for detailed info on fullers/fullering) and lightly run your marks. Rose leafs viens are staggered and the center line gets lighter towards the tip of the leaf.

when your done it will look something like this

now the cool part...simply flip them over...and...

At this point i go to the belt sander and put the exact shape into each leaf, and then use the edge of the belt to add the jagged edegs that rose leafs have.

Now to soften the leaves use the ball pein hammer and gently create the countour and smooth out the main ridges. I like to flip them over and do each side a few times. Finishing with my topside. Remember your going to have the torch work to get the flow and curves you want so this step is really about getting the veins and edges a life like as possible. Nothing ruins a flower like crappy unrealistic leaves.

I use 1/8" round rod to make the leaves stem and lay it all out to adjust for length and placement. Then cut the stem at an angle and spot weld to the main stem. The leaves are spot welded from the back to the rod as well. I always overhang a little bit of the leaf at the bottom so you can wrap it around the stem and really blend its origin into the metal instead of it just laying on top of it. Use a dremel or other sander/grinder and blend the stem welds and the back of the leaves to as minimal as possible.

torch work done, overlap done, and the shape finished

the brass brush work added

And finished

My wife decided that this was going to be her rose...I explained how I needed it as a display for the booth this weekend and put it in the pile of stuff thats going to be taken to market. When I came home later that afternoon she had reclaimed it... What are you gonna do.??? woman had my steel rose for a few hours and its already living in popuri... :headscrat
Well, I have to admit she styled it nicely


Allright, that completes that project so on to the next.
Thanks again for the comments! They are much appreciated and encouraging.
JP
Education through restoration thread link:
http://www.fsjnetwork.com/forum/viewtop ... =12&t=1366
Blacksmithing thread link:
http://www.fsjnetwork.com/forum/viewtop ... f=6&t=1381
http://www.fsjnetwork.com/forum/viewtop ... =12&t=1366
Blacksmithing thread link:
http://www.fsjnetwork.com/forum/viewtop ... f=6&t=1381
-
Florida83FSJCherokee
Topic author - Posts: 196
- Joined: Sat Mar 09, 2013 7:53 pm
- Location: Lakeland , Central Florida
Re: Blacksmith forging project thread idea (pic heavy)
Doghouse Update for mid October.
This one will be fun. Theres a cool Chef cleaver with a new handling process as well as the exciting news that the rasp steel mystery is finally solved.
There is also a rather complex but satisfying attempt at forging a Calla Lilly Plant. Ha! yes, I said plant.
Before the fun projects I would like to update the metalurgy information just in case someone is actually using my trials to build their own blades.
Here is the most current and the most accurate process and tolerances that Doghouse Forge has learned and applied to date:
The steel mystery finally came to an end and Im happy to report that the rasp steel couldnt be more user friendly for knife making. (aside from being one of the hardest possible alloys)
Its W-2 blend steel. Its similar to W-1 except thie alloy blend uses vanadium and tungsten. Im not positive as to the exact amount since he wouldnt tell me, but it has to be somewhere between .1 and .25% in order to qualify as W-2. Its a very common steel used in file making and is rather difficult to purchase as straight bar w-2 so my seemingly endless rasp pile is a great resource. The properties are very similar to 1095 carbon steel, which is the most common knife making steel.
So real quick, some steel label education. Its sad that Im just now understanding this stuff but I guess mild steel isnt really something you worry about the content for if its simply for creating horseshoes.
What do the letters and numbers stand for???
I have only started to learn this stuff so this is the basic into that i have been given. As I educate myself and learn more I will hopefully be able to use different steels with a proper understanding of their properties.
The W stands for water hardening steels, the O stand for oil hardening, and the A steels are air hardening. the A steels are the deepest hardening becuase they never really stop harding.
The numbers stand for a lot of different things but for this reference Im just going to break down the basics.
1 indicates carbon steel 1XXXX
4 indicates molybdenum steel 4XXXX
5 indicates chromium steel 5XXXX
6 indicates chrome vanadium steel 6XXXX
8 indicates nickel chromium molybdenum, steel 8XXXX
9 indicates silicon manganese steel 6XXXX
The second number indicates any additional elements that affect the steels properties.
the third and fouth give the carbon content of the steel
So as an example: a very common tool steel is 1095 -
this steel is a carbon steel with no additional elements and 95% carbon content.
If by chance the steels number was 1195 it tell you that it has an additive.
This number would mean that its a carbon steel, with sulfur added, and 95% carbon. I unfortunatly dont know what every number for aditional elemenst is but at least when Im ordering or finding steel the what and how will be a little clearer to understand. Several cahrts are available online that discuss this method for lableing steel in great depth.
As for the tempering, anneling, and hardening the process is the simplest and easiest with water hardend steels.
here is a list with the particular properties and tolerances for W-2 carbon steel:
Treatment Temperature Range Cooling/Quenching:
Forging
1700-1900° F
Heat slowly to maximum temperature.
Forging should begin as soon as the section is uniformly heated through.
Annealing
1400-1450° F
Cool slowly in the furnace at a maximum rate of 50° F per hour/s..
Protect against surface decarburization by pack-annealing. Hold at temperature for 1 hour.
Stress Relieving
1200-1250° F
Cool slowly in air.
Stress relieve after rough machining
Preheating
1200-1250° F
Preheat time in furnace is ¾ Hr. per inch of thickness
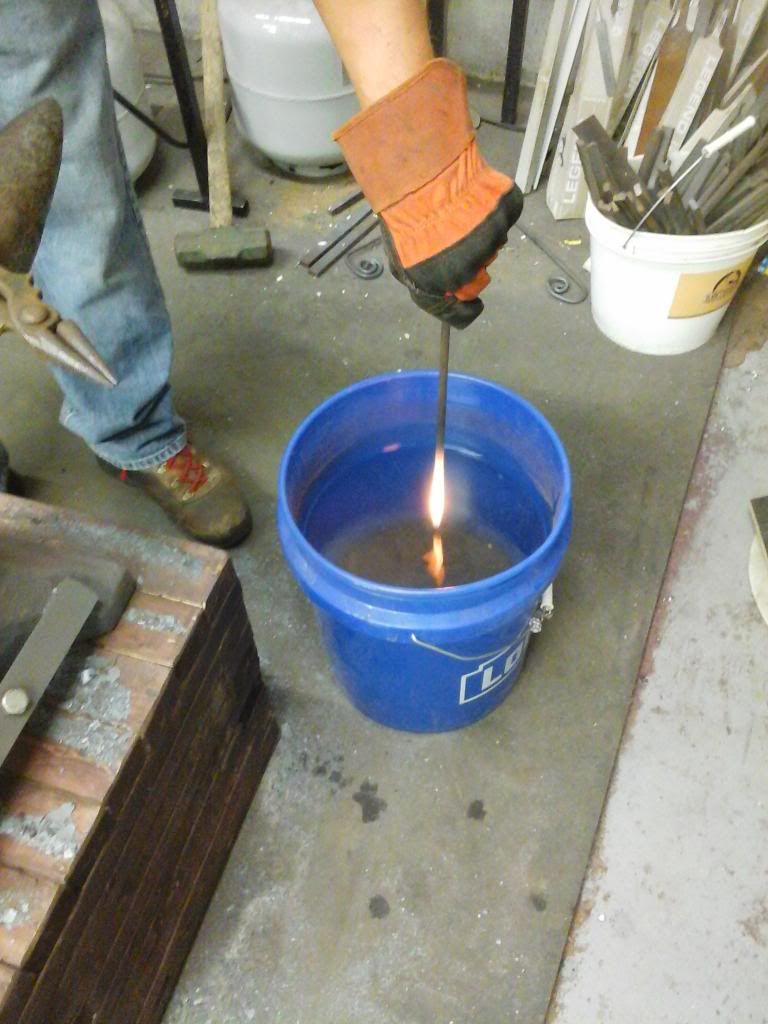
Hardening
1375-1450° F
Quench In water or in a brine solution immediatly upon removal from critical temp.
Tempering
Recommended temperature is 350-550° F
Temper immediately after hardening and quenching..
recommended soak time is 2 hours per inch of thickness.
The tempering scale to determine the rockwell hardness upon completion of the low heat soak looks like this:
Rockwell hardness by definaition is defined by wikipedia - The Rockwell scale is a hardness scale based on indentation hardness of a material. The Rockwell test determines the hardness by measuring the depth of penetration of an indenter under a large load compared to the penetration made by a preload
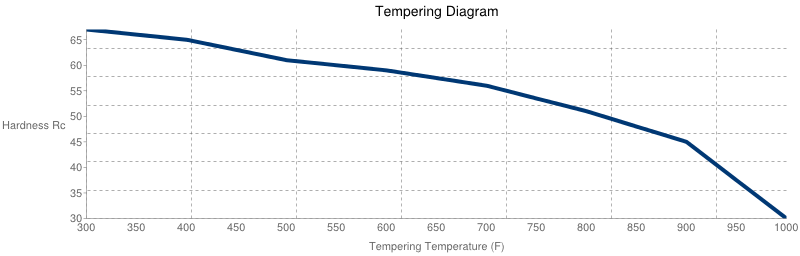
tempering in rockwell hardness by temp/saturation is as follows:
Quenched at 1450deg - as quenched 67HRC
Quenched at 1450deg - at 300deg - 64HRC
Quenched at 1450deg - at 400deg - 61HRC
Quenched at 1450deg - at 500deg - 59HRC
Quenched at 1450deg - at 600deg - 55HRC
Now understanding whats listed above and actually being able to calibrate it takes more than the forge, water bucket, and oven. Thats why the knife makers have furnaces/kilns to do the treating process. My mentor has a time controlled programable kiln for his blades and i see now why its such an important part of his process.
Here's a chart with the temperature to color relationship. Its not as accurate as a thermometer but at least it will get you in the ball park.
So the process for the cleaver that will be posted next used this information and was adhered to as closely as I was able to achieve. Since I do a "mixed forge/stock removal" blade build, instead of a "stock removal" blade I take a temper after the initial forging and hardening before i cut out the finished shape on the band saw. This extra tempering really made the metal easier for the band saw to handle and the cut time was noticably shortend. It also made the initial grinding and shaping much faster. Once the blade has reached the thickness and shape I looking for the blank is tempered again before the final edge is ground.
So thats where the science is at in the Doghouse as of October 2013. Hopefully ill read this post in 6 months and say "man you left out a ton of steps to make it easier and better" but at least for now Im producing a quality blade that has it roots in a solid build system.
The next thing to learn is how to establish a good differential tempering so I can harden the cutting edge and soften the spine at the same time. This is gonna prove needed when i make the longer, super thin fillet knives I have in mind. Flexible and rock hard will prove to be a tricky combo in sure.
Ok, no more boring technical stuff and on to the fun photo filled build post.
Thanks
JP
This one will be fun. Theres a cool Chef cleaver with a new handling process as well as the exciting news that the rasp steel mystery is finally solved.
There is also a rather complex but satisfying attempt at forging a Calla Lilly Plant. Ha! yes, I said plant.
Before the fun projects I would like to update the metalurgy information just in case someone is actually using my trials to build their own blades.
Here is the most current and the most accurate process and tolerances that Doghouse Forge has learned and applied to date:
The steel mystery finally came to an end and Im happy to report that the rasp steel couldnt be more user friendly for knife making. (aside from being one of the hardest possible alloys)
Its W-2 blend steel. Its similar to W-1 except thie alloy blend uses vanadium and tungsten. Im not positive as to the exact amount since he wouldnt tell me, but it has to be somewhere between .1 and .25% in order to qualify as W-2. Its a very common steel used in file making and is rather difficult to purchase as straight bar w-2 so my seemingly endless rasp pile is a great resource. The properties are very similar to 1095 carbon steel, which is the most common knife making steel.
So real quick, some steel label education. Its sad that Im just now understanding this stuff but I guess mild steel isnt really something you worry about the content for if its simply for creating horseshoes.
What do the letters and numbers stand for???
I have only started to learn this stuff so this is the basic into that i have been given. As I educate myself and learn more I will hopefully be able to use different steels with a proper understanding of their properties.
The W stands for water hardening steels, the O stand for oil hardening, and the A steels are air hardening. the A steels are the deepest hardening becuase they never really stop harding.
The numbers stand for a lot of different things but for this reference Im just going to break down the basics.
1 indicates carbon steel 1XXXX
4 indicates molybdenum steel 4XXXX
5 indicates chromium steel 5XXXX
6 indicates chrome vanadium steel 6XXXX
8 indicates nickel chromium molybdenum, steel 8XXXX
9 indicates silicon manganese steel 6XXXX
The second number indicates any additional elements that affect the steels properties.
the third and fouth give the carbon content of the steel
So as an example: a very common tool steel is 1095 -
this steel is a carbon steel with no additional elements and 95% carbon content.
If by chance the steels number was 1195 it tell you that it has an additive.
This number would mean that its a carbon steel, with sulfur added, and 95% carbon. I unfortunatly dont know what every number for aditional elemenst is but at least when Im ordering or finding steel the what and how will be a little clearer to understand. Several cahrts are available online that discuss this method for lableing steel in great depth.
As for the tempering, anneling, and hardening the process is the simplest and easiest with water hardend steels.
here is a list with the particular properties and tolerances for W-2 carbon steel:
Treatment Temperature Range Cooling/Quenching:
Forging
1700-1900° F
Heat slowly to maximum temperature.
Forging should begin as soon as the section is uniformly heated through.
Annealing
1400-1450° F
Cool slowly in the furnace at a maximum rate of 50° F per hour/s..
Protect against surface decarburization by pack-annealing. Hold at temperature for 1 hour.
Stress Relieving
1200-1250° F
Cool slowly in air.
Stress relieve after rough machining
Preheating
1200-1250° F
Preheat time in furnace is ¾ Hr. per inch of thickness
Hardening
1375-1450° F
Quench In water or in a brine solution immediatly upon removal from critical temp.
Tempering
Recommended temperature is 350-550° F
Temper immediately after hardening and quenching..
recommended soak time is 2 hours per inch of thickness.
The tempering scale to determine the rockwell hardness upon completion of the low heat soak looks like this:
Rockwell hardness by definaition is defined by wikipedia - The Rockwell scale is a hardness scale based on indentation hardness of a material. The Rockwell test determines the hardness by measuring the depth of penetration of an indenter under a large load compared to the penetration made by a preload

tempering in rockwell hardness by temp/saturation is as follows:
Quenched at 1450deg - as quenched 67HRC
Quenched at 1450deg - at 300deg - 64HRC
Quenched at 1450deg - at 400deg - 61HRC
Quenched at 1450deg - at 500deg - 59HRC
Quenched at 1450deg - at 600deg - 55HRC
Now understanding whats listed above and actually being able to calibrate it takes more than the forge, water bucket, and oven. Thats why the knife makers have furnaces/kilns to do the treating process. My mentor has a time controlled programable kiln for his blades and i see now why its such an important part of his process.
Here's a chart with the temperature to color relationship. Its not as accurate as a thermometer but at least it will get you in the ball park.

So the process for the cleaver that will be posted next used this information and was adhered to as closely as I was able to achieve. Since I do a "mixed forge/stock removal" blade build, instead of a "stock removal" blade I take a temper after the initial forging and hardening before i cut out the finished shape on the band saw. This extra tempering really made the metal easier for the band saw to handle and the cut time was noticably shortend. It also made the initial grinding and shaping much faster. Once the blade has reached the thickness and shape I looking for the blank is tempered again before the final edge is ground.
So thats where the science is at in the Doghouse as of October 2013. Hopefully ill read this post in 6 months and say "man you left out a ton of steps to make it easier and better" but at least for now Im producing a quality blade that has it roots in a solid build system.
The next thing to learn is how to establish a good differential tempering so I can harden the cutting edge and soften the spine at the same time. This is gonna prove needed when i make the longer, super thin fillet knives I have in mind. Flexible and rock hard will prove to be a tricky combo in sure.
Ok, no more boring technical stuff and on to the fun photo filled build post.
Thanks
JP
Education through restoration thread link:
http://www.fsjnetwork.com/forum/viewtop ... =12&t=1366
Blacksmithing thread link:
http://www.fsjnetwork.com/forum/viewtop ... f=6&t=1381
http://www.fsjnetwork.com/forum/viewtop ... =12&t=1366
Blacksmithing thread link:
http://www.fsjnetwork.com/forum/viewtop ... f=6&t=1381
-
Florida83FSJCherokee
Topic author - Posts: 196
- Joined: Sat Mar 09, 2013 7:53 pm
- Location: Lakeland , Central Florida
Re: Blacksmith forging project thread idea (pic heavy)
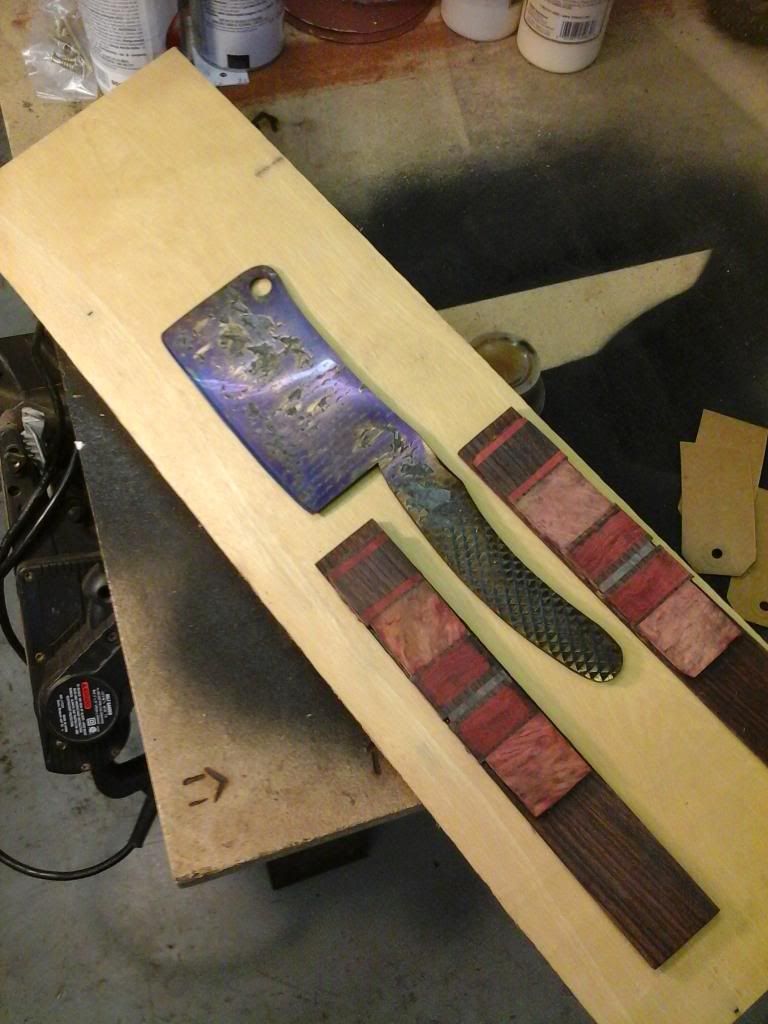
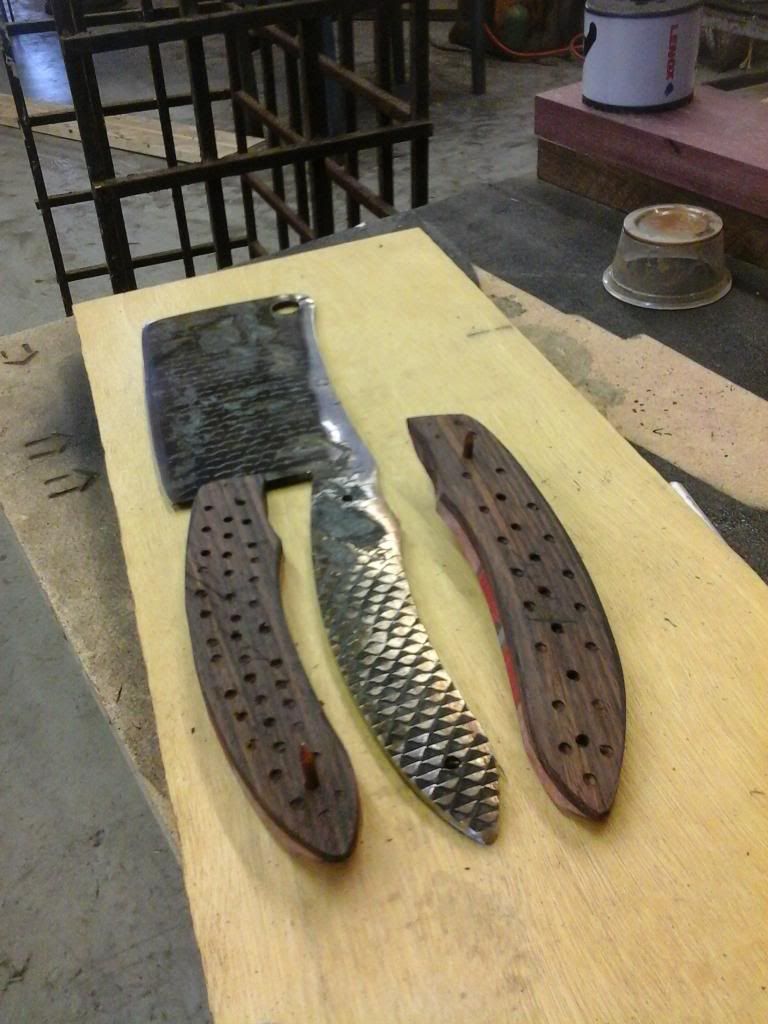
Forged Chef Cleaver:
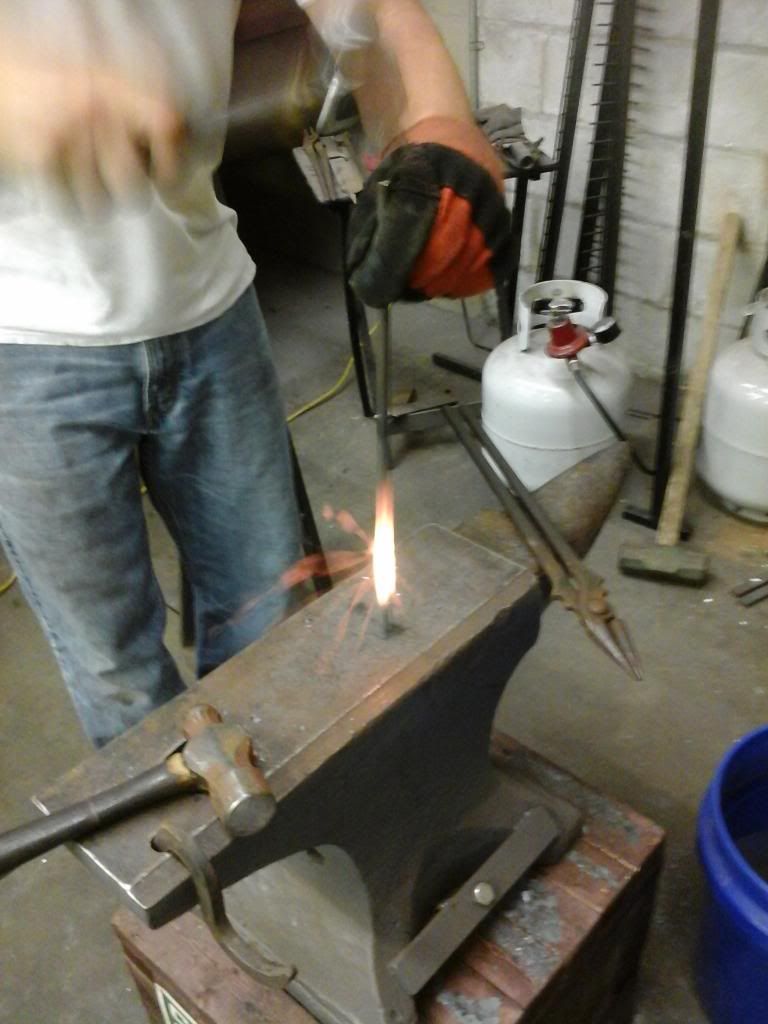
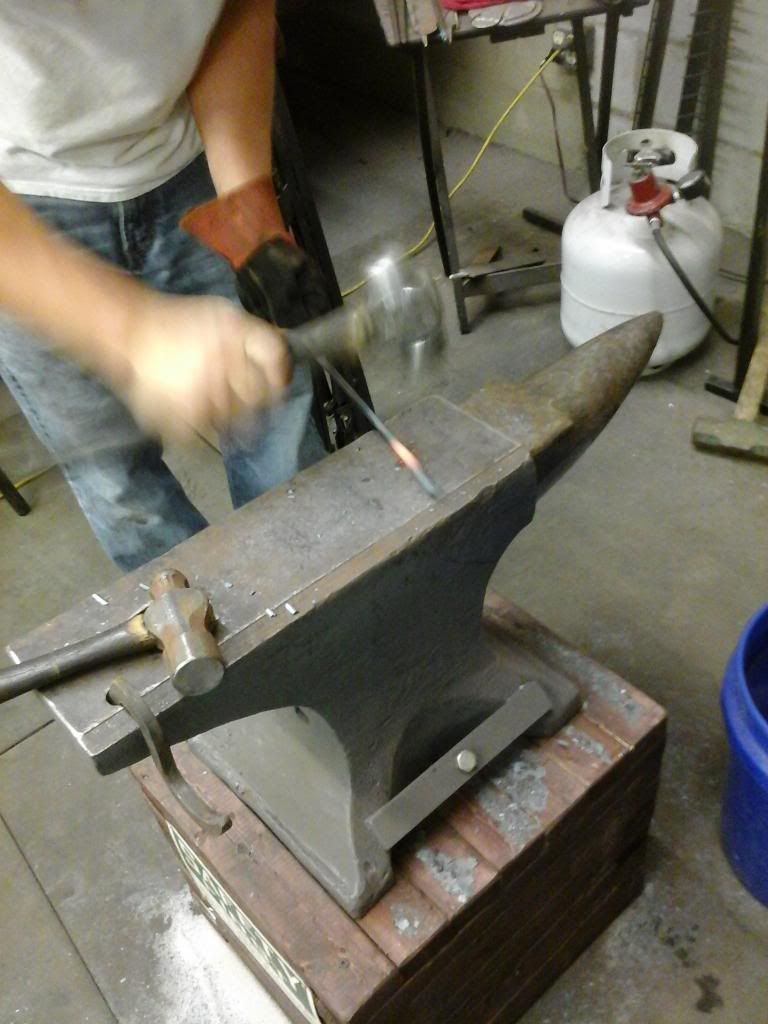
This is the truest "forged blade" that I have built so far. Aside from the tang this thing was hammerd to 1/16 "thickness and the initial cutting edge was forged into it as well. The upper draw at the forward most point of the spine was also forged. To accomplish this my buddy Jarrid and myself had to get a 2 man forging system going. He ran the 10lb sledge and acted as the power hammer and i worked the steel with both hands holding the tongs.
It took a little time to get the trust up and the rhythm established but once we got rollin this thing started to move across the anvil face. Jarrids not a blacksmith so a few side glanced sledge blows mared the surface to babdly to get the smooth blade I usually go for but this thing is mean! so a few good scars and forging marks suited it well.
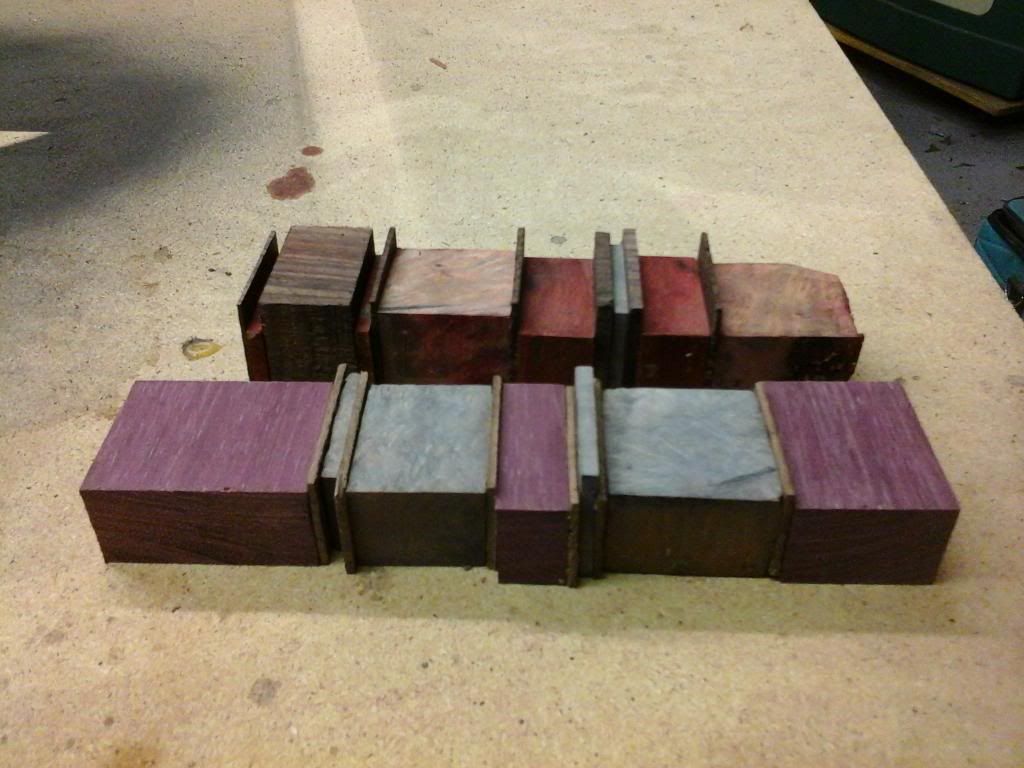
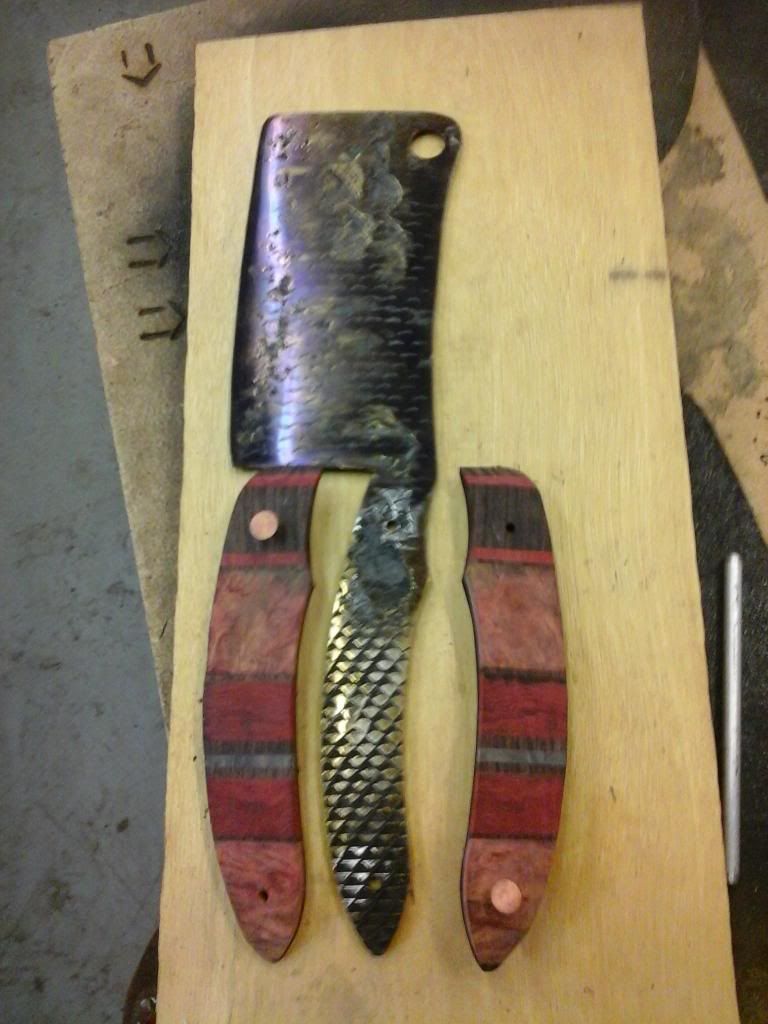
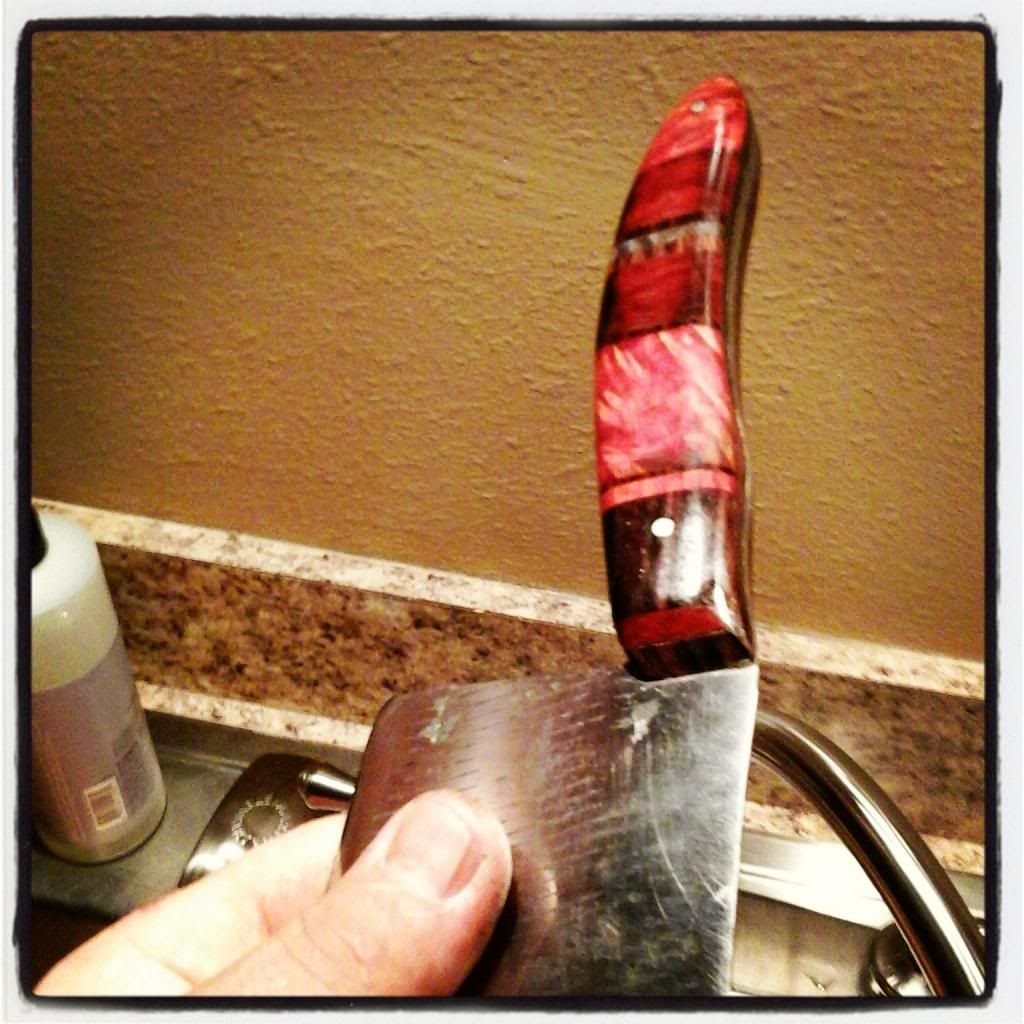
The other cool new addition to this Knife was the building of the "burled" handle laminate. Burls have no actuall grain pattern and because of that when polished they become almost 3-D.
Here's the start of the laminate process. The layout includes chunks of the redwood burl, different exotics, a small sliver of purple burl, and varied thicknesses of rosewood strips.
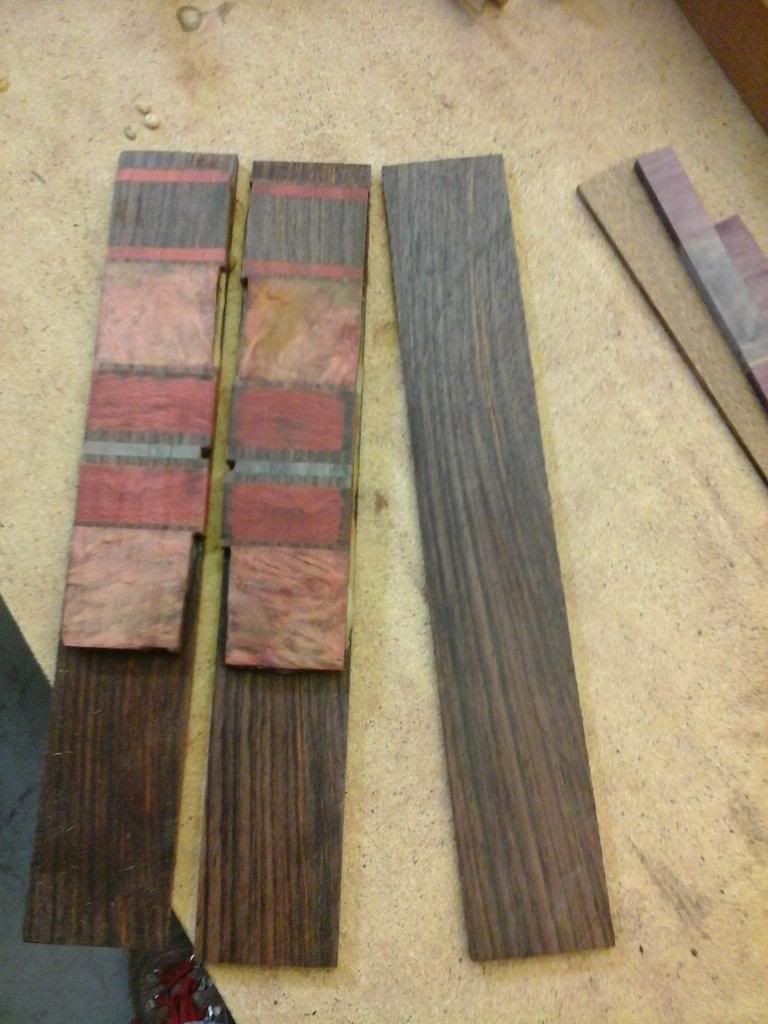
The pieces get glued and pressed together just like the cutting board builds and then the bandsaw is used to cut strips . I will not lie to you, it took me an hour! to get my band saw tuned up enough to cut straight even sections from the glued pieces. The drift allowance is hard to understand so one day Im gonna find somebody or a class to attend that will teach me about it. The bandsaw I have is 100% capable of resawing up to 14" boards but I wouldnt dare try it at this point.
Heres the tempered blank after its second round in the oven. I wish there was a way to get the finished tempering color to stay but its such a thin layer that it smudges and wont last. ( I actually learned that the thinness is the reason the color displayes the way it does. Its so thin that light passes through it causing the prism of color)
The laminate was attached to a 1/8th inch thick rosewood strip. The idea being the when the edges had all been blended together you wouldnt be able to see the difference between the laminates rosewood and the backing rosewood. Making the colored sections look as if they were imbedded in the rosewood itself.
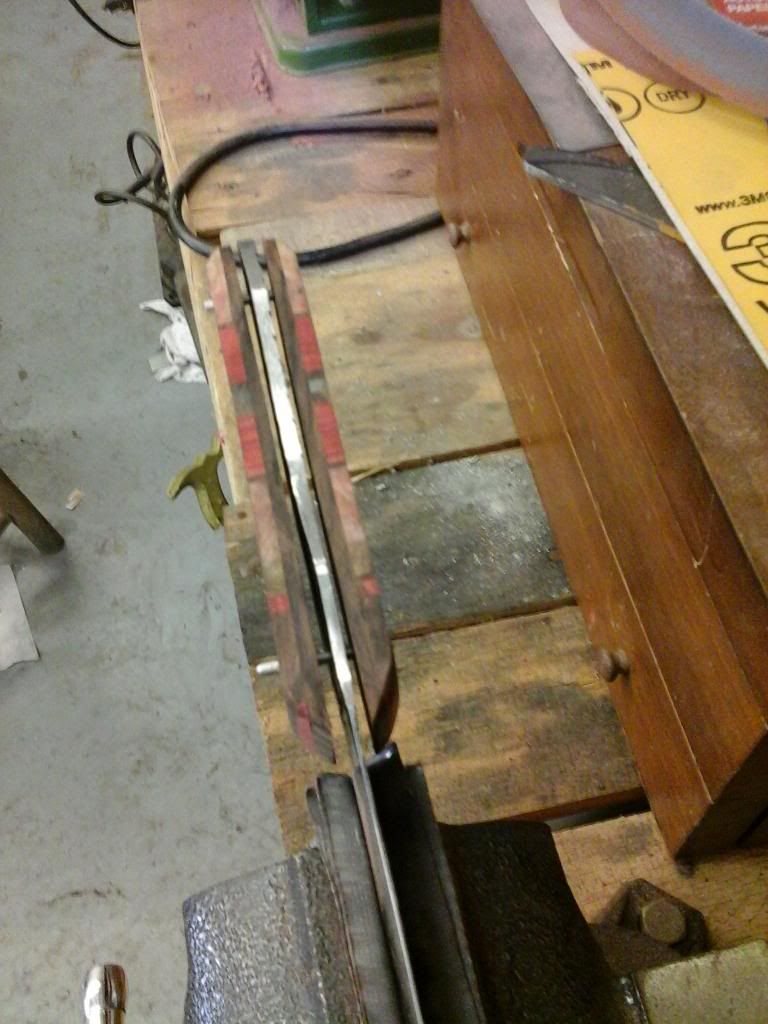
Handle process chaged at the Doghouse this last knife build. Instead of gluing a gross cut handle; then grinding the shape and pinning after the epoxy has cured, the new process is more traditional. The handle sides are ground to fit the tang. Then the inner layer is ported to alow better grip and adhesion from the epoxy. Once the fit is very close I drill out the tang. Its drilled one size larger than the pins. The handles are marked through the tang to insure alignment and then they are drilled out as well. once they are dry pinned i can grind and sand the remaining issues without worrying about overheating the epoxy. This also insures that if I slip up and mark my blade I can fix it before the handle is in the way.
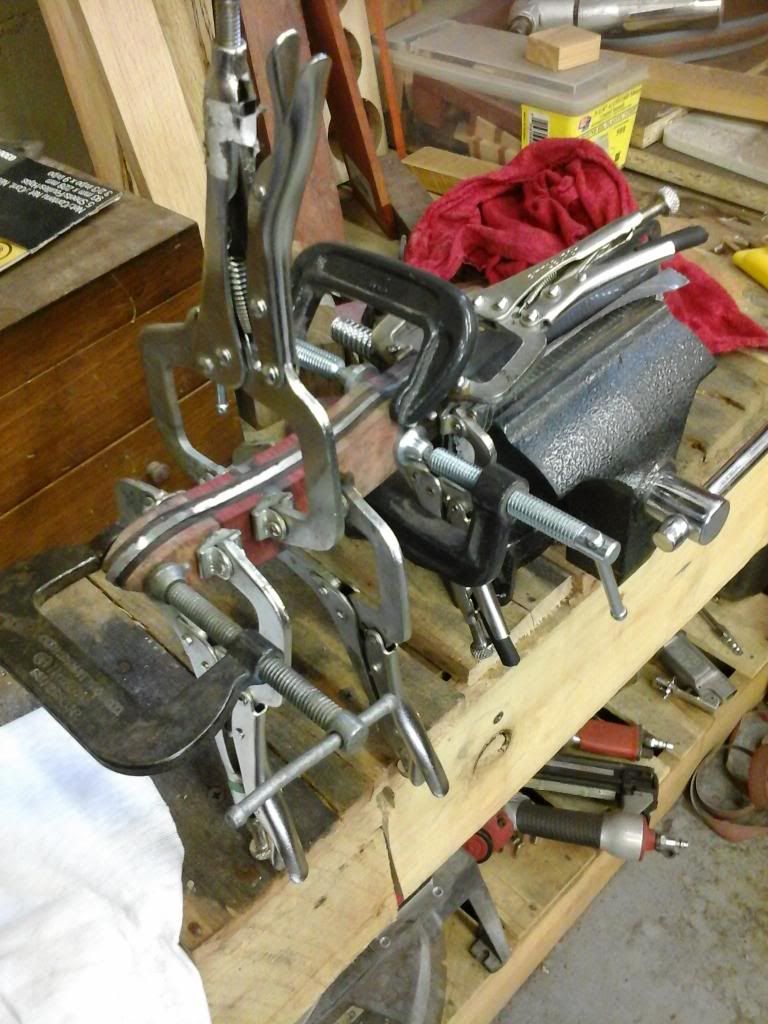
With the sides in place the extra lenght left in the pins alows me to slide the wooded sections back and forth while adding the epoxy to each side. Then they "AggiMethod" is applied and you find something else to do for the rest of the afternoon...
Before I leave for the day the knife gets removed and the epoxy overage gets sanded away. Since the handle work was already finished up to 120 grit before the assembly the knife looks almost finished right out of the vice.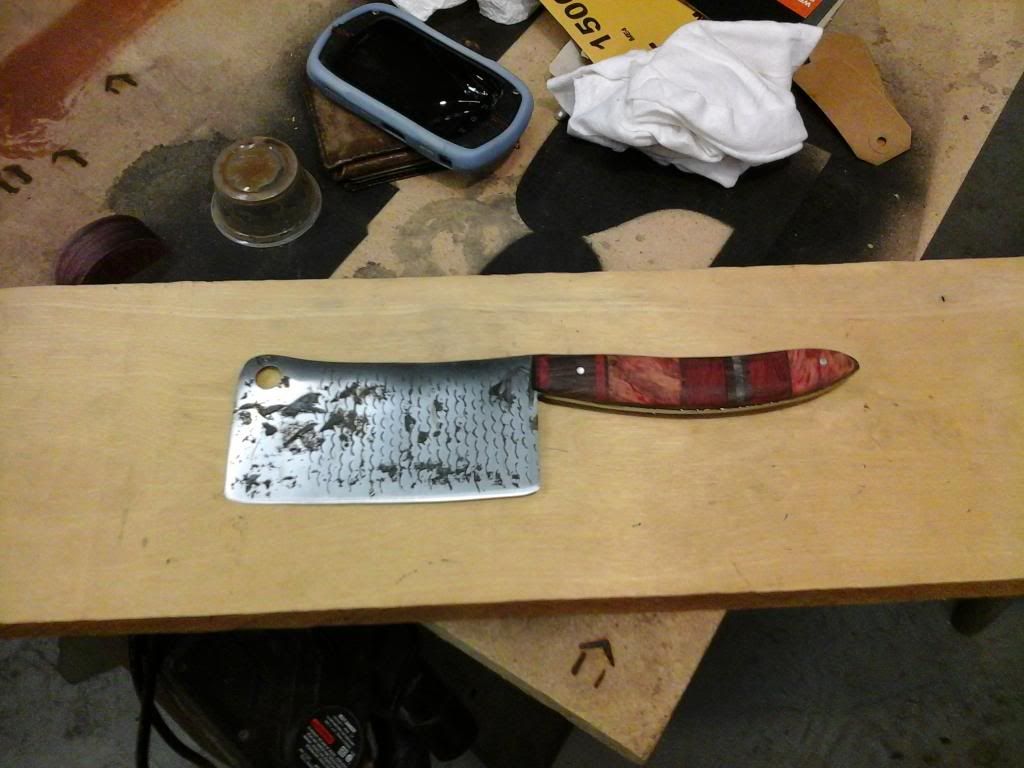
The rest is the same as the previous. The blade gets finished out to a razor edge and sanded up to 2000grit while the handle is brought to a smooth 400grit finish. The only new process at this point was that instead of using the "Watco butcher block sealer" I made my own finish with mineral oil and beeswax. This was recommended at the woodstore as a beautiful way to bring the depth out of the burl and still be food safe and natural. Id say it worked.
after one coat, no polishing...
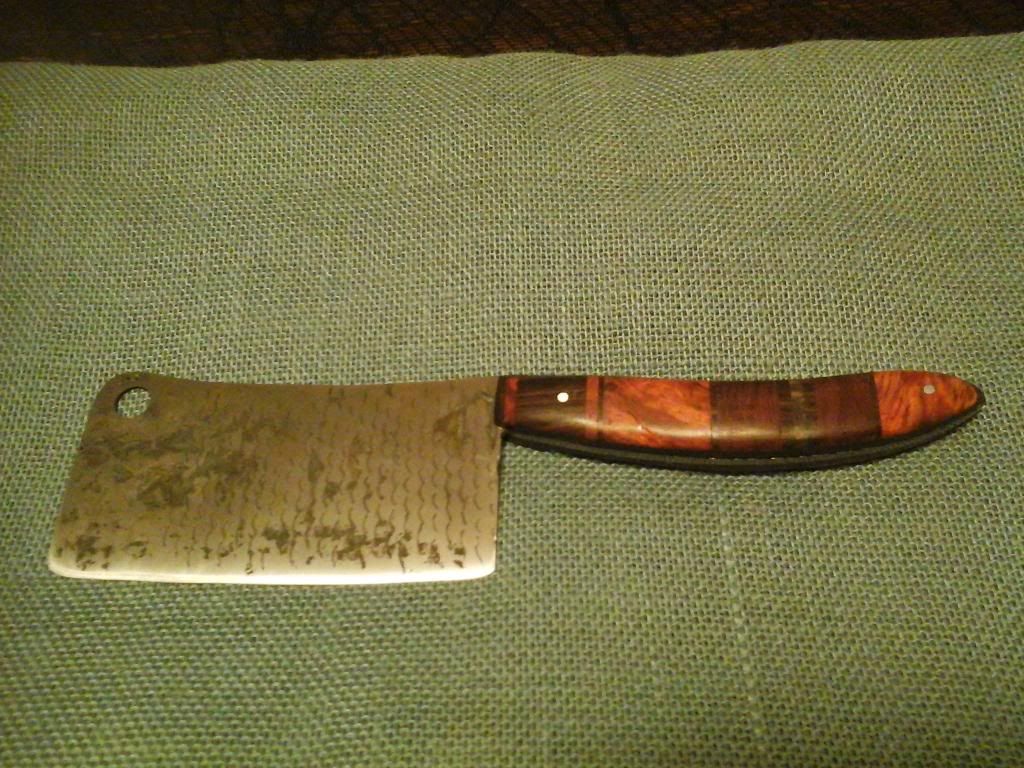
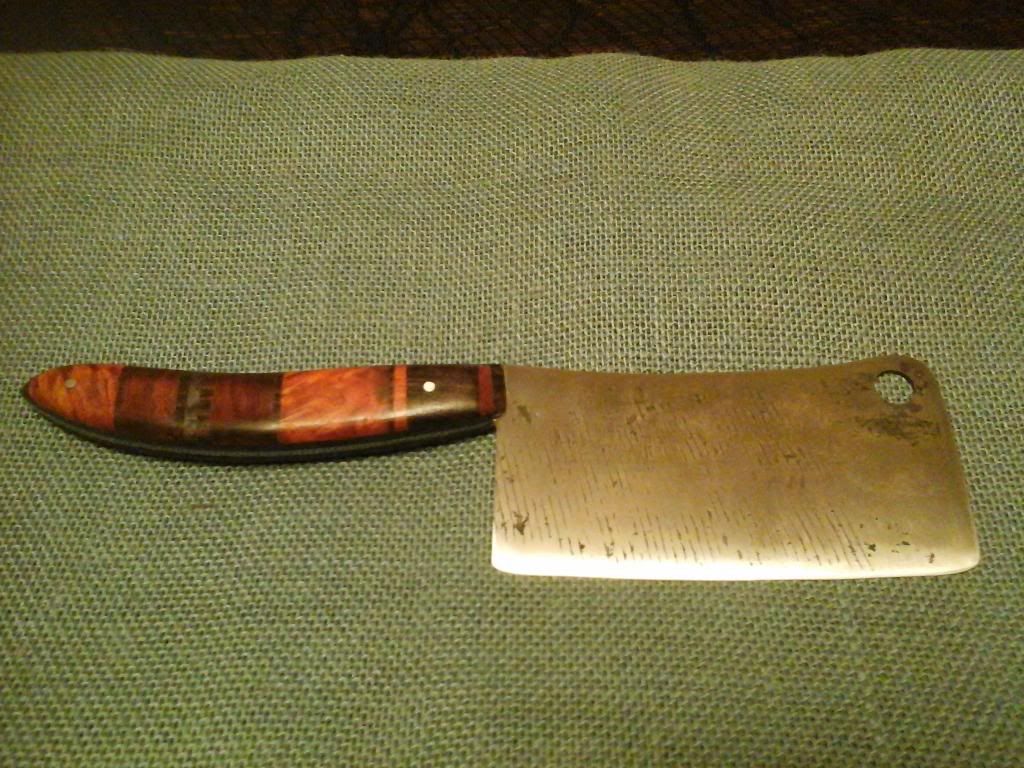
The mixture is 5 mineral to 1 beeswax, heated untill the wax is melted and blended. Applied with a rag and allowed to penetrate for 15 min. Then the excess is wiped away. The photo below is after the second coat had dried and been polished with a micro fiber cloth. DAMN! this stuff is rad! Smells good to!
So thats the latest knife build. I was supposed to be making it for someone but I havent handed it over yet... I just might keep it for myself!
Thanks
JP
Next post will be the Lilly plant, gonna start putting it together now.
This is the truest "forged blade" that I have built so far. Aside from the tang this thing was hammerd to 1/16 "thickness and the initial cutting edge was forged into it as well. The upper draw at the forward most point of the spine was also forged. To accomplish this my buddy Jarrid and myself had to get a 2 man forging system going. He ran the 10lb sledge and acted as the power hammer and i worked the steel with both hands holding the tongs.
It took a little time to get the trust up and the rhythm established but once we got rollin this thing started to move across the anvil face. Jarrids not a blacksmith so a few side glanced sledge blows mared the surface to babdly to get the smooth blade I usually go for but this thing is mean! so a few good scars and forging marks suited it well.
The other cool new addition to this Knife was the building of the "burled" handle laminate. Burls have no actuall grain pattern and because of that when polished they become almost 3-D.
Here's the start of the laminate process. The layout includes chunks of the redwood burl, different exotics, a small sliver of purple burl, and varied thicknesses of rosewood strips.

The pieces get glued and pressed together just like the cutting board builds and then the bandsaw is used to cut strips . I will not lie to you, it took me an hour! to get my band saw tuned up enough to cut straight even sections from the glued pieces. The drift allowance is hard to understand so one day Im gonna find somebody or a class to attend that will teach me about it. The bandsaw I have is 100% capable of resawing up to 14" boards but I wouldnt dare try it at this point.

Heres the tempered blank after its second round in the oven. I wish there was a way to get the finished tempering color to stay but its such a thin layer that it smudges and wont last. ( I actually learned that the thinness is the reason the color displayes the way it does. Its so thin that light passes through it causing the prism of color)
The laminate was attached to a 1/8th inch thick rosewood strip. The idea being the when the edges had all been blended together you wouldnt be able to see the difference between the laminates rosewood and the backing rosewood. Making the colored sections look as if they were imbedded in the rosewood itself.

Handle process chaged at the Doghouse this last knife build. Instead of gluing a gross cut handle; then grinding the shape and pinning after the epoxy has cured, the new process is more traditional. The handle sides are ground to fit the tang. Then the inner layer is ported to alow better grip and adhesion from the epoxy. Once the fit is very close I drill out the tang. Its drilled one size larger than the pins. The handles are marked through the tang to insure alignment and then they are drilled out as well. once they are dry pinned i can grind and sand the remaining issues without worrying about overheating the epoxy. This also insures that if I slip up and mark my blade I can fix it before the handle is in the way.


With the sides in place the extra lenght left in the pins alows me to slide the wooded sections back and forth while adding the epoxy to each side. Then they "AggiMethod" is applied and you find something else to do for the rest of the afternoon...


Before I leave for the day the knife gets removed and the epoxy overage gets sanded away. Since the handle work was already finished up to 120 grit before the assembly the knife looks almost finished right out of the vice.

The rest is the same as the previous. The blade gets finished out to a razor edge and sanded up to 2000grit while the handle is brought to a smooth 400grit finish. The only new process at this point was that instead of using the "Watco butcher block sealer" I made my own finish with mineral oil and beeswax. This was recommended at the woodstore as a beautiful way to bring the depth out of the burl and still be food safe and natural. Id say it worked.
after one coat, no polishing...


The mixture is 5 mineral to 1 beeswax, heated untill the wax is melted and blended. Applied with a rag and allowed to penetrate for 15 min. Then the excess is wiped away. The photo below is after the second coat had dried and been polished with a micro fiber cloth. DAMN! this stuff is rad! Smells good to!

So thats the latest knife build. I was supposed to be making it for someone but I havent handed it over yet... I just might keep it for myself!
Thanks
JP
Next post will be the Lilly plant, gonna start putting it together now.
Education through restoration thread link:
http://www.fsjnetwork.com/forum/viewtop ... =12&t=1366
Blacksmithing thread link:
http://www.fsjnetwork.com/forum/viewtop ... f=6&t=1381
http://www.fsjnetwork.com/forum/viewtop ... =12&t=1366
Blacksmithing thread link:
http://www.fsjnetwork.com/forum/viewtop ... f=6&t=1381
-
Florida83FSJCherokee
Topic author - Posts: 196
- Joined: Sat Mar 09, 2013 7:53 pm
- Location: Lakeland , Central Florida
Re: Blacksmith forging project thread idea (pic heavy)
So Ive been doing little, mild forge work at the market while i sit and talk to the folks coming by the booth. They seem to dig that something is actually being created right there at the market and it keeps me busy while I burn through a saturday morning.
Roses kept me busy the first couple weeks but I want something bigger and more technical to finish at this weeks market.
So the Calla Lilly came to mind.
Its one of those ideas that Ive been playing with the "how to accomplish that" thoughts for a while now and the time finally came just to jump in.
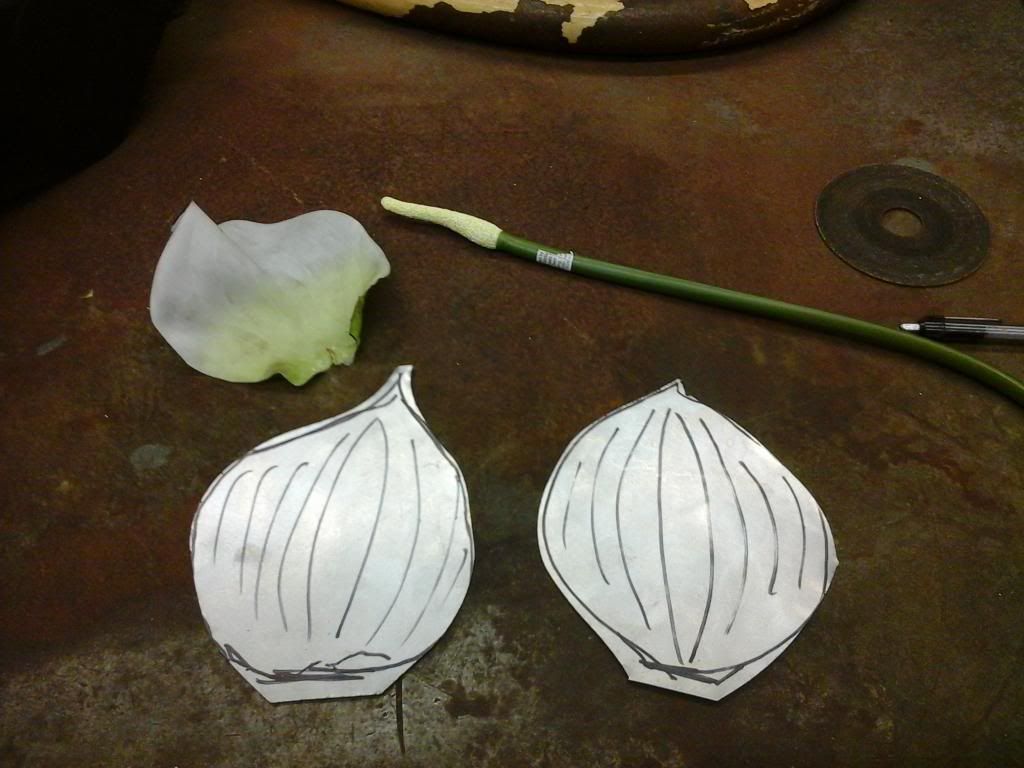
I started by disecting a fake calla lilly from the "Hobs Lobs".
The fabric was used to help me understand the pattern needed as a blank. (I tried this without the flower and failed , badly, several times.) Its wierd, because the lilly has the long drawn out bloom I thought the pattern would need a "tail" to accomodate it. Well it doesnt.
Fuller technique same as the rose leaves to give my viens life
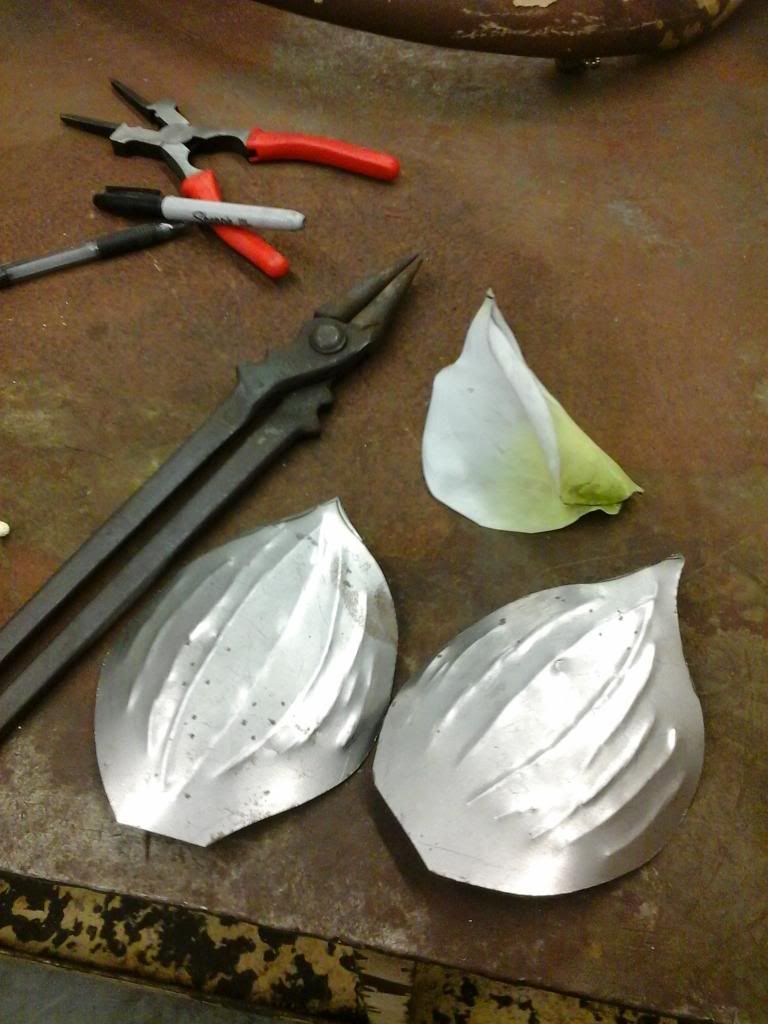
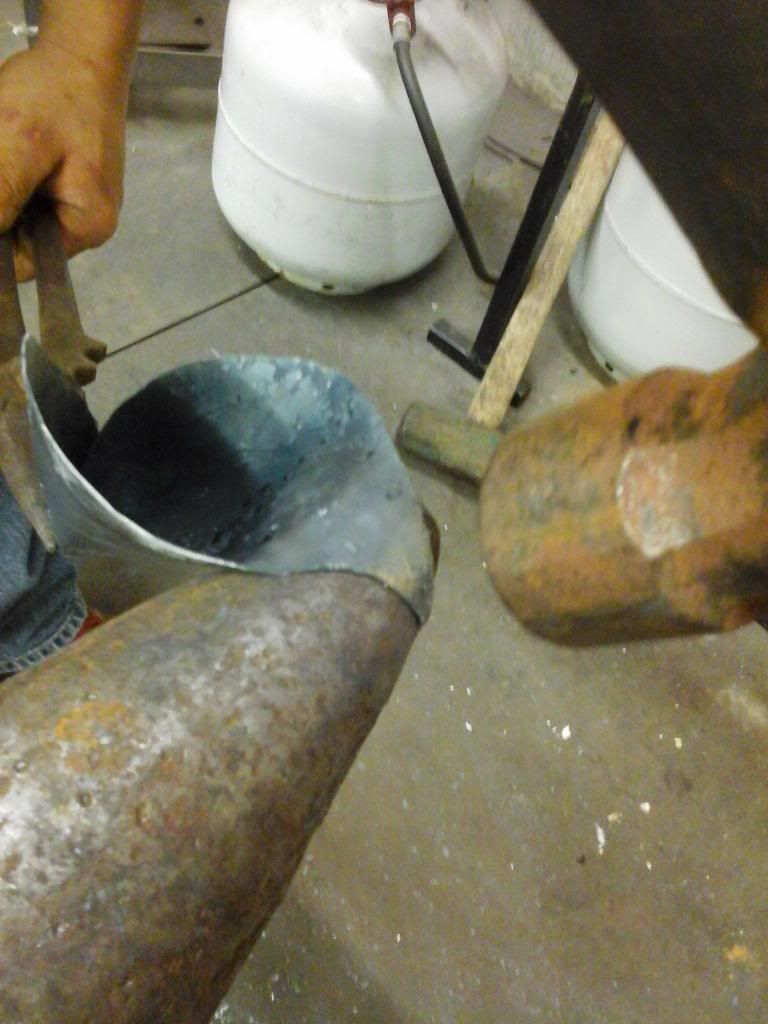
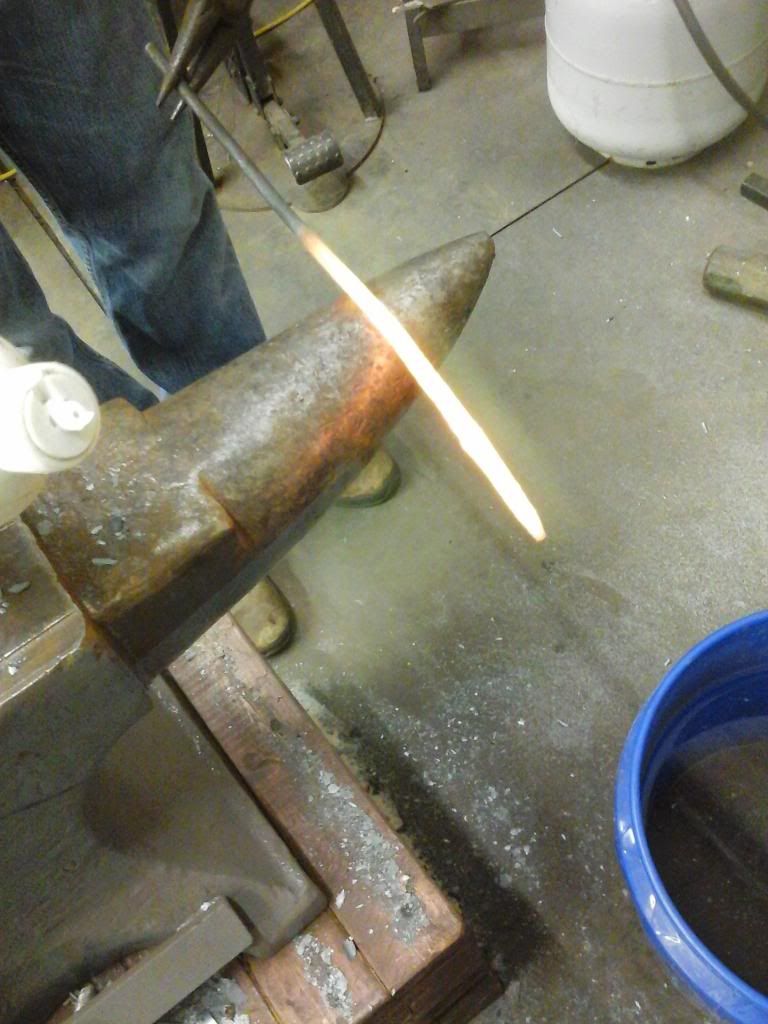
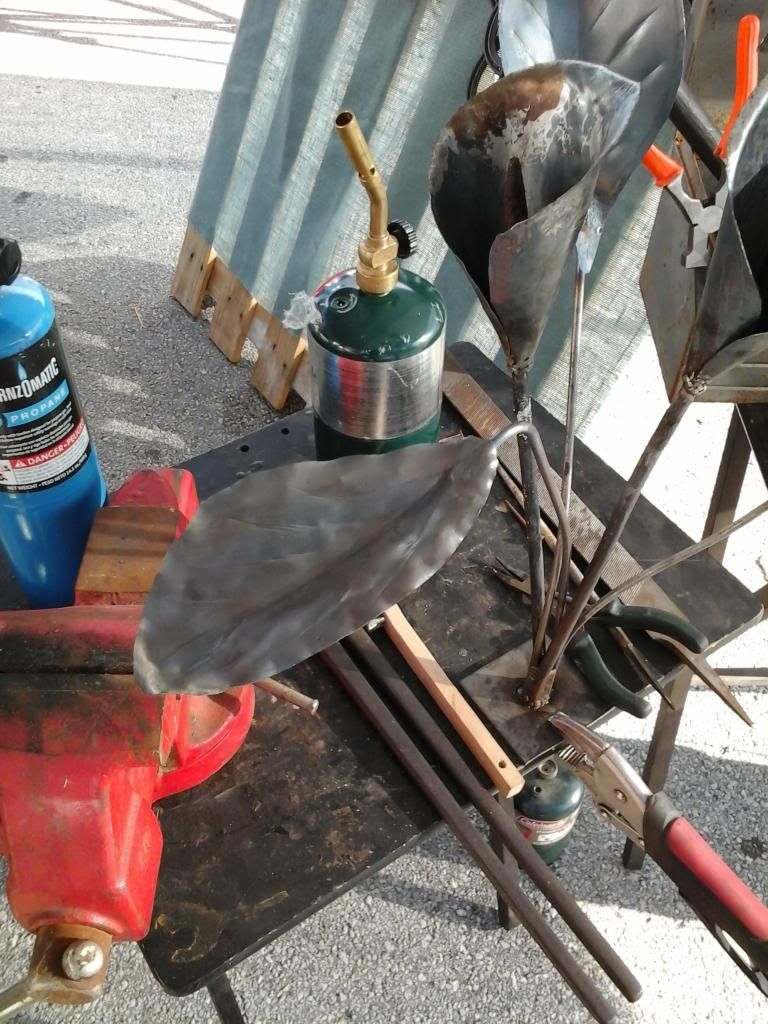
Using the round side of my rounding hammer and the face of the anvil as leverage I started to work the bend into the bloom.
then the horn was used to finish the radious.
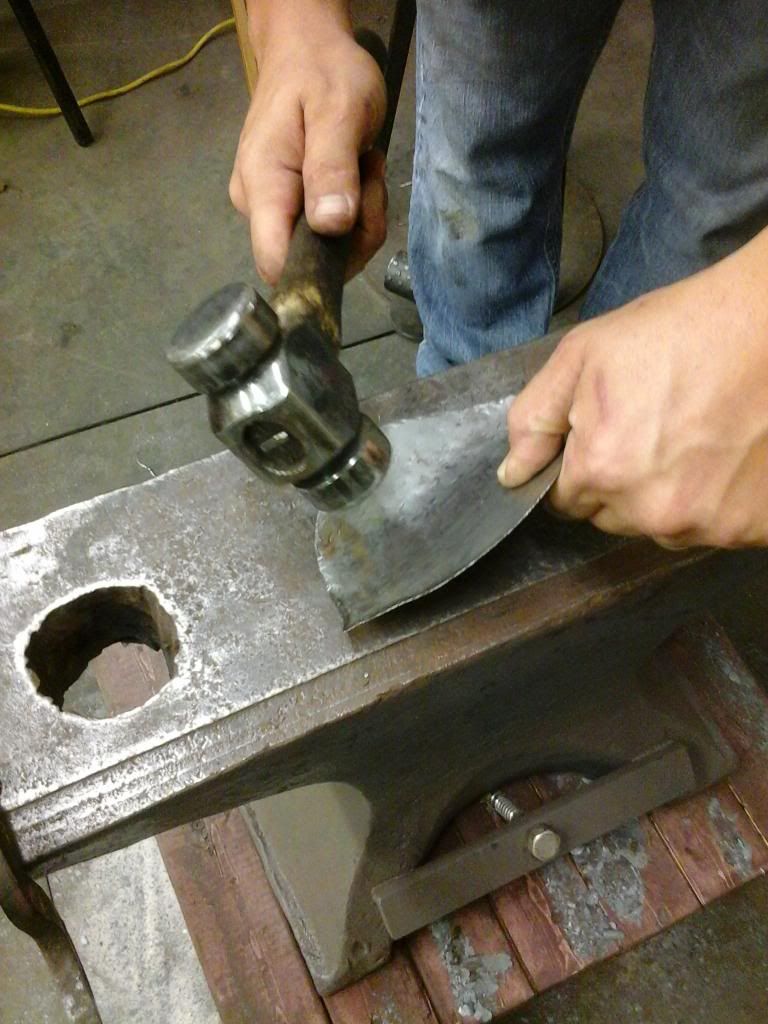
At this point i needed heat to turn the blooms sides into themselves and get the "rolling" effect i was after.
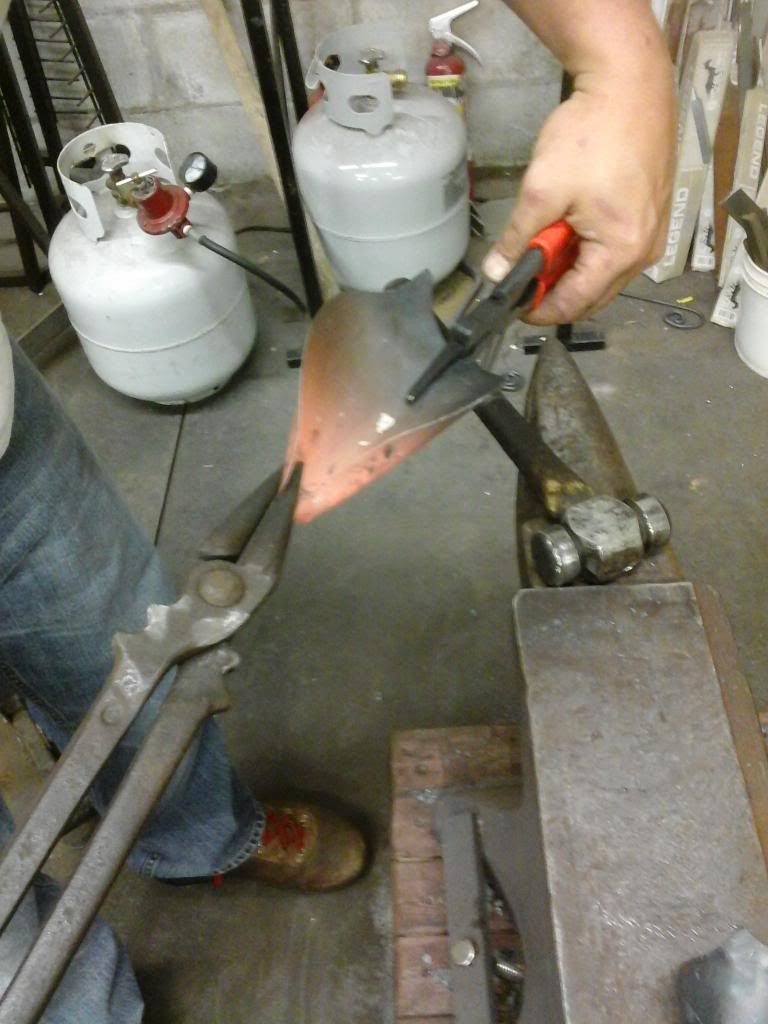
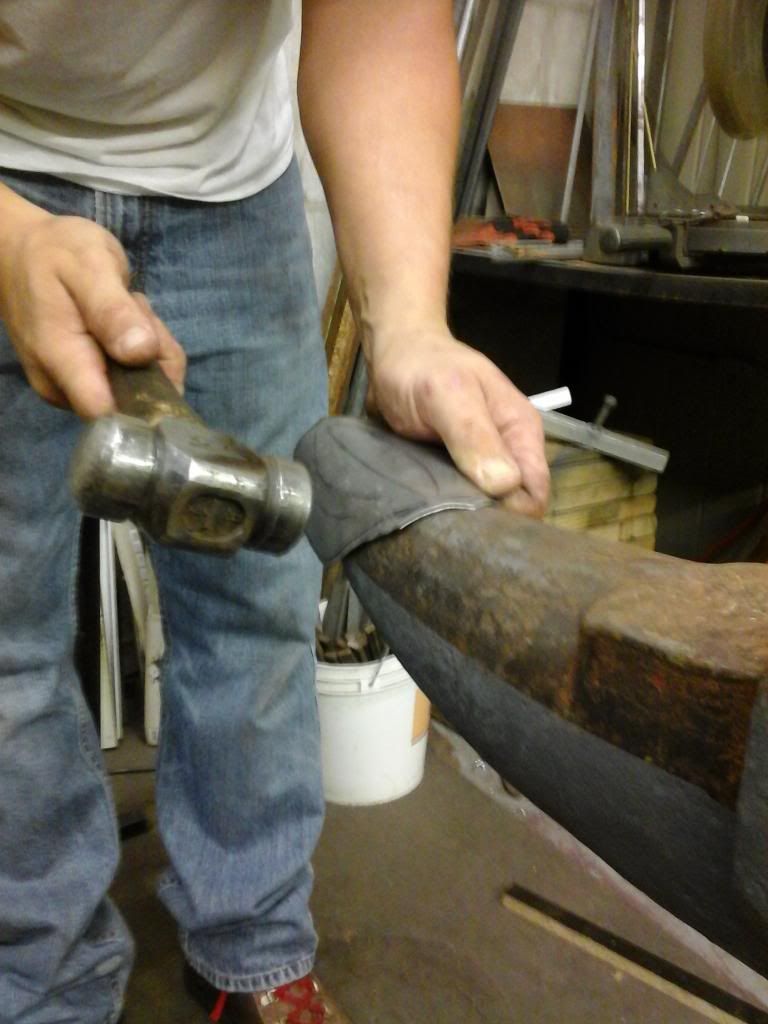
Use the hammer to glance light blows across the seem and tighten the connection
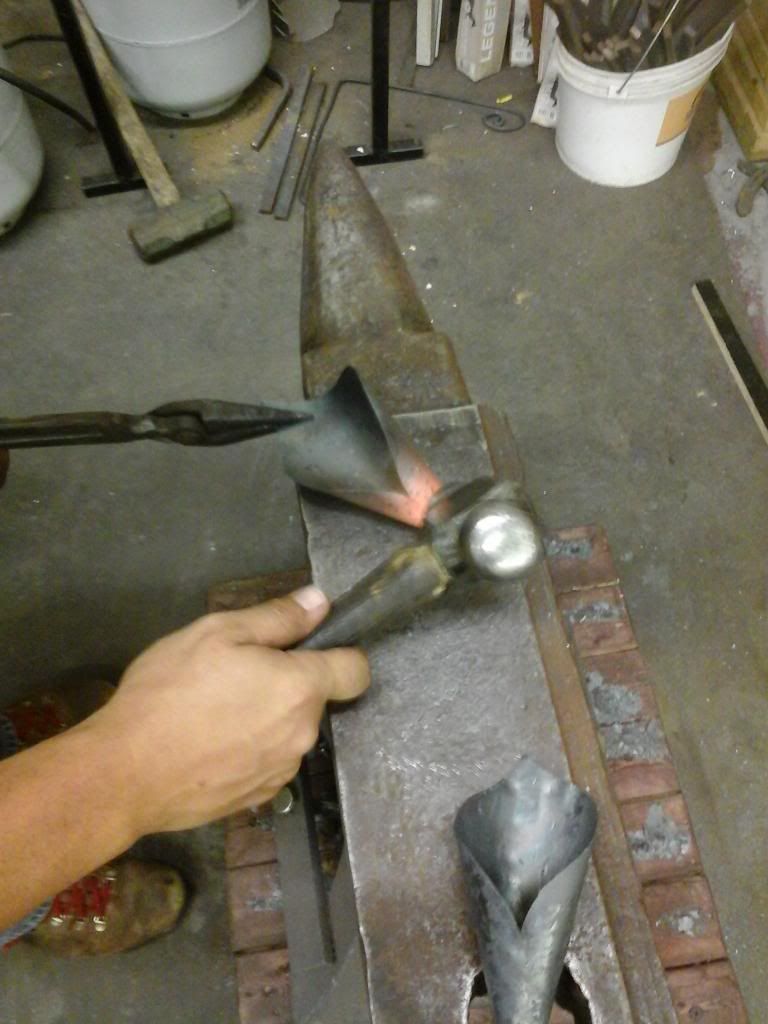
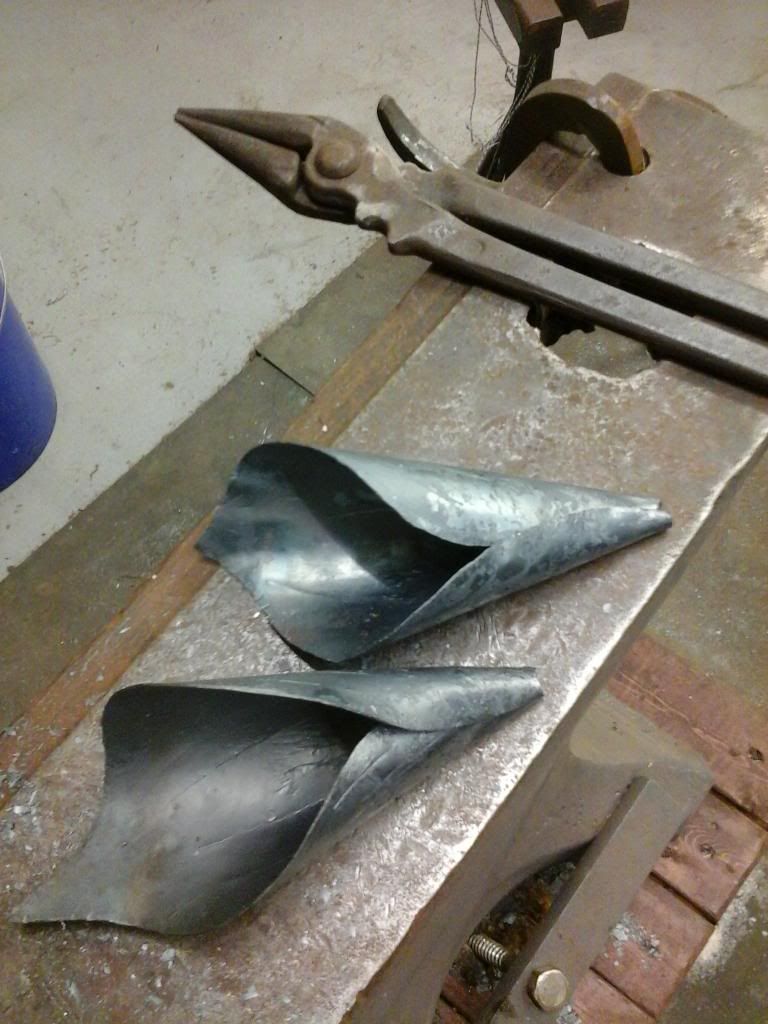
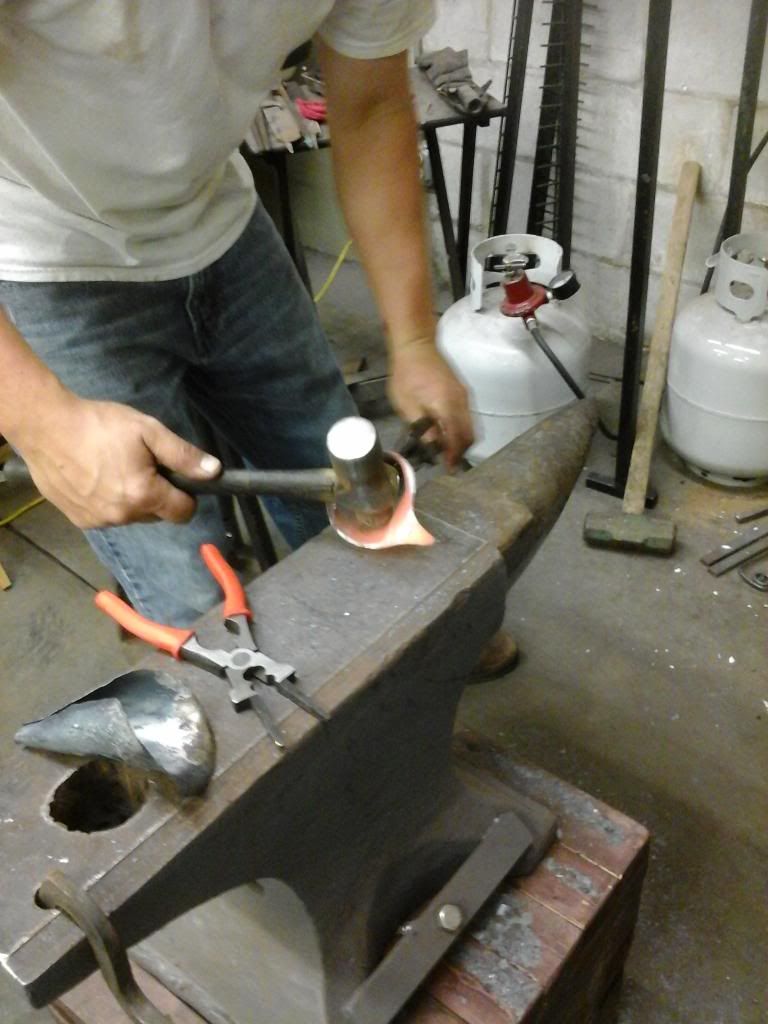
repeat for number two and this is what you get
the next step is to drop the pedal down to create the trademark dip and curl
this created a little buck inside the bloom and i used the ball pien to pop it back out
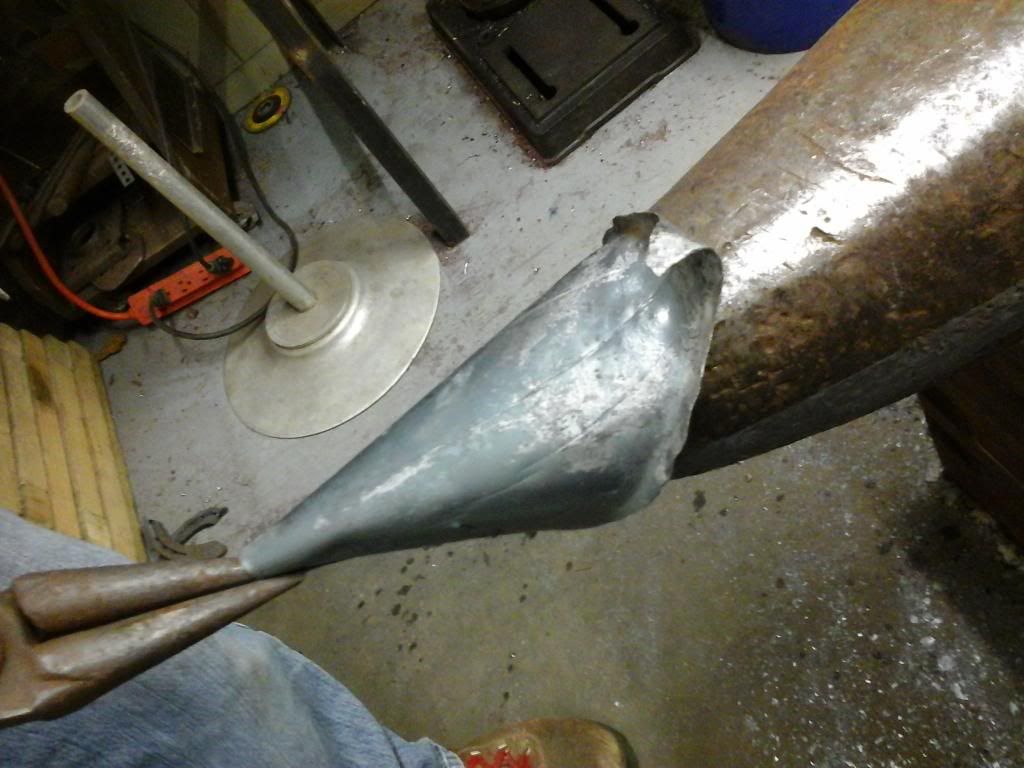
This was a very stupid idea because the anvil pushed back into the bloom and dented the opposite side
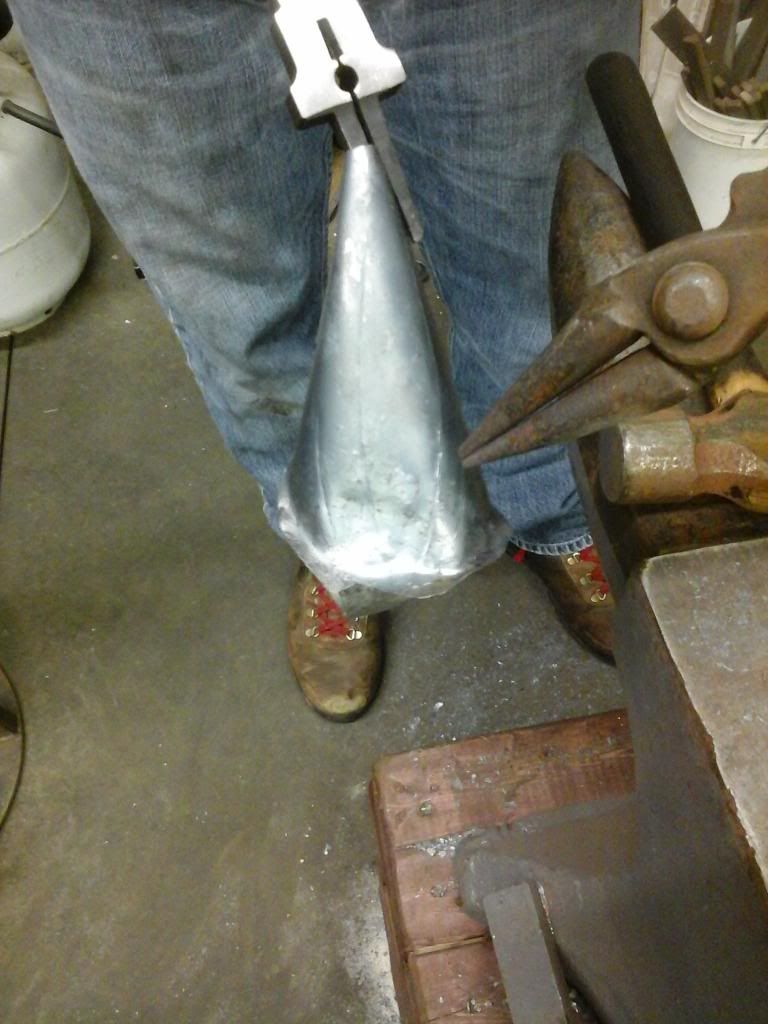
So i used the horn to fix it!
Place the horn inside the bloom/cone and lightly tap around the dent along the raised edges. the force will transfer into the anvil and push the center of the dent out from the inside
Roses kept me busy the first couple weeks but I want something bigger and more technical to finish at this weeks market.
So the Calla Lilly came to mind.
Its one of those ideas that Ive been playing with the "how to accomplish that" thoughts for a while now and the time finally came just to jump in.
I started by disecting a fake calla lilly from the "Hobs Lobs".
The fabric was used to help me understand the pattern needed as a blank. (I tried this without the flower and failed , badly, several times.) Its wierd, because the lilly has the long drawn out bloom I thought the pattern would need a "tail" to accomodate it. Well it doesnt.

Fuller technique same as the rose leaves to give my viens life

Using the round side of my rounding hammer and the face of the anvil as leverage I started to work the bend into the bloom.
then the horn was used to finish the radious.


At this point i needed heat to turn the blooms sides into themselves and get the "rolling" effect i was after.


Use the hammer to glance light blows across the seem and tighten the connection

repeat for number two and this is what you get

the next step is to drop the pedal down to create the trademark dip and curl

this created a little buck inside the bloom and i used the ball pien to pop it back out

This was a very stupid idea because the anvil pushed back into the bloom and dented the opposite side

So i used the horn to fix it!
Place the horn inside the bloom/cone and lightly tap around the dent along the raised edges. the force will transfer into the anvil and push the center of the dent out from the inside

Education through restoration thread link:
http://www.fsjnetwork.com/forum/viewtop ... =12&t=1366
Blacksmithing thread link:
http://www.fsjnetwork.com/forum/viewtop ... f=6&t=1381
http://www.fsjnetwork.com/forum/viewtop ... =12&t=1366
Blacksmithing thread link:
http://www.fsjnetwork.com/forum/viewtop ... f=6&t=1381
-
Florida83FSJCherokee
Topic author - Posts: 196
- Joined: Sat Mar 09, 2013 7:53 pm
- Location: Lakeland , Central Florida
Re: Blacksmith forging project thread idea (pic heavy)
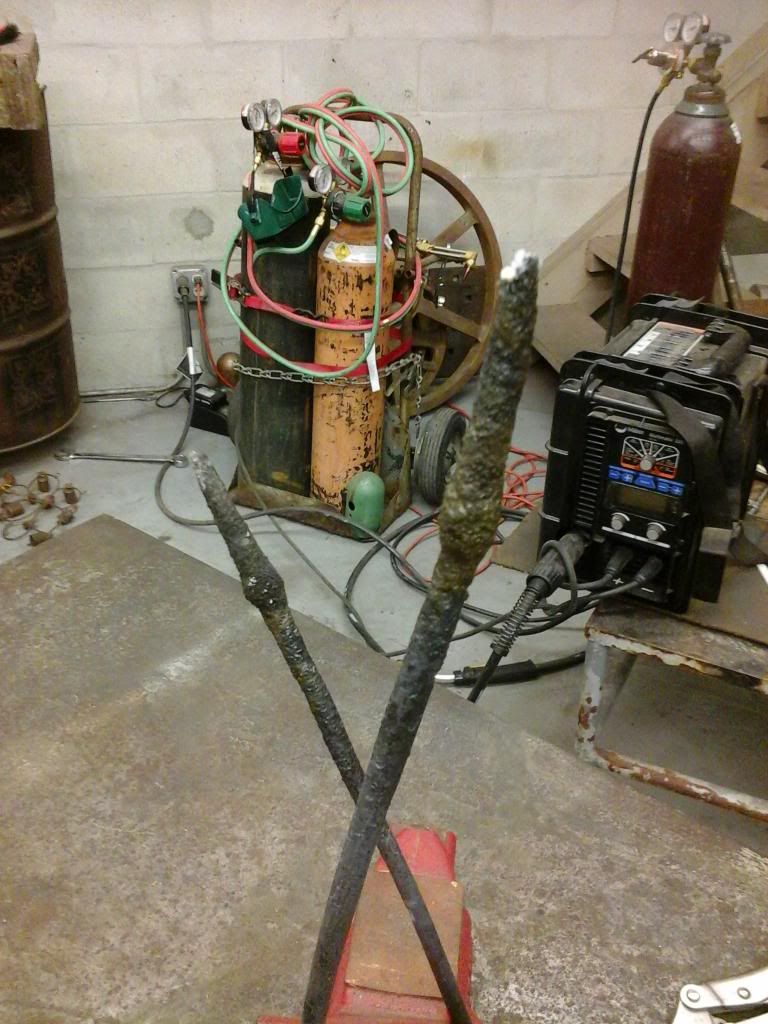
With those fininshed for now the attention was turned to the stems and those cone shaped "Pistals?" or pollen shafts inside the bloom.
If you remeber back to the tomahawk build i went over "bumping" and the same process was used to thincken the base of this cone along the steel rod.
I didnt need a ton but just enough to establish the fatter section at the base of the cone.
To create the texture and mass needed in the pollen section i used forge welding flux. The steel was super heated and i would spin it while dusting the flux on it. Working at it from the base of the cone untill i had filled in what was needed to establish the right shape. The texture was course without any extra effort so that was a little artistic bonus
once they were built i let them soak in the forge so the flux could melt and then harden slowly while cooling. (this was an experiment that luckily worked out the first attempt)
cooled and looking pretty darn real
the leaves and branches were made like large individual rose leaves. The only difference in the process was i forged layerd smoothed edges instead of using the belt sander to add the jagged edges.
I decided on three to give and appealing symetry to the double bloom.
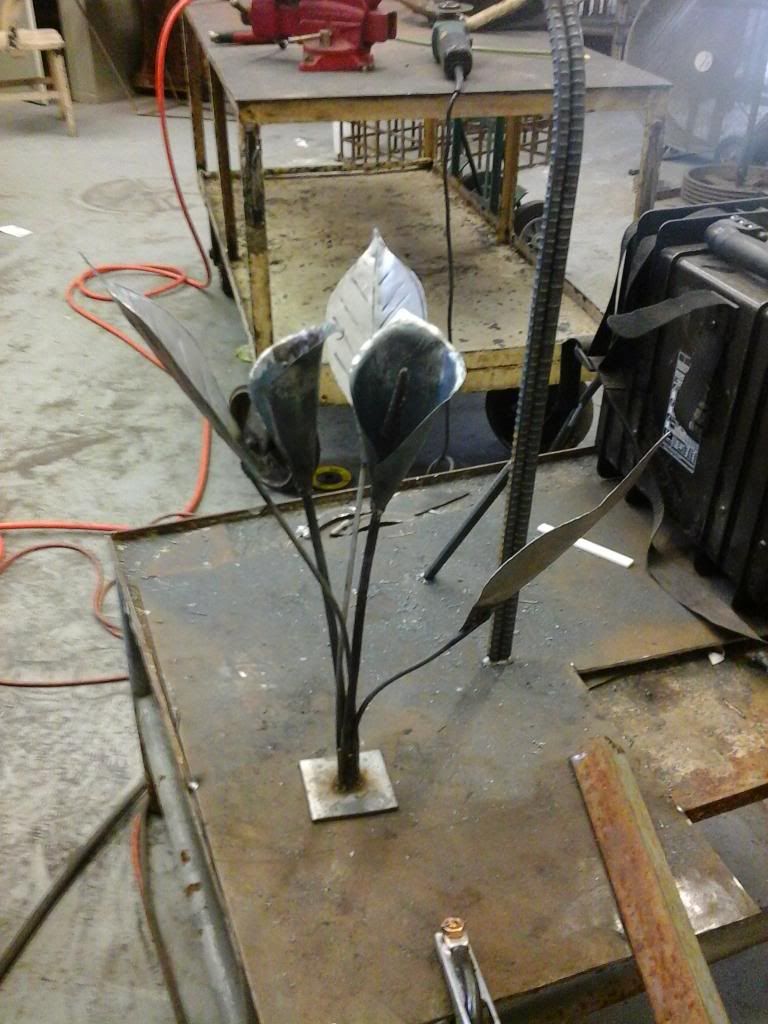
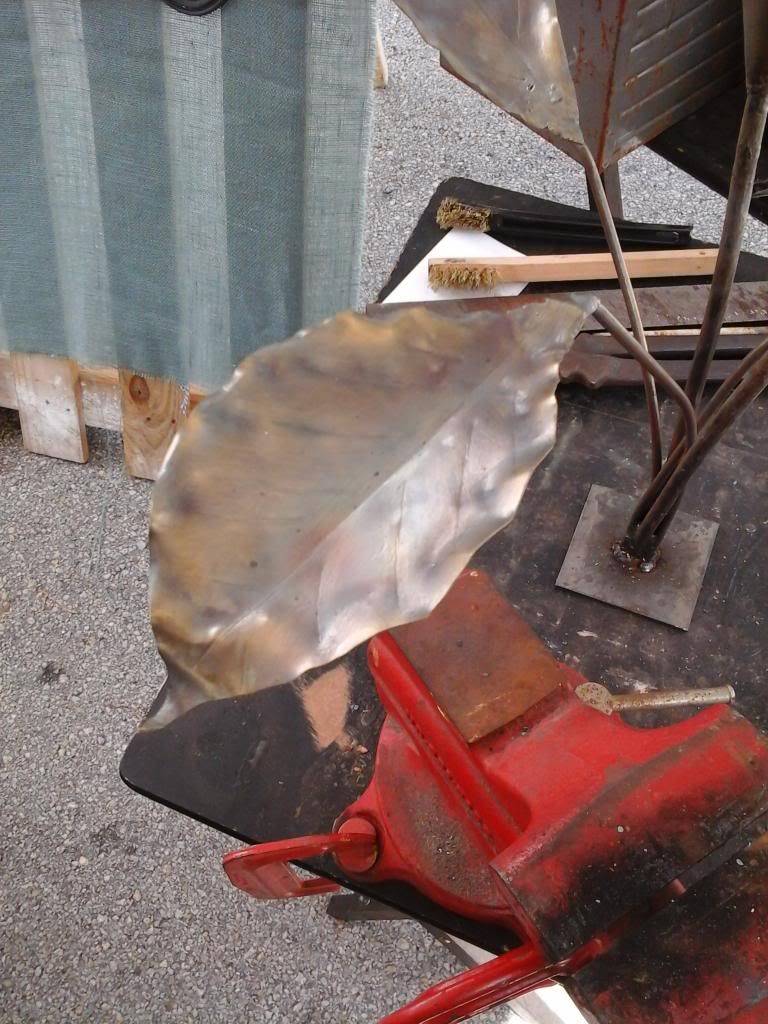
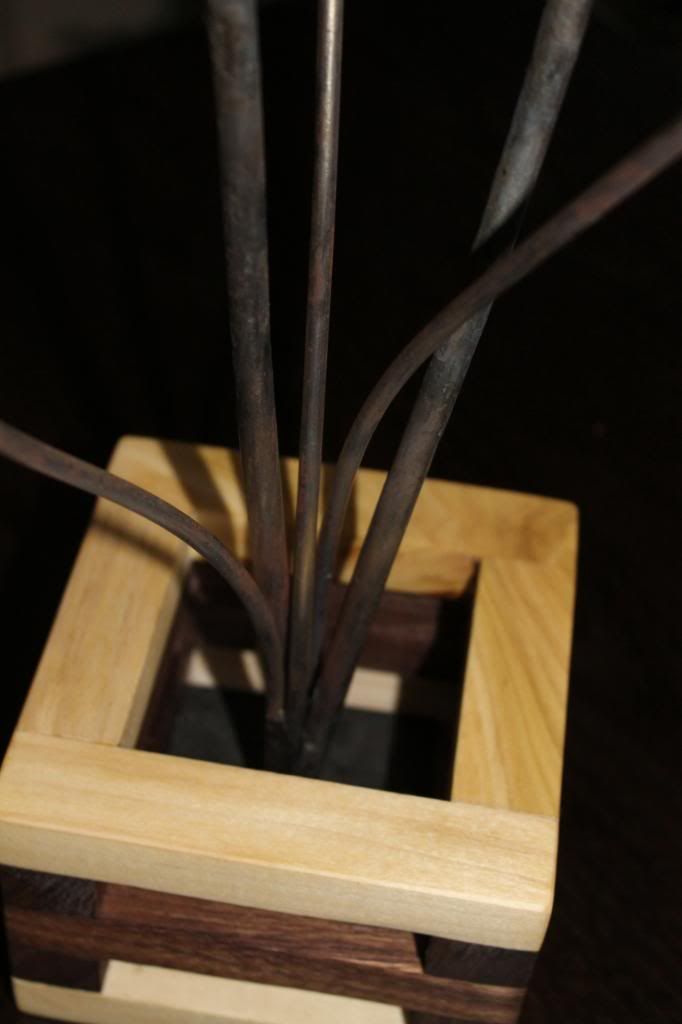
I welded them together to make a solid trunk, and wove them though one another to add texture to the stalk. The were all attached to a 1/8 inch plate section to give a good platform for added suport/stabalization.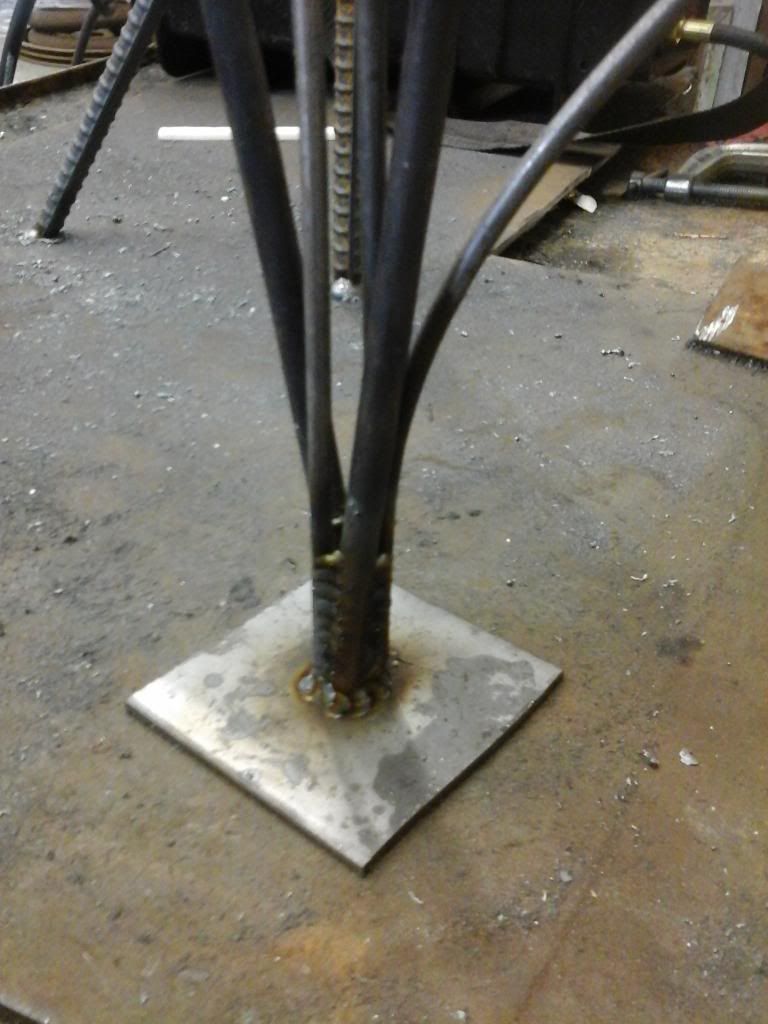
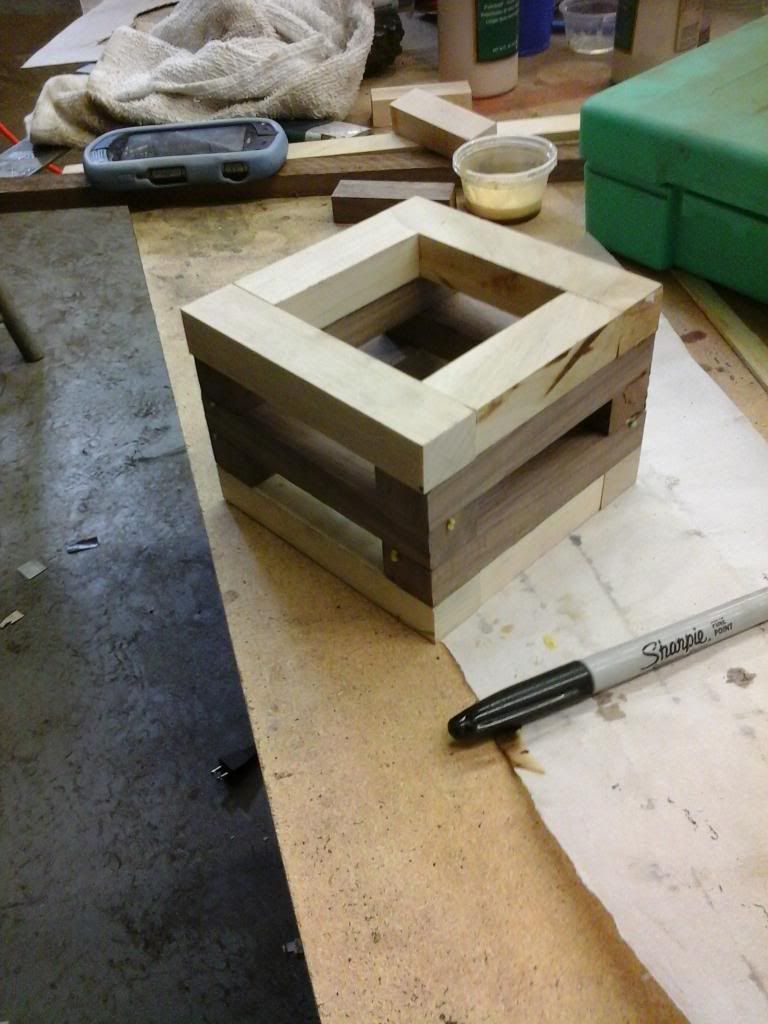
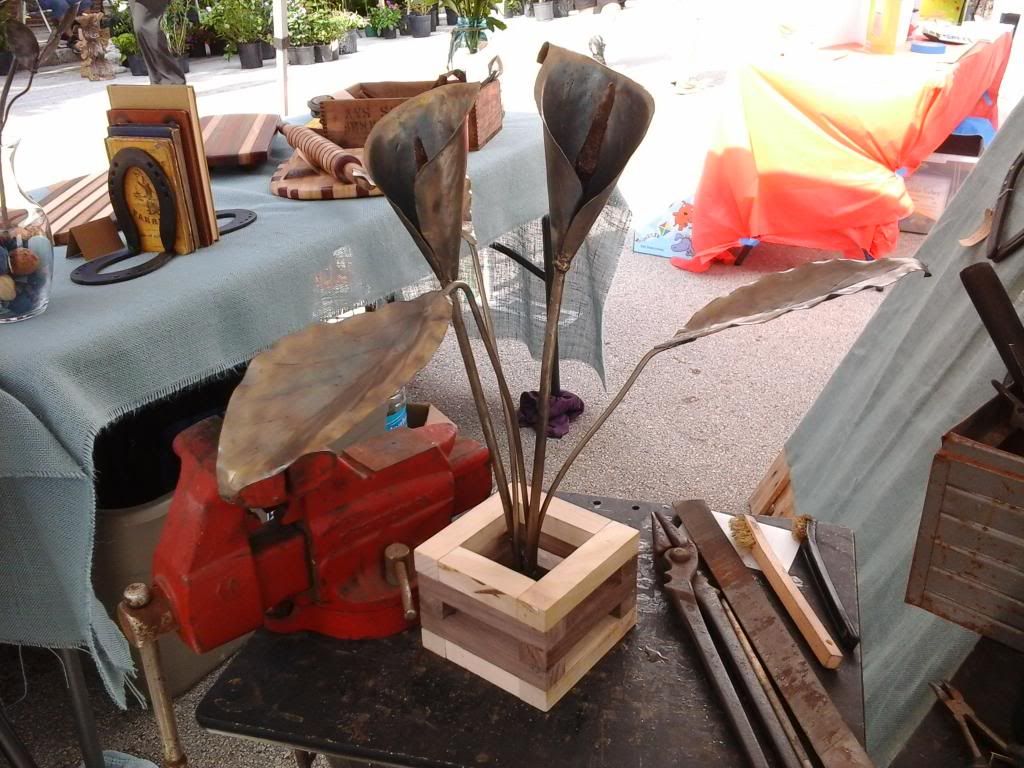
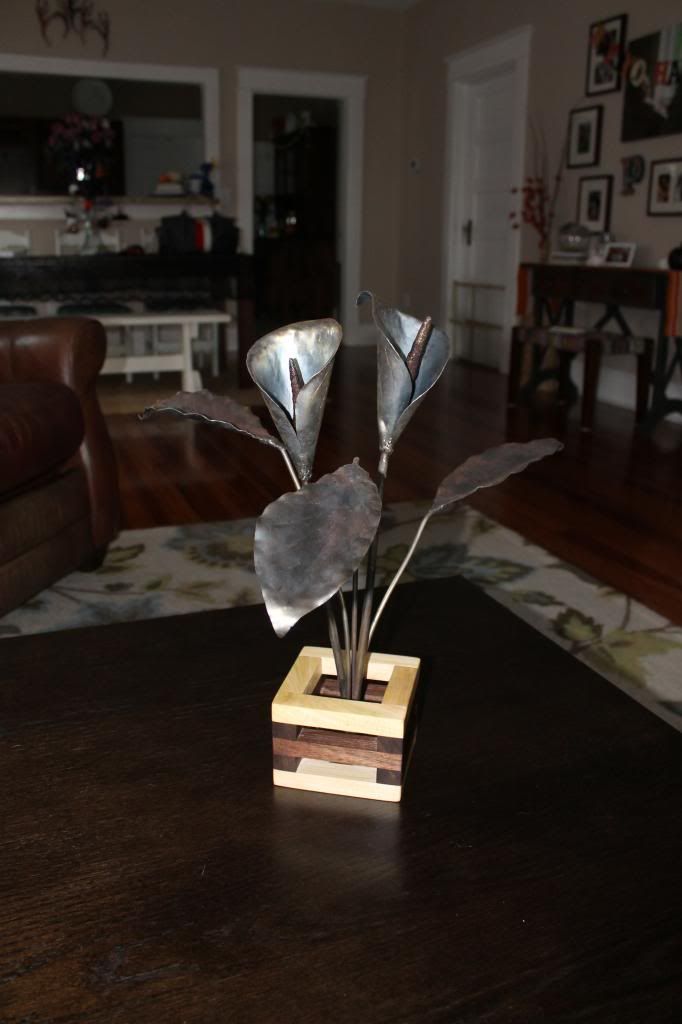
Some walnut scraps and poplar scraps made a nice flower box for my calla lilly to live in.
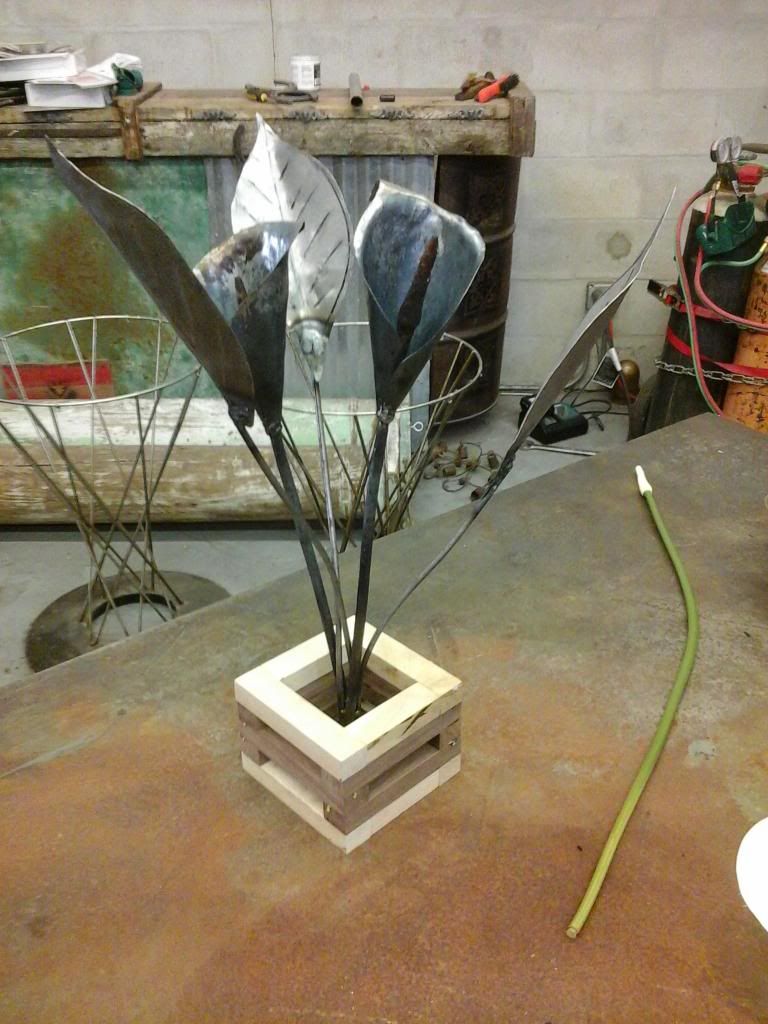
and this is what the blank I took to the market looked like
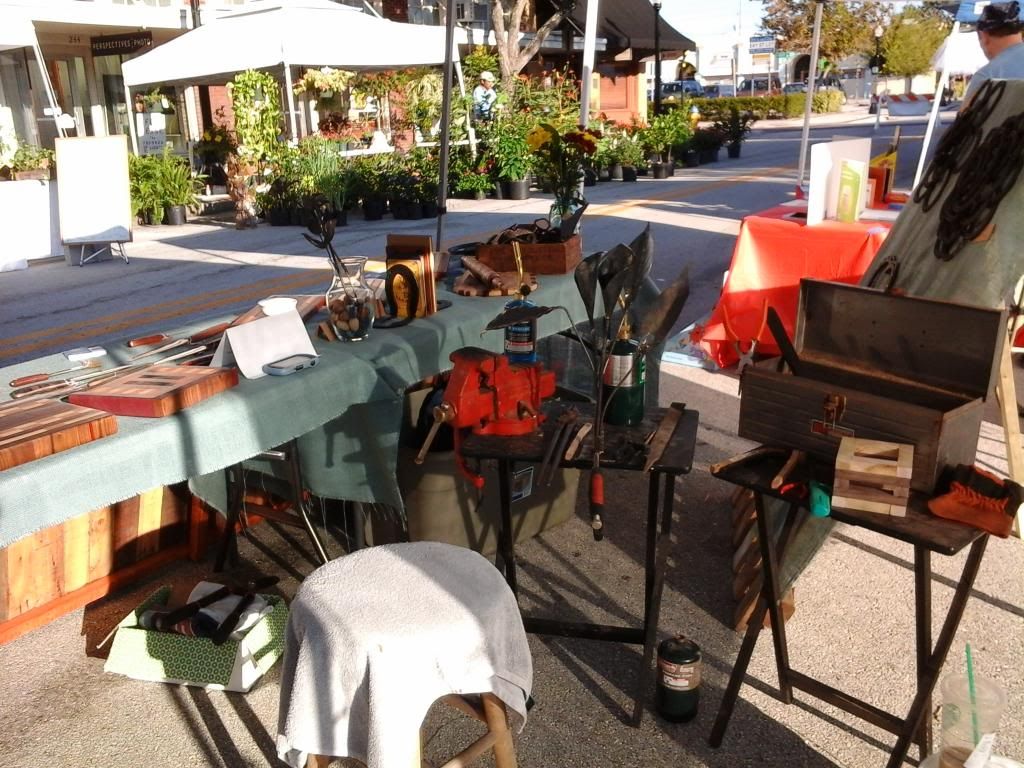
Welcome to the market shop. No fire marshal yet. LOL. i am raedy though, fire extinguisher and a 3 gallon buckt of water! I hate to burn down the guy next doors "phonix books" ...proof that phonix is a horrible idea is on evey page of this thread. I spell the worst out of my entire family and im the only one born in the phonix age.
The scroll tongs where used to roll and countour the leaves. Calla lilly leaves are big and broad with a slow droop and the edges curling up and down. This was a little time consuming but turned out well.
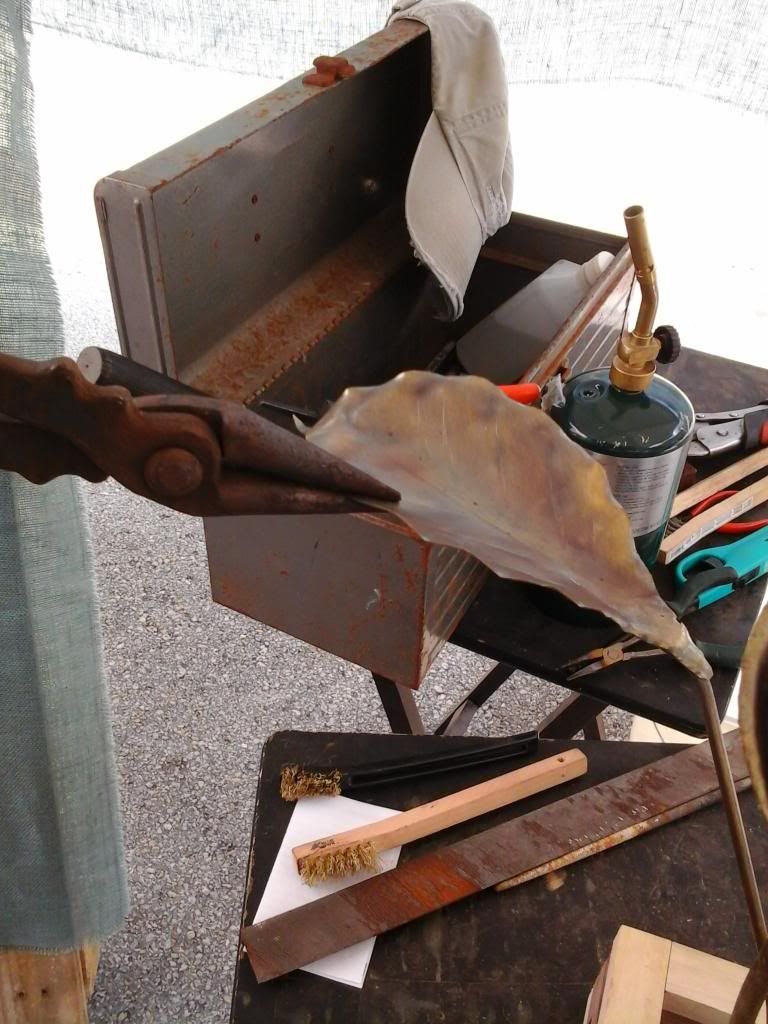
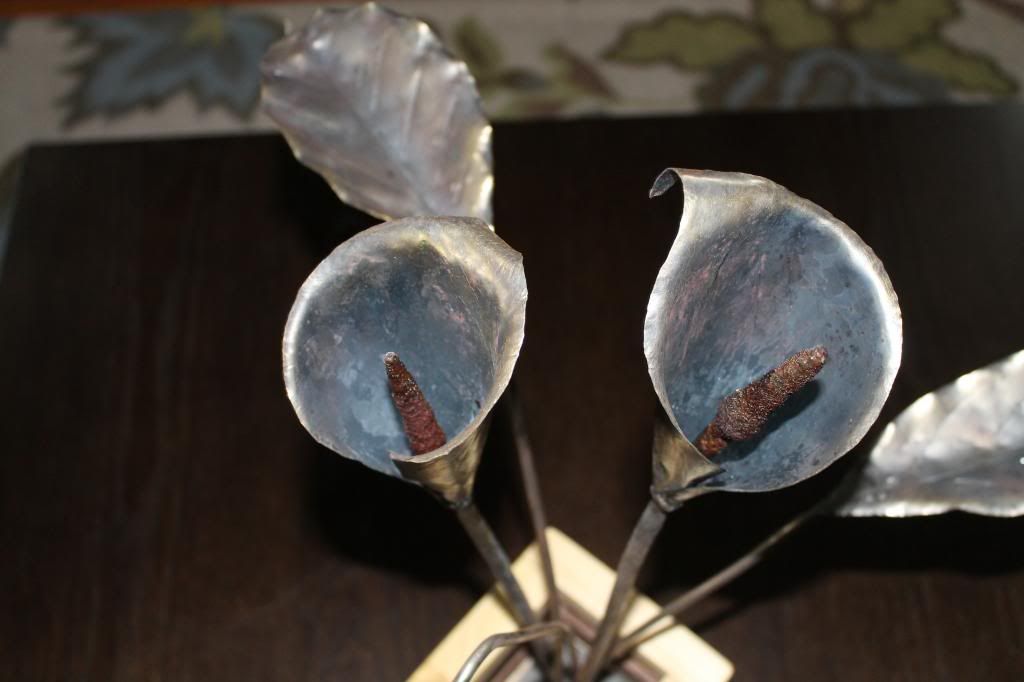
used the scroll tongs to roll the edges on the bloom and set the tips as well
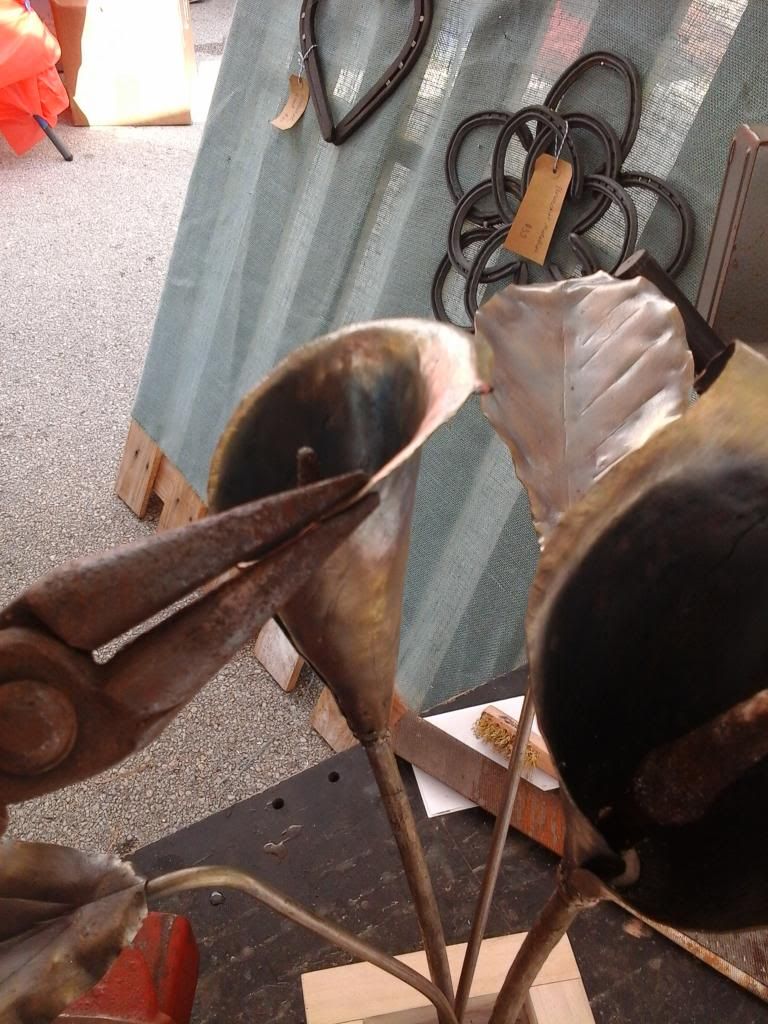
I used a combination of stainless steel and brass brushes to really get some cool coloring on all the surfaces. The heating and workin of the brass brush is really a lot of fun!
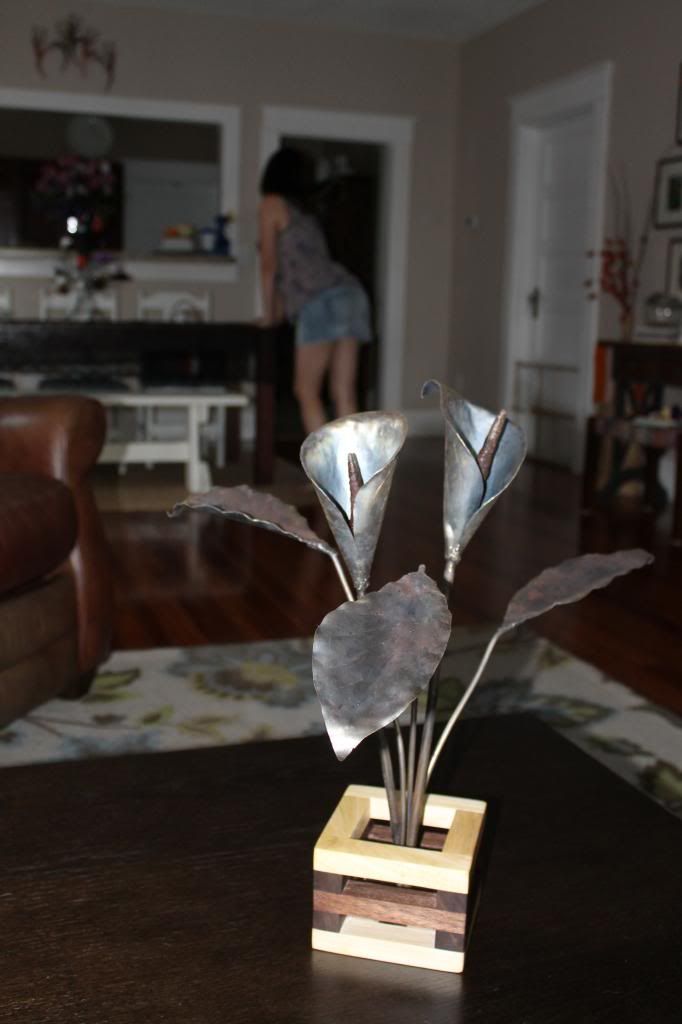
tweaked to a finish and in its home. last step was a sand and teak oil the box.
Heres the finished liily in its finished box. Im planning to add some steel wool or shredded natural fiber burlap as "bedding" inside the box and around the stem. (yes, my dog sleeps in the fireplace, Shes almost 14 and cooler than most people I know so she does what she wants )
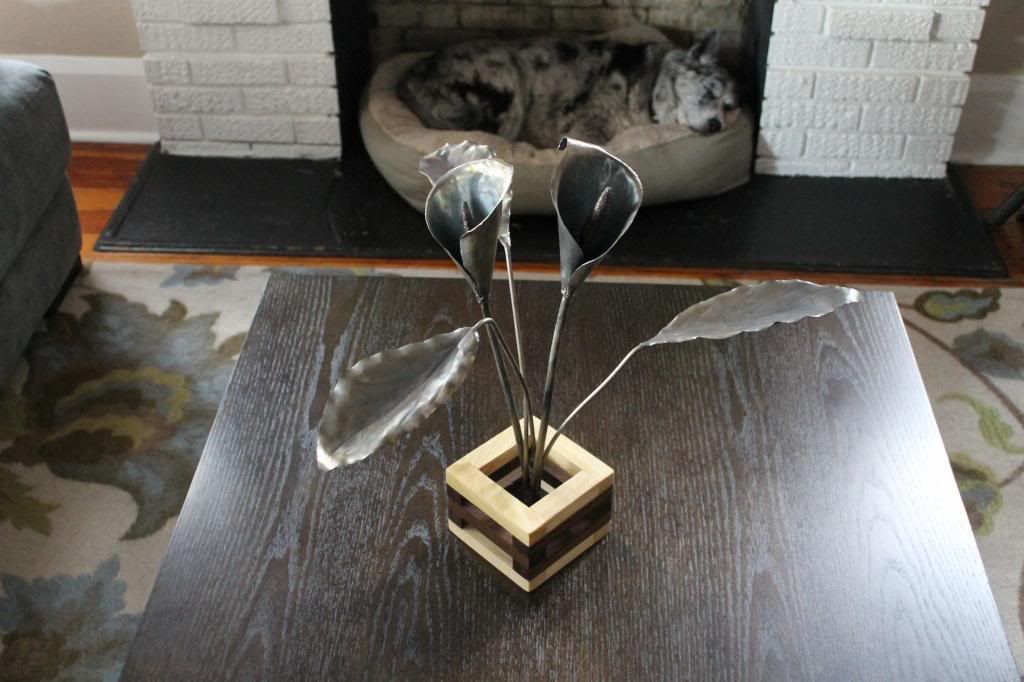
The colors really came out better than i had hoped

Really a fun project
Thanks for checking it out and I hope you all have a good week! If you have any questions, as always, feel free to ask away.
JP
If you remeber back to the tomahawk build i went over "bumping" and the same process was used to thincken the base of this cone along the steel rod.


I didnt need a ton but just enough to establish the fatter section at the base of the cone.

To create the texture and mass needed in the pollen section i used forge welding flux. The steel was super heated and i would spin it while dusting the flux on it. Working at it from the base of the cone untill i had filled in what was needed to establish the right shape. The texture was course without any extra effort so that was a little artistic bonus

once they were built i let them soak in the forge so the flux could melt and then harden slowly while cooling. (this was an experiment that luckily worked out the first attempt)

cooled and looking pretty darn real

the leaves and branches were made like large individual rose leaves. The only difference in the process was i forged layerd smoothed edges instead of using the belt sander to add the jagged edges.
I decided on three to give and appealing symetry to the double bloom.

I welded them together to make a solid trunk, and wove them though one another to add texture to the stalk. The were all attached to a 1/8 inch plate section to give a good platform for added suport/stabalization.

Some walnut scraps and poplar scraps made a nice flower box for my calla lilly to live in.

and this is what the blank I took to the market looked like

Welcome to the market shop. No fire marshal yet. LOL. i am raedy though, fire extinguisher and a 3 gallon buckt of water! I hate to burn down the guy next doors "phonix books" ...proof that phonix is a horrible idea is on evey page of this thread. I spell the worst out of my entire family and im the only one born in the phonix age.

The scroll tongs where used to roll and countour the leaves. Calla lilly leaves are big and broad with a slow droop and the edges curling up and down. This was a little time consuming but turned out well.


used the scroll tongs to roll the edges on the bloom and set the tips as well

I used a combination of stainless steel and brass brushes to really get some cool coloring on all the surfaces. The heating and workin of the brass brush is really a lot of fun!

tweaked to a finish and in its home. last step was a sand and teak oil the box.

Heres the finished liily in its finished box. Im planning to add some steel wool or shredded natural fiber burlap as "bedding" inside the box and around the stem. (yes, my dog sleeps in the fireplace, Shes almost 14 and cooler than most people I know so she does what she wants

The colors really came out better than i had hoped


Really a fun project

Thanks for checking it out and I hope you all have a good week! If you have any questions, as always, feel free to ask away.
JP

Education through restoration thread link:
http://www.fsjnetwork.com/forum/viewtop ... =12&t=1366
Blacksmithing thread link:
http://www.fsjnetwork.com/forum/viewtop ... f=6&t=1381
http://www.fsjnetwork.com/forum/viewtop ... =12&t=1366
Blacksmithing thread link:
http://www.fsjnetwork.com/forum/viewtop ... f=6&t=1381
-
Florida83FSJCherokee
Topic author - Posts: 196
- Joined: Sat Mar 09, 2013 7:53 pm
- Location: Lakeland , Central Florida
Re: Blacksmith forging project thread idea (pic heavy)
Worked on this yesterday while the Shop had my truck for repairs.
Not really anything new as far as the processes used to accomplish it so if you have questions about the rose, leaves, or brackets there are detailed post previous to this one that will probably answer them.
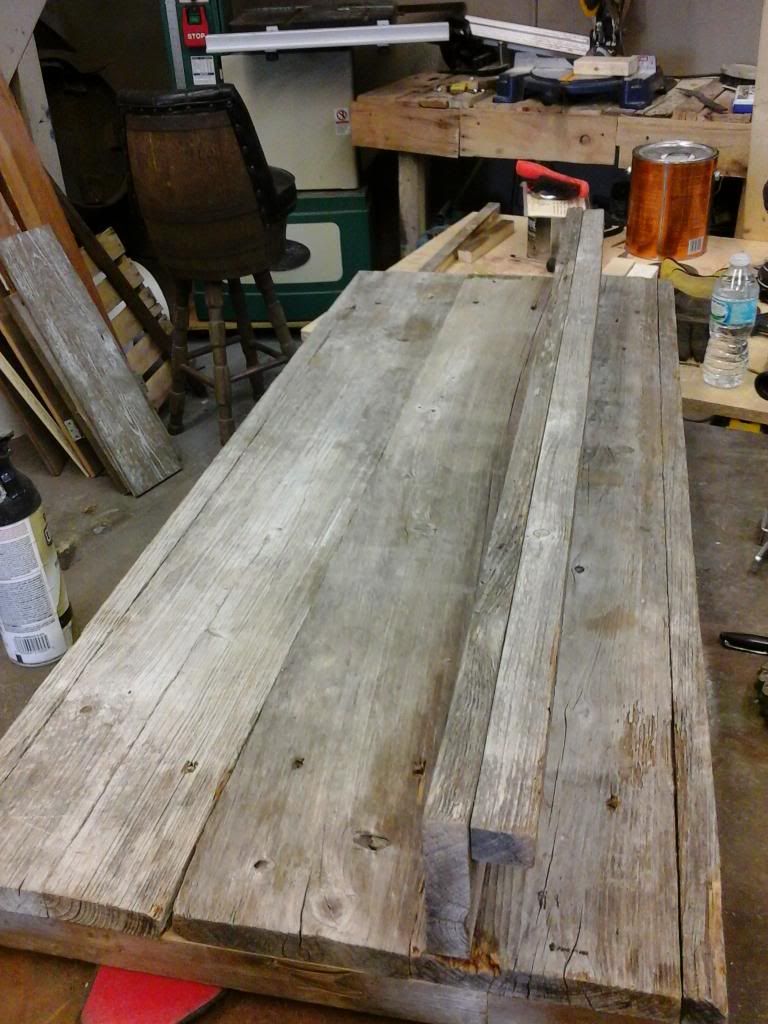
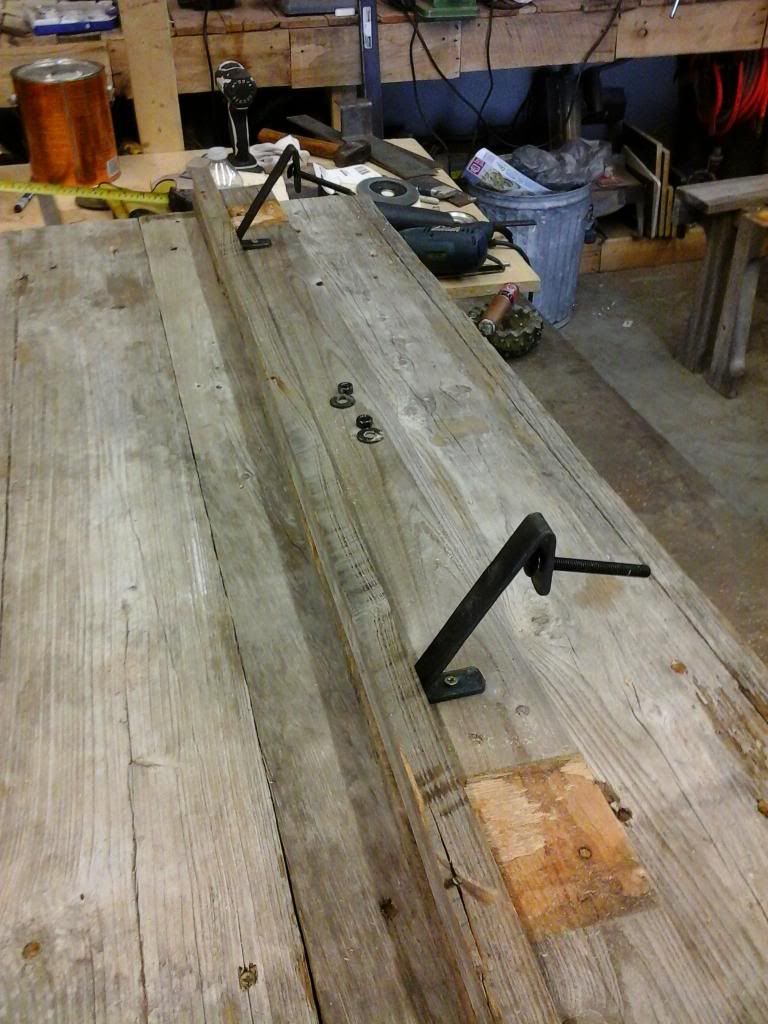
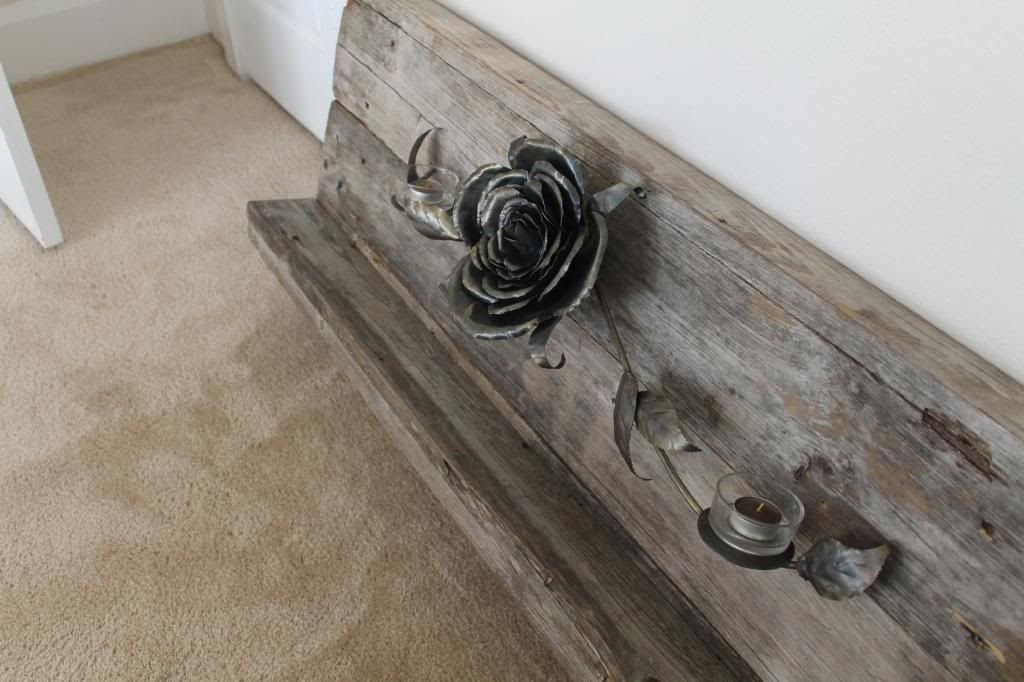
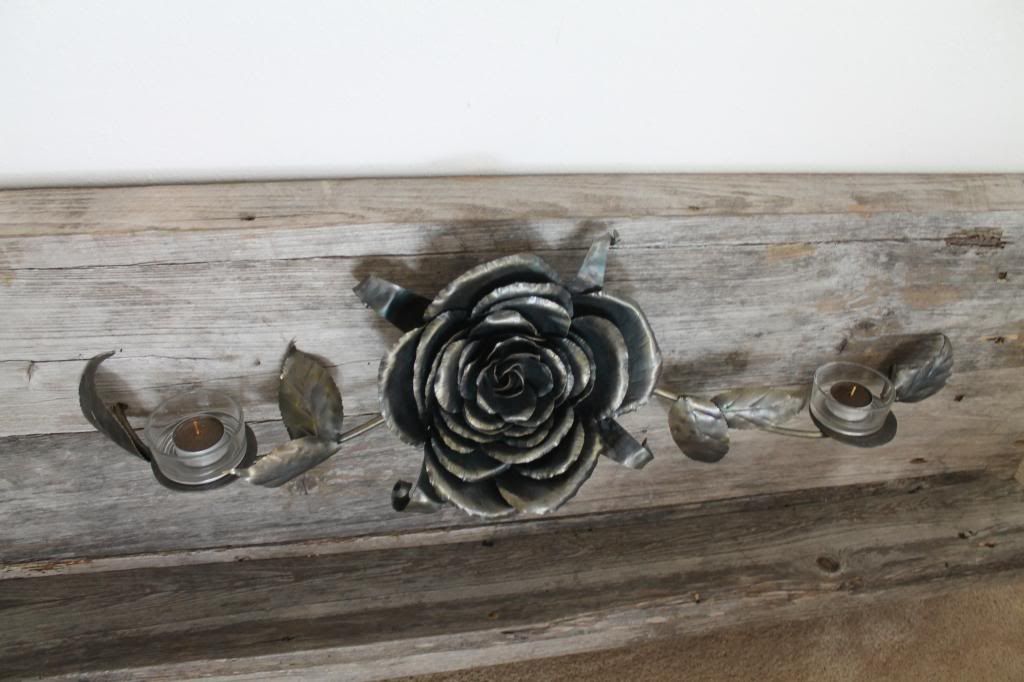
Reclaimed Florida cypress and forged rose mantel/wall mount display shelf.
Ive had this wood in the stash for a while. Its off an old barn in Dade City Florida and is Florida Cypress. The barn was built in the 40's -50's according to the clients memory so its at least 60years old. Im not sure of the facts reguarding this next bit of info, but from what i understand you cant cut down this type of cypress any longer or its extinct? One of the two??? So reguardless, its worth alot of money not only because of the patina (rot and wear) but also due to its rareity. I will say that when you cut it the only worn section it the outer 1/16" and it looks brand new inside.
I used it to build a framed backing and small shelf.
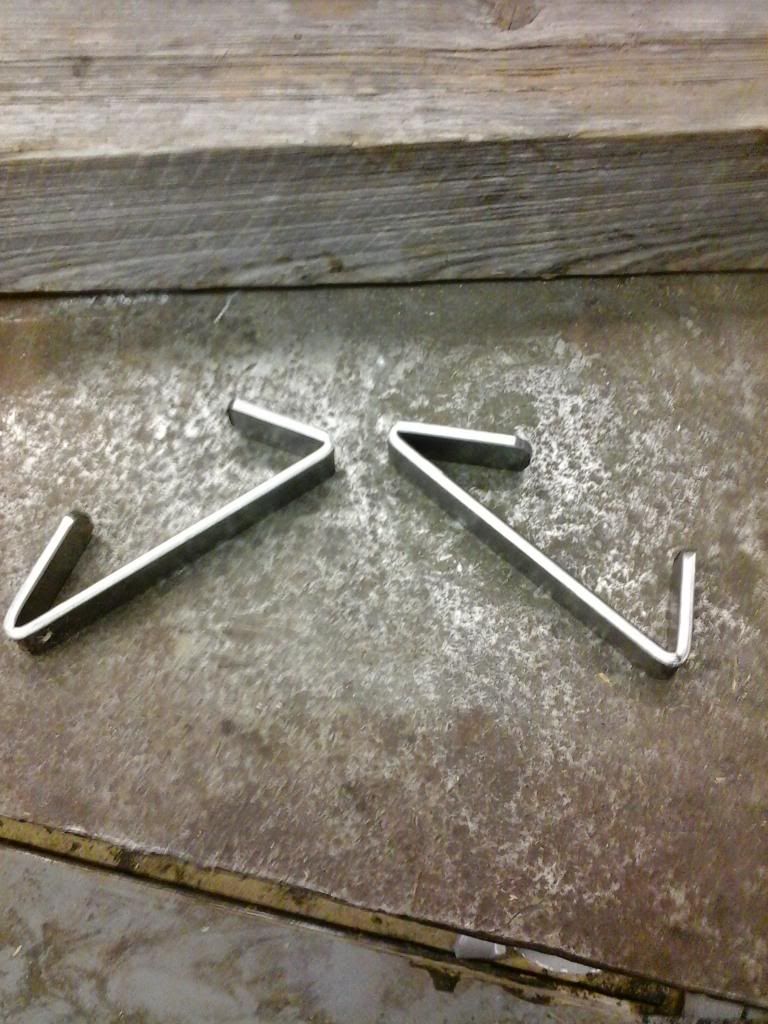
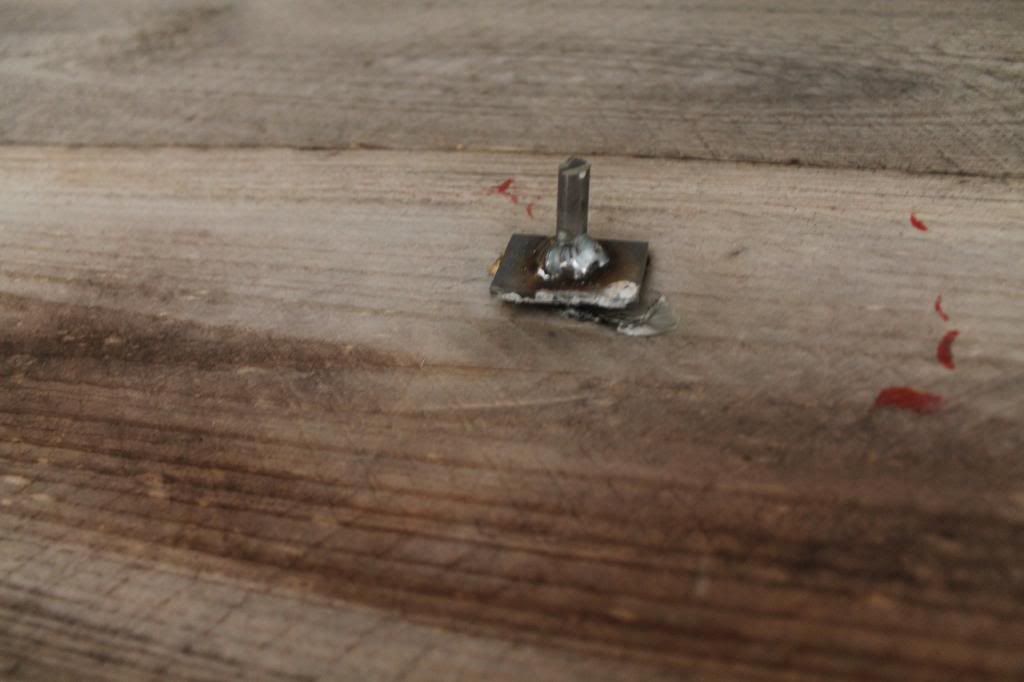
For the brackets I used the break and folded up some 1/8"x1" flat bar. I hammer finished and drilled them for mounting access but dont make the same mistake as i did and bend them before hand....made the forgework and drilling slightly annoying... The fininsh was similar to the pintels from previous post but not quite as deep.
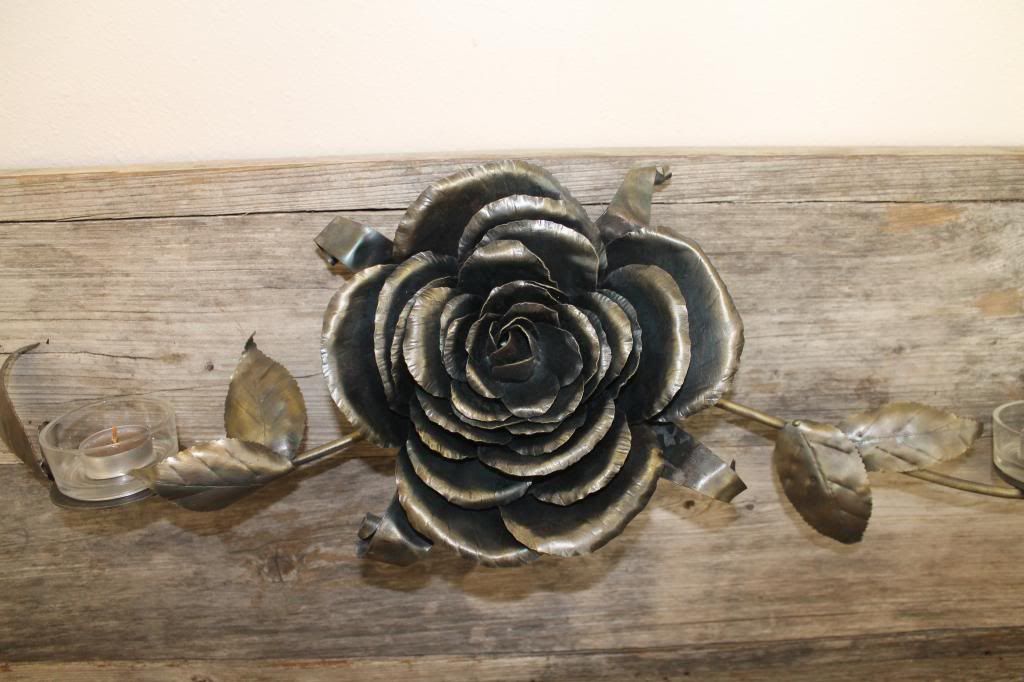
A while back another blacksmith posted a rose build thread and I used some of the things he had done to improve the texture of my own roses. The steel was upped to 20guage and the texture was layed in over the entire petal instead of just the edging. The leaves however I like to look more realistic so I opted to stick with my orriginal method.
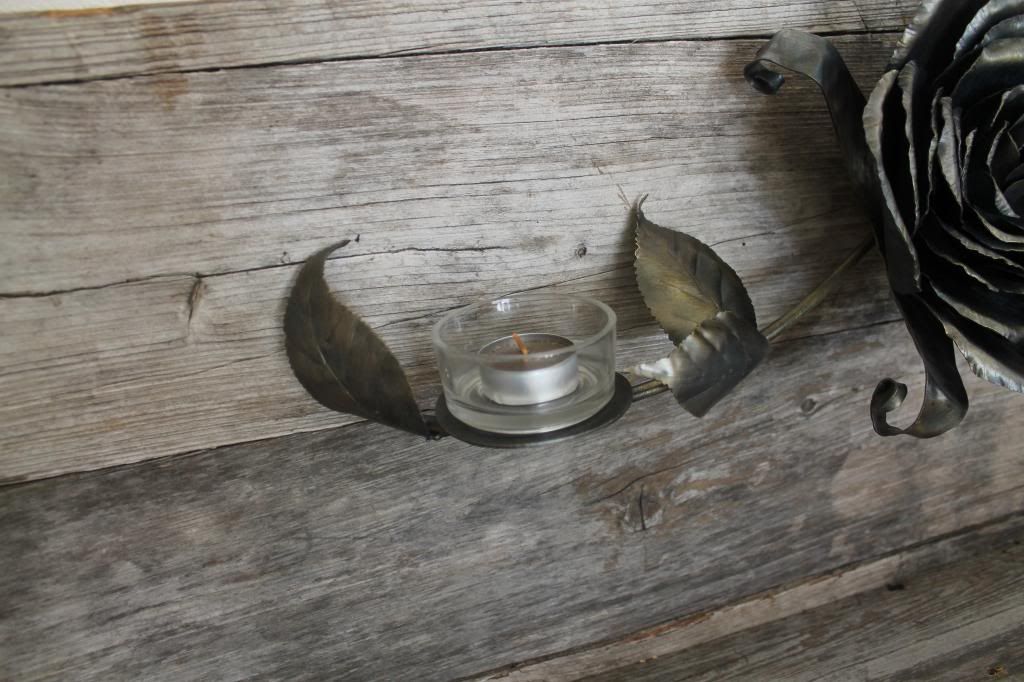
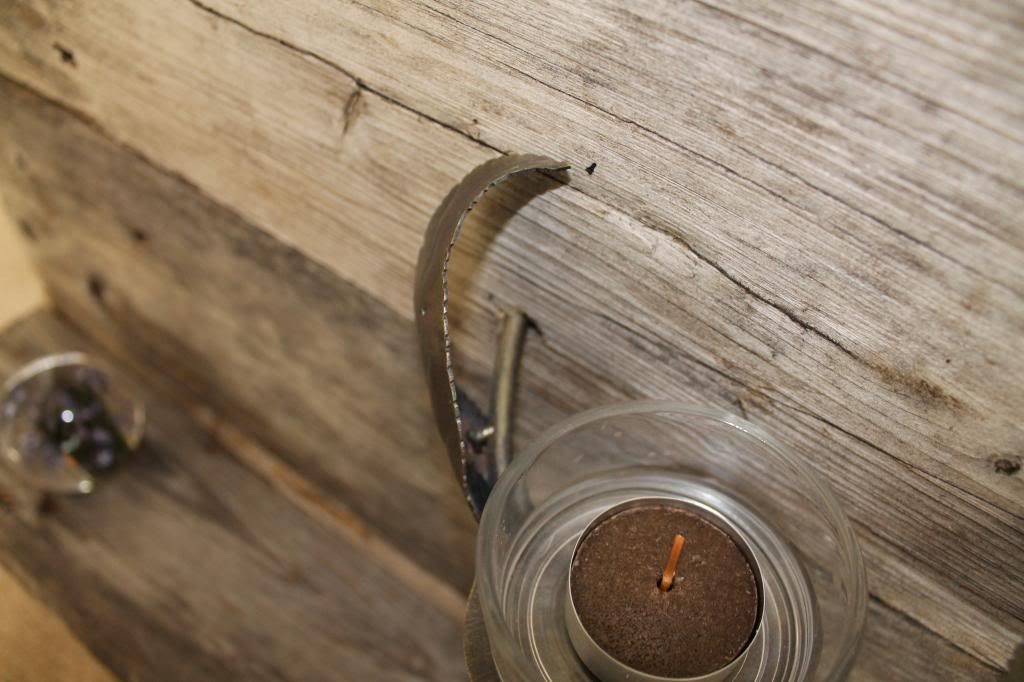
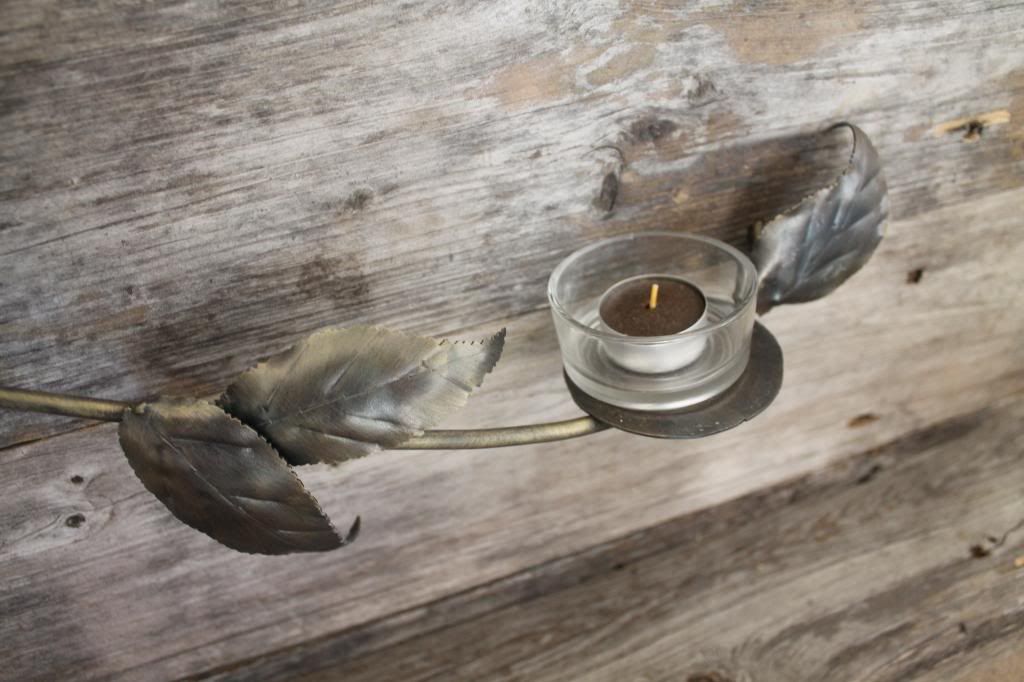
Added some candle platforms and used the stems and leaves to hide the welds and mounting locations.
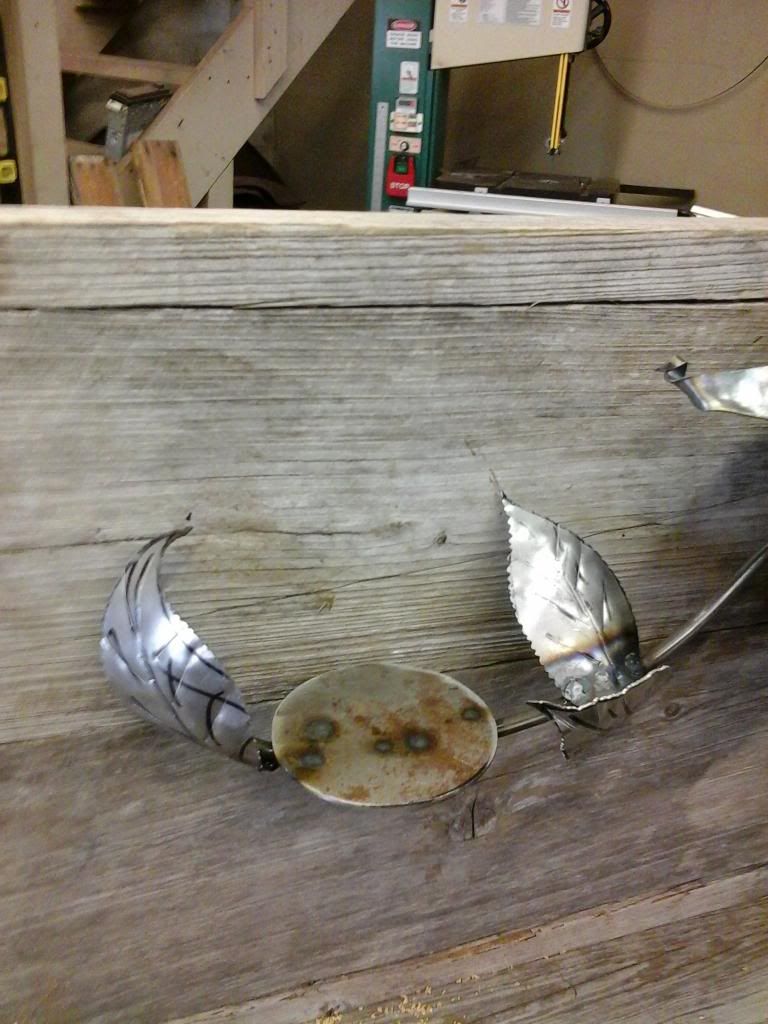
Heres the rough finish with the large rose, and two branches with candle holders extended from it.
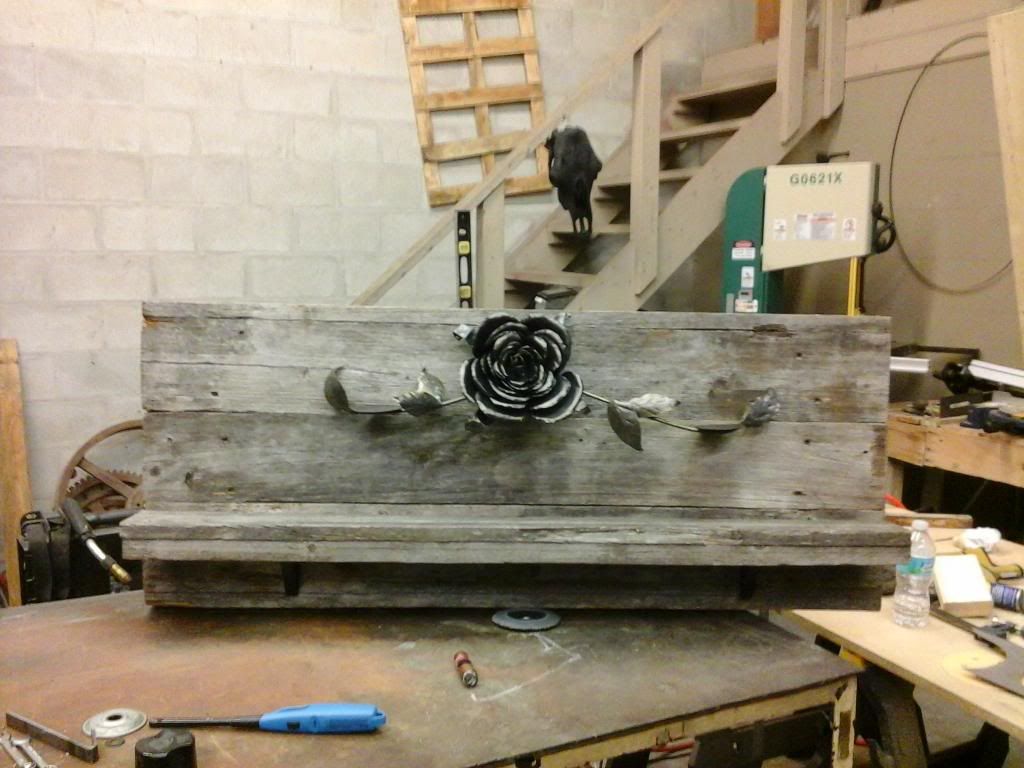
Everything got sprayed with Polycrylic semi gloss. This really brings out the brass work in the steel. It also gave more depth to the wood without being noticably sealed with something.
Here it is a home the day after:
Its tilted and should be upright but i couldnt get it to stay that way withou actually mounting it. But you get the idea.
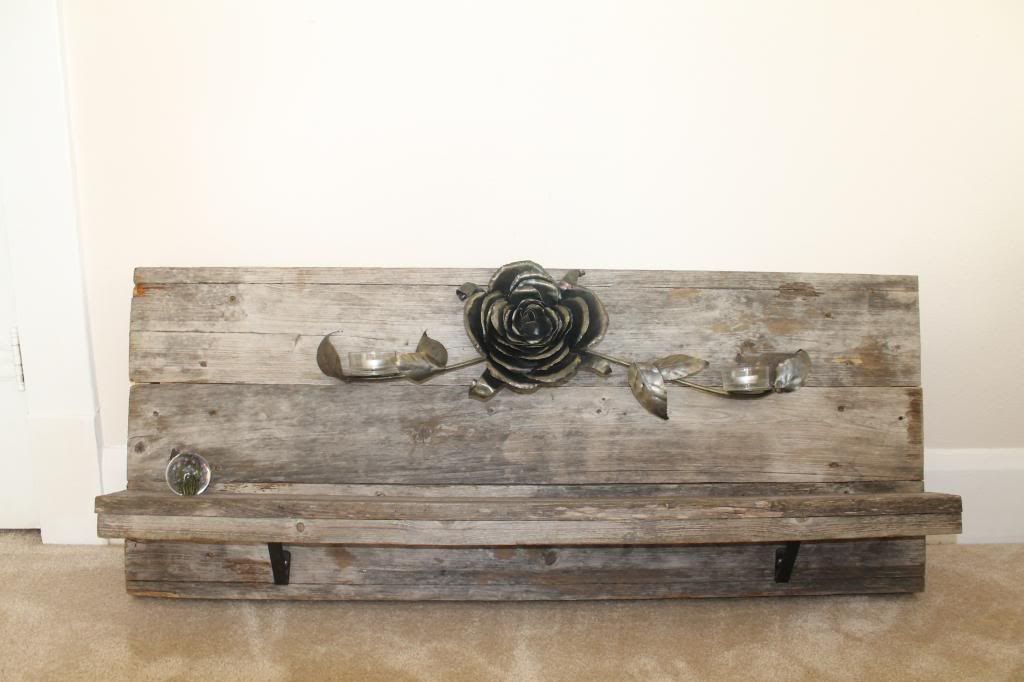
to attach and suport the candle brackets i ran the rod through the backing and welded a cap on the other side. This same method was done on the rose stem. solved the issue or threading the rod and made a nice firm clamping method. (i did set the center one on fire so have some water!)
Not a bad days project. Should fetch a pretty penny at the market next week. People are ate up with the reclamed wood down here and the forged rose will seal the deal. My wife thinks its should have some hooks under the shelf for a nice enrty way coat rack function. I kinda thought it would look cool behind an old bar with some scotch bottles and crystal glasses. The other idea was to use it as a headborad for a full size bed. Who knows???
Its built with the pull to the right hand side so a picture frame or flowers or bottle can give the hieght to balance it on the left. I cant believe Im thinking about stuff like that...
Have a great weekend!
JP
Not really anything new as far as the processes used to accomplish it so if you have questions about the rose, leaves, or brackets there are detailed post previous to this one that will probably answer them.
Reclaimed Florida cypress and forged rose mantel/wall mount display shelf.
Ive had this wood in the stash for a while. Its off an old barn in Dade City Florida and is Florida Cypress. The barn was built in the 40's -50's according to the clients memory so its at least 60years old. Im not sure of the facts reguarding this next bit of info, but from what i understand you cant cut down this type of cypress any longer or its extinct? One of the two??? So reguardless, its worth alot of money not only because of the patina (rot and wear) but also due to its rareity. I will say that when you cut it the only worn section it the outer 1/16" and it looks brand new inside.
I used it to build a framed backing and small shelf.

For the brackets I used the break and folded up some 1/8"x1" flat bar. I hammer finished and drilled them for mounting access but dont make the same mistake as i did and bend them before hand....made the forgework and drilling slightly annoying... The fininsh was similar to the pintels from previous post but not quite as deep.


A while back another blacksmith posted a rose build thread and I used some of the things he had done to improve the texture of my own roses. The steel was upped to 20guage and the texture was layed in over the entire petal instead of just the edging. The leaves however I like to look more realistic so I opted to stick with my orriginal method.
Added some candle platforms and used the stems and leaves to hide the welds and mounting locations.

Heres the rough finish with the large rose, and two branches with candle holders extended from it.

Everything got sprayed with Polycrylic semi gloss. This really brings out the brass work in the steel. It also gave more depth to the wood without being noticably sealed with something.
Here it is a home the day after:
Its tilted and should be upright but i couldnt get it to stay that way withou actually mounting it. But you get the idea.


to attach and suport the candle brackets i ran the rod through the backing and welded a cap on the other side. This same method was done on the rose stem. solved the issue or threading the rod and made a nice firm clamping method. (i did set the center one on fire so have some water!)


Not a bad days project. Should fetch a pretty penny at the market next week. People are ate up with the reclamed wood down here and the forged rose will seal the deal. My wife thinks its should have some hooks under the shelf for a nice enrty way coat rack function. I kinda thought it would look cool behind an old bar with some scotch bottles and crystal glasses. The other idea was to use it as a headborad for a full size bed. Who knows???
Its built with the pull to the right hand side so a picture frame or flowers or bottle can give the hieght to balance it on the left. I cant believe Im thinking about stuff like that...
Have a great weekend!
JP
Education through restoration thread link:
http://www.fsjnetwork.com/forum/viewtop ... =12&t=1366
Blacksmithing thread link:
http://www.fsjnetwork.com/forum/viewtop ... f=6&t=1381
http://www.fsjnetwork.com/forum/viewtop ... =12&t=1366
Blacksmithing thread link:
http://www.fsjnetwork.com/forum/viewtop ... f=6&t=1381
-
Florida83FSJCherokee
Topic author - Posts: 196
- Joined: Sat Mar 09, 2013 7:53 pm
- Location: Lakeland , Central Florida
Re: Blacksmith forging project thread idea (pic heavy)
Knives, Knives, some more Knives, and a couple special order jobs...
So to start here are a couple special orders that have come from the market.
One customer wanted a set of quirky numbers made from horseshoes like my signs lettering. She wanted to use them to mark the rows in her garden so after they were completed i welded them to rebar spikes.
Not something I would have made for myself but...To each there own! :dunno::lol:
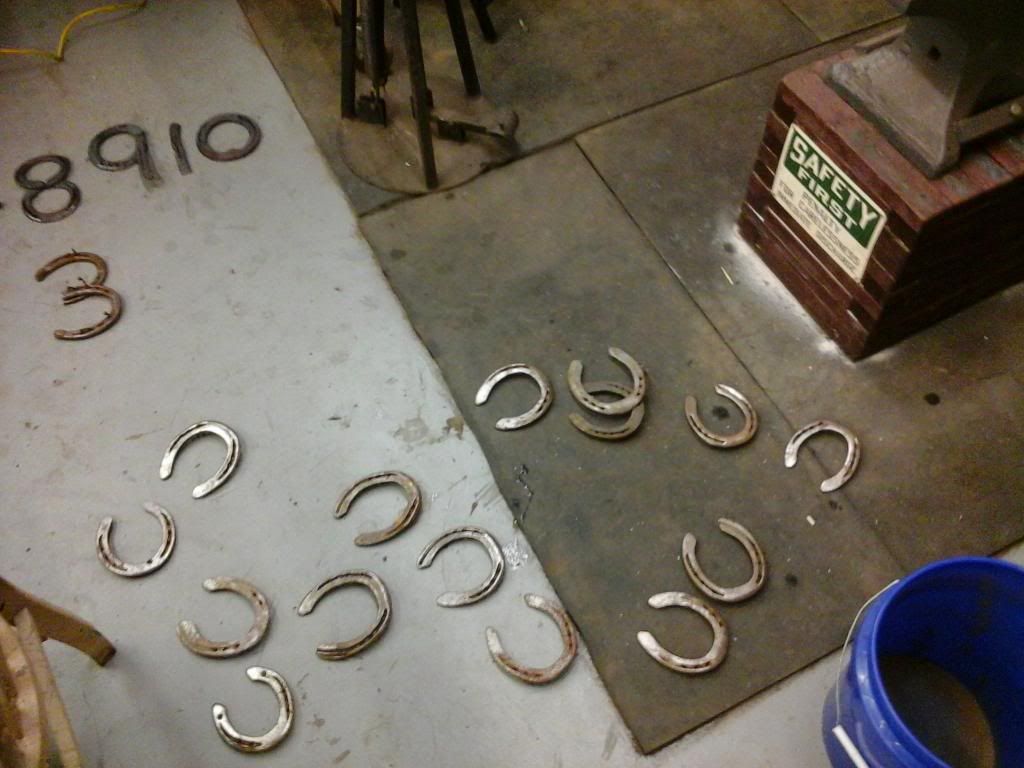
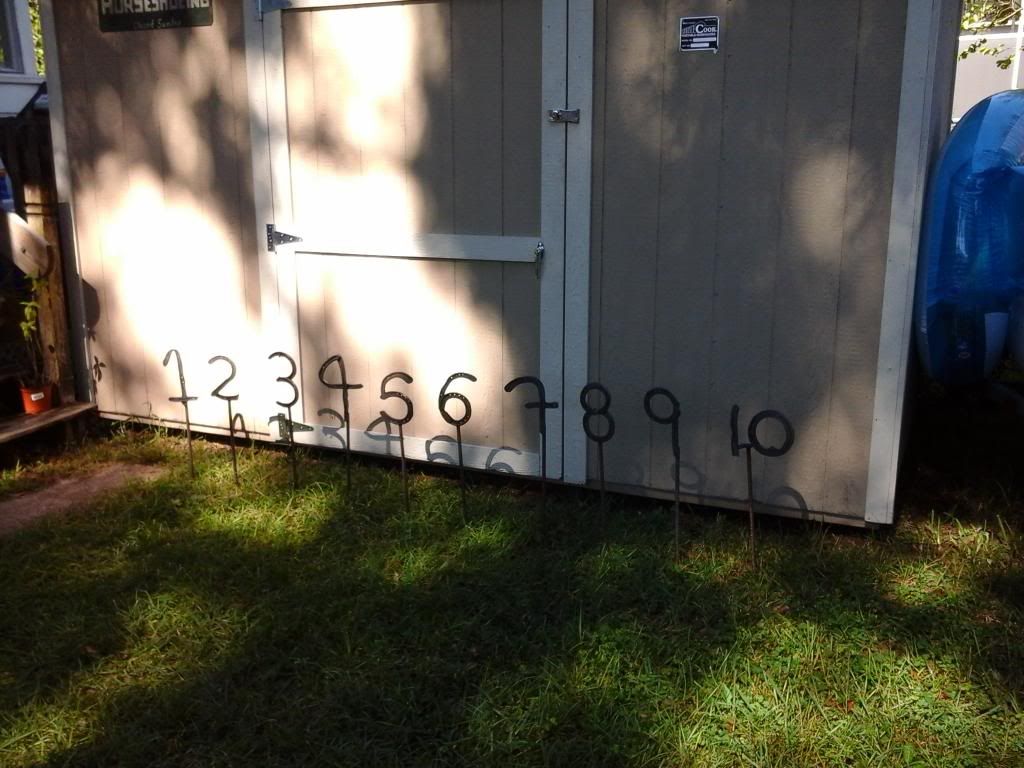
The second order took a little more concentration and honestly gave me some trouble...
The request was for two towel bars to go on the end of an old, primitive style, wooden bar. She wanted it to be forged and twisted with a brushed finish. I had to make them twice because this was the first time I have had to make hardware with a specific hieght and width requirement. Doing the math to figure out how much strech was going to occur form the twist and from forging the bends was a little harder than i expected.
The bars needed to be 14" across and around 4 inches in height. I figured on 14" of stock for the distance and 4" of stock for each side. That was 22" of 1/2x1/2" square bar stock. I then subtracted 1.5" from each side for the gain forging the mounting tabs was going to draw out of the stock and another 2" for random gains due to the stretching when its twisted, So my total length of steel was 17". when I finished the first set they were 4" tall and 15" wide! Dag!!!
So i re-made them with only an inch of random gain from the twisting and got it right on the 14" mark. In the future, the stretch from twisting should only be added if the twist are loosly done or covering alot of width. All four of the twist on each bar were tight and almost stationary so the stretch was minimal.
Oh well... live and learn and store it for next time.
Here's her bar brackets. I wasnt really happy with them but the customer was completly happy and ordered some more pieces.

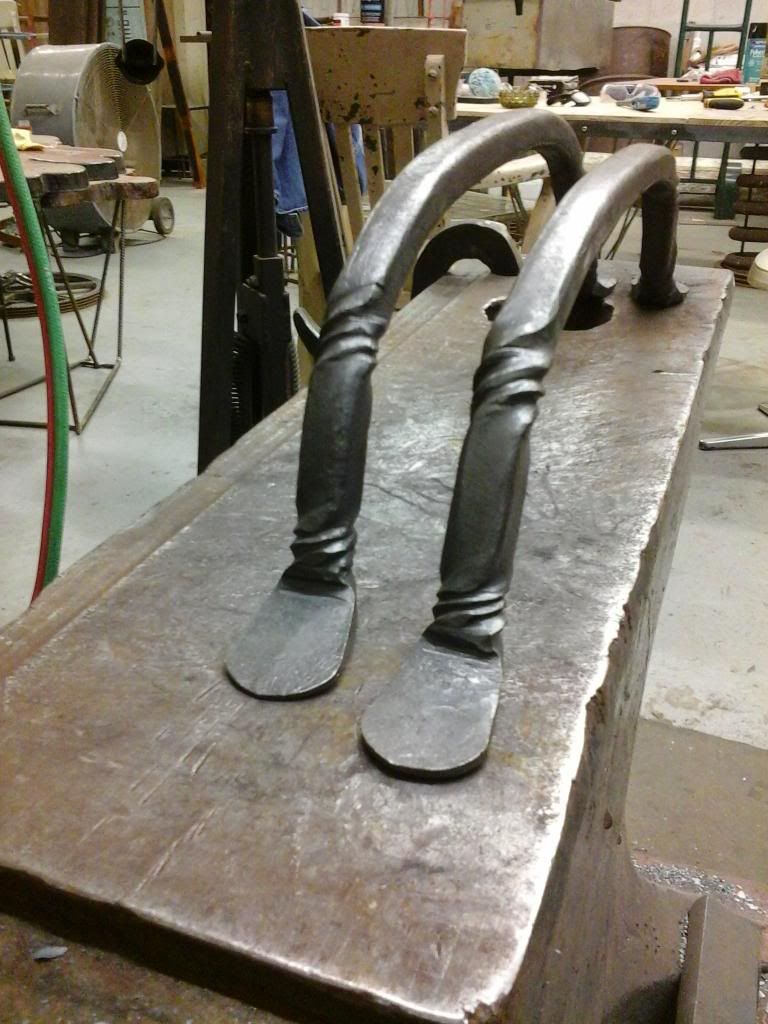
In the second photo you can see that the bar in back is higher and narrower than the bar in front. The front bar is perfect so to fix the rear you simply heat the corners with the torch and knock them down. As the corners come down the sides will push outward and the width increases so it only took a few taps to get them evened up.
Im going to work on the next knife update for a while and will hopefully have it posted soon.
Thanks
JP
Education through restoration thread link:
http://www.fsjnetwork.com/forum/viewtop ... =12&t=1366
Blacksmithing thread link:
http://www.fsjnetwork.com/forum/viewtop ... f=6&t=1381
http://www.fsjnetwork.com/forum/viewtop ... =12&t=1366
Blacksmithing thread link:
http://www.fsjnetwork.com/forum/viewtop ... f=6&t=1381
-
Florida83FSJCherokee
Topic author - Posts: 196
- Joined: Sat Mar 09, 2013 7:53 pm
- Location: Lakeland , Central Florida
Re: Blacksmith forging project thread idea (pic heavy)
Knives continued...
Ok, heres the latest batch of knives and the latest info from the heat treating front. Please note that I am learning this stuff as I go and sharing it with you in real time. My mistakes are learning tools and the info im presenting is as best i know of to date. As I improve I will update you and hopefully this journey will reach a point where success is achieved by following the system which has been developed.
I tried to photograph the different stages of the heat treating process to give some reference to all the info Ive been posting and alot of the photos will correspond with the chart "aggie" posted earlier as well.
So the first step is still the same. Get it hot and hit it hard!
Forging:
I dont worry so much any more about trying to forge the shape of the knife into the rasp but instead focus on forging the taper. Each rasp starts at 1/4" thickness and gets drawn down to 1/8" thickness. Next I try to envision the blade that im going to cut from the finished blank. With that picture in your head you can hammer out the blank leaving it thicker down the top line and working it to a very fine edge along what will be the bottom.
Heres a photo of the blank with what would be the imaginary blade from my head drawn on it. By forging the taper before hand the grinding time is reduced a tremendous amount and my belt usage is lower so I spend less money per knife.
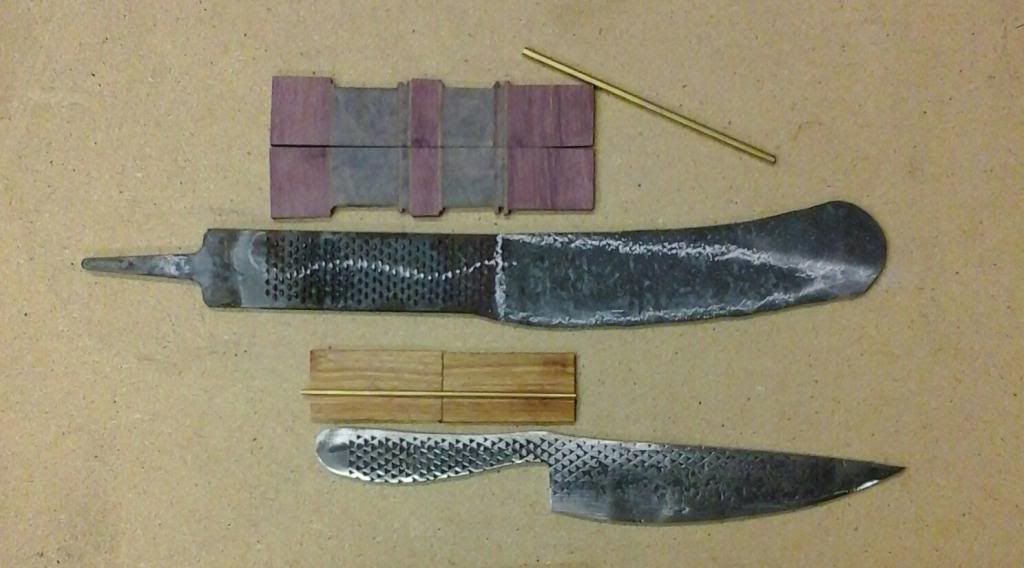
The band saw is going to do a much better job at making the shape than my hammer is and its also also way! faster than trying to move that incredibly hard W-2 steel around
That being said, if i quench the forged steel at this point it will harden. Even if not done at a high temp it still will be made tougher to some degree by cooling it. The temperature difference that simply coming from the forge to what the amibiant room temperature is will harden it to a degree.
In order for the bandsaw to cut through the tool steel at faster than a couple inches a minute I need to turn the forged blank into the softest state possible. This improves the speed at which it cuts but also reduces stress on the blade. My band saw has a 108" blade so they are not cheap and replacements must be ordered. While the blade I have is built for cutting hardend tool steels the longer it last the better.
Annealing and Normalizing:
To achieve the softest stage of metal is to Anneal it. That involves bringing the steel up to what its specific critical temperature is and holding it there for a set period of time. We are usually talking an hour or more of holding temp and then a very!!!! slow controlled cooling of the steel. Temps usually cant decrease more than 50deg per half hour. So without a kiln and temperature controller true annealing isnt an option.
side note:
When you buy tool steel it usually comes completly annealed from the foundry. This is why stock removal knife builders dont need to do all the heat treating before hand. When its removed from the package its the softest it will ever be. So the heat treating usually comes after the grinding has finished.
So to work with what i have, I can do a lesser form of annealing called "Normalization". This involves bringing the steel up to "non magnetic" or 1450deg and then cooling as slowy as your set up alows. With my forge I can get the inner liner very very hot and it will stay hot for along time after the gas is shut off. I can further increase the temp holding ability by blocking off the side ports with 1/4 plate. After an hour my blanks will still have a light cherry golw when the forge has remained closed up.
The steel is alowed to cool untill its room temperature. With my forge set up that can take up to 4 hours. Now that seems like a long time but the hardness is decreased enough that the bandsaw can rip through the blanks and more importantly the cut out blank is easier to grind during the stock removal portion of the blade build.
Here is a picture of the blanks soaking in the forge heat during the "normalization process"
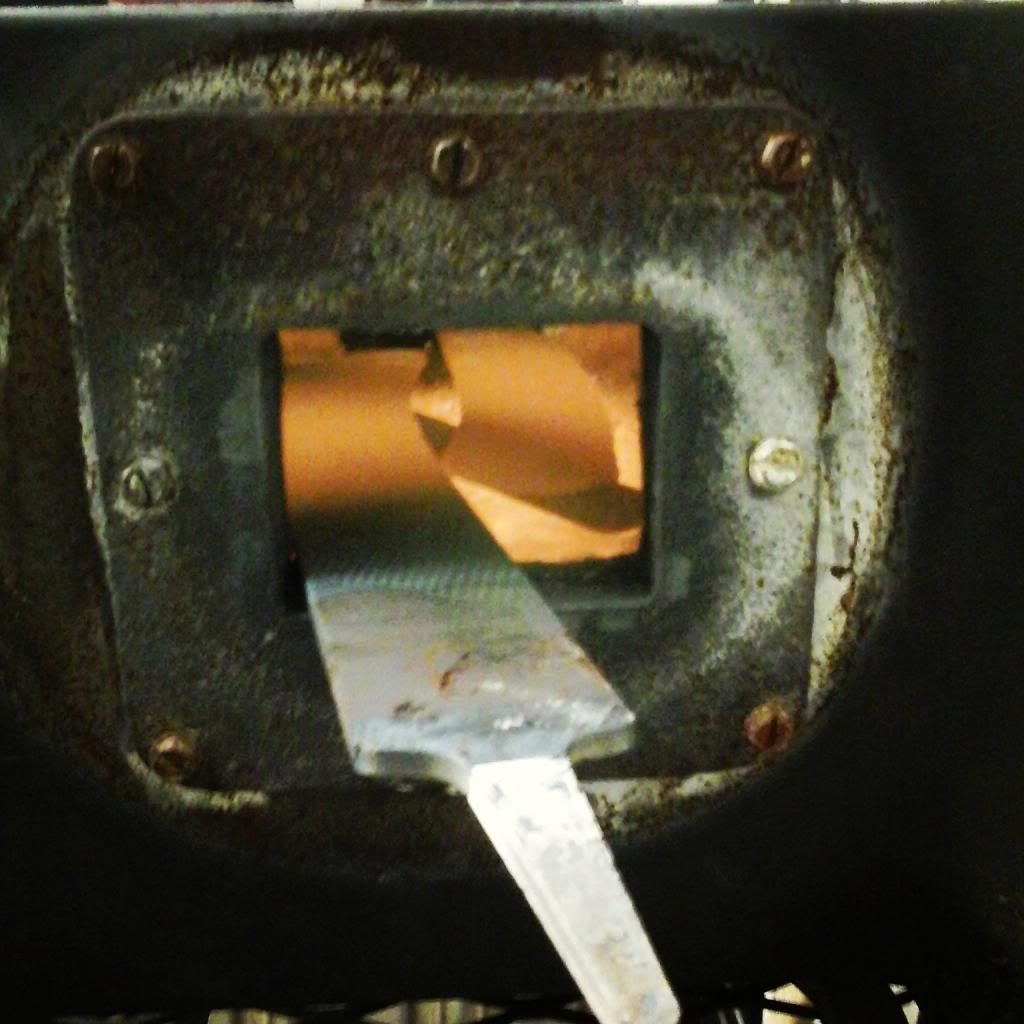
So after normalizing, the shape is cut, and you can spend as much time as you desire grinding the perfect blade for your knife. When you have reached the thickness and contour that is ideal for your finished knife design you need to stop before putting your finished cutting edge in place. I take a moment to drill out my pin holes and get any fine tuning of "level" or straightness fixed if needed.
Hardening:
The next step is to harden the steel back up to the level it was before you normalized it. This step is quenching or hardening...
Its important that you heat the steel enough to affectivly harden it throughout the blade but not heat it to the point that your start to break down the strucuture permanently. The chart that "aggierailroad" posted shows the different names for this breakdown and the temps that certain steels reach those breakdowns.
Unless you have a pretty rad thermometer or a kiln its not really possible to know how or when you will reach the ideal temp for hardening or to know that you didnt reach a temp higher than needed and instead cause your steel to become brittle. Luckily, the ideal temp for hardening is 1450def far. This is also the temperature at which steel becomes "non Magnetic". So by using a magnet you can put your knife in the fire, heat it, check its magnetism, and repeat untill it no longer attracts the magnet. Once non magnetic is reached the quenching can occur.
Since the rasp steel is a "W" steel i can use water or brine to quench, and once non-magnetic is reached i immediatly cool the blade in the water.
When the cooling occurs it shocks the molecules in the steel and causes them to bunch up real tight. This makes the steel more dense and in turn harder.
Here are some pictures:
heating to non-magnetic 1450 deg.
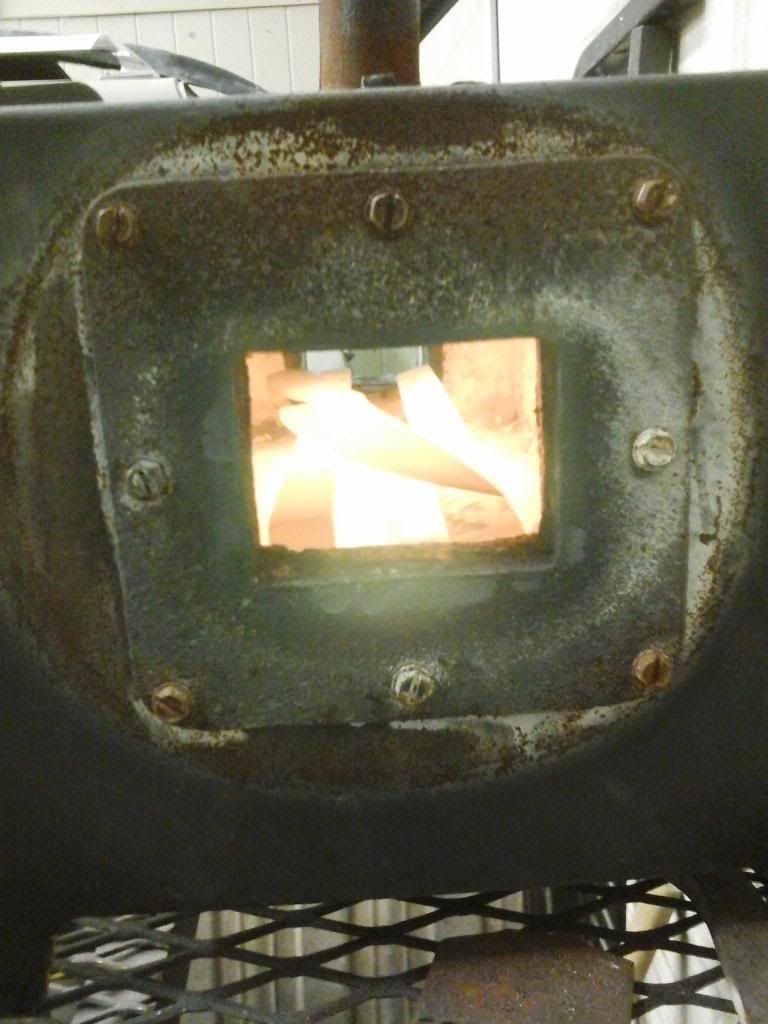
After the shock cooling:
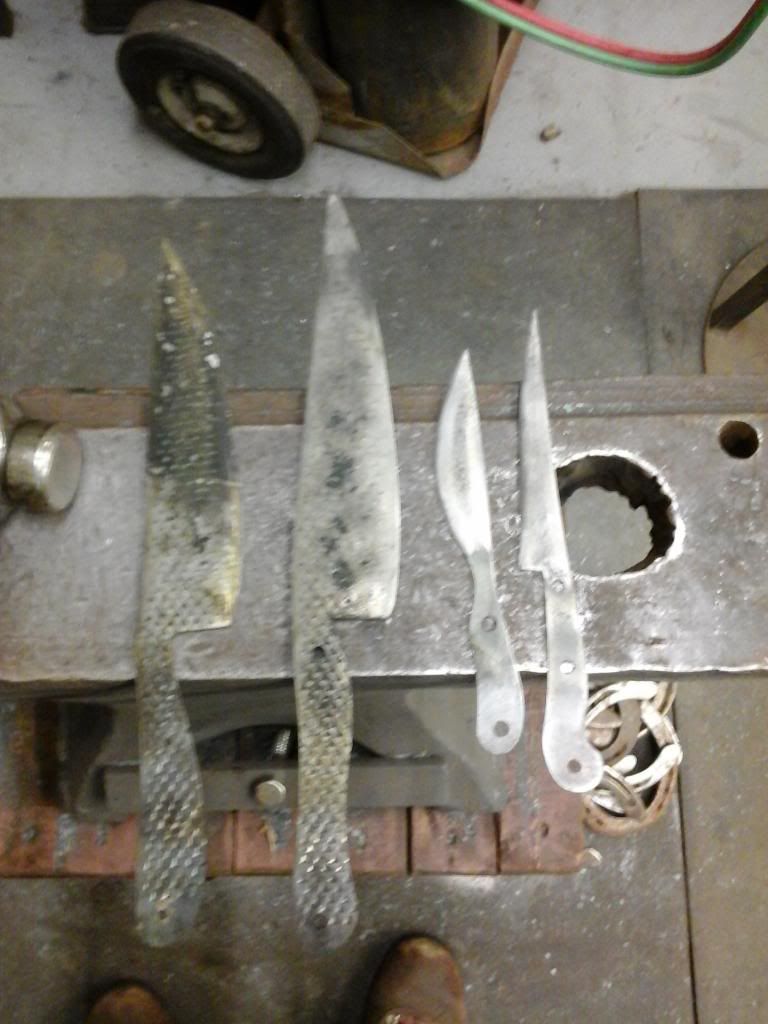
Notice the coloring in the above pictures. Since I was trying to photograph this instead of paying attention I let one of the knives get to hot. I quenched it and it became brittle and got micro cracks in the surface along the thickest section of the blade where it was alowed to get the hottest. The coloring shows the damaged steel compared to the normally quenched steel. The chart aggi listed has the correct names for when these damaging changes take place but for general purposes its bad when they do.
That knife was ruined and along with it about 3 hours or labor. Instead of tossing it I ground it down untill I had removed all the steel with visible hairline stress cracks and reshaped it into a serving knife. It would never be safe to use as a chopping knife but it will be fine for cutting cake or carving the turkey at thanksgiving. Ill keep it and it can be a nice addition to my cutlery at home.
Education through restoration thread link:
http://www.fsjnetwork.com/forum/viewtop ... =12&t=1366
Blacksmithing thread link:
http://www.fsjnetwork.com/forum/viewtop ... f=6&t=1381
http://www.fsjnetwork.com/forum/viewtop ... =12&t=1366
Blacksmithing thread link:
http://www.fsjnetwork.com/forum/viewtop ... f=6&t=1381
-
Florida83FSJCherokee
Topic author - Posts: 196
- Joined: Sat Mar 09, 2013 7:53 pm
- Location: Lakeland , Central Florida
Re: Blacksmith forging project thread idea (pic heavy)
Tempering:
step one - wait until your wife has gone to bed and steal the oven for the night!
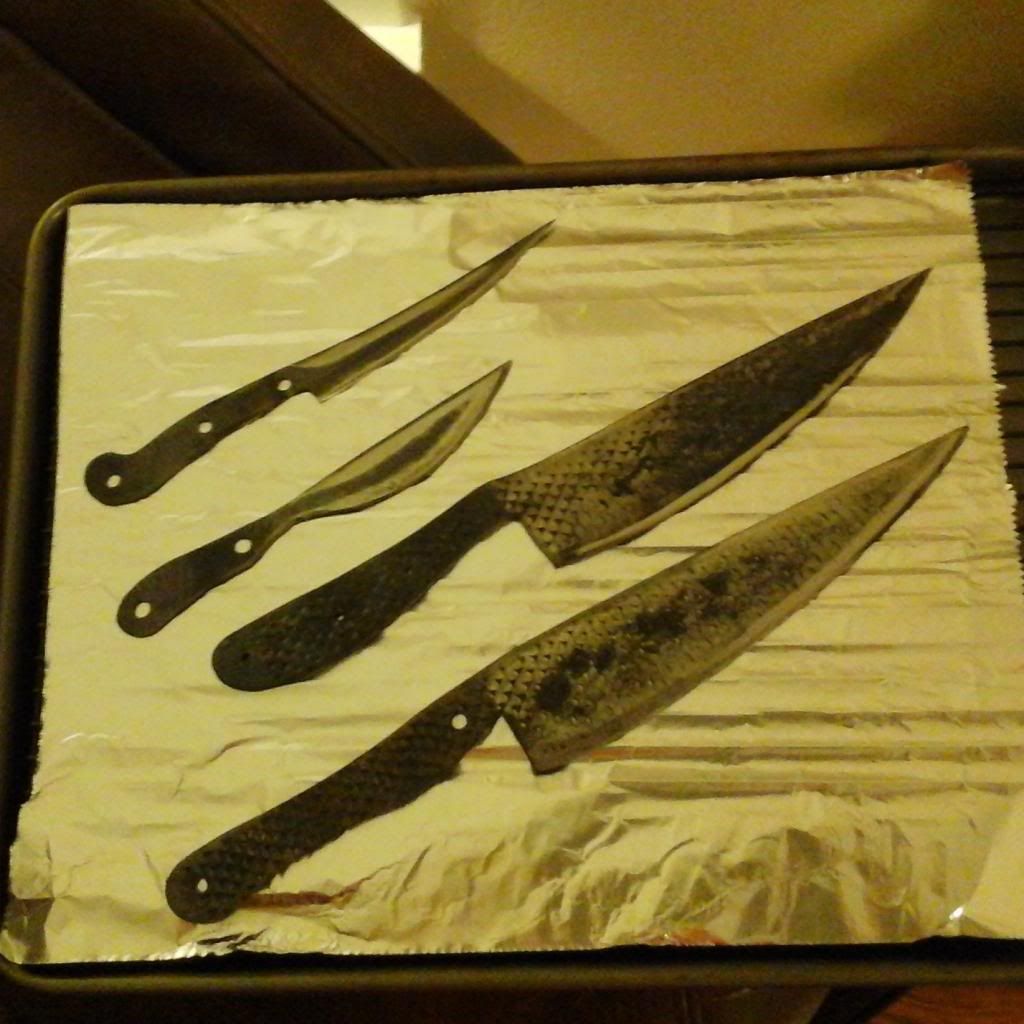
Ok here are the charts from the previous post reguarding the tolerances for W-2 steel and tempering.
So tempering has been discussed in some previous post so Im not going to be very in depth on the "whys". Instead I would like to use the charts to show how I achieved what i did.
From many discussions with my mentor, researching online, and talking with a fellow "junksteel" Knife maker on instagram i determined that the best Rockwell Hardness for my kitchen type knives is around 60HR. This appers to be the best balance for keeping a sharpend edge and being able to resharpen when needed. If the hardness is to high on the rockwell scale then you can probably put an edge on the knife with your belt sander but you wont be able to achieve it any other way. On the same note if its to soft it wont hold its edge and will need constant maintainence.
So by using the chart to achieve 60 RC my temperature needs to stay at 580deg. How long to soak the steel at temp depends on the type of steel but I have a set time of 1.5hours. I have read that the time is no less than 30 min per 1/4" of thickness but all of my contacts use a set 1.5 hour system so untill i understand it better im sticking with that.
A fun fact Ive learned is that my oven at home is only accurate when set up to 430deg. after that it doesnt regulate the temperature correctly and it gets up to 550plus. This was discoverd by accident when I tried to temper a batch at 450 and the color chart showed it had gotten to the high five hundereds. I turned it down to 430 for the second batch and they came out golden straw colored just like they were supposed to. Then I tempered the cleaever and set it to 450 again and reached the 550plus mark. guess im lucky the fault is working in my favor but let it be a warning that the home oven may not be as correct as you think.
Here are the blades after tempering, I temper them TWICE!! and let them cool complety in between. Thats why I do it late at night so no body disturbs them while they are cooling. Then the next night I repeat the procedure.
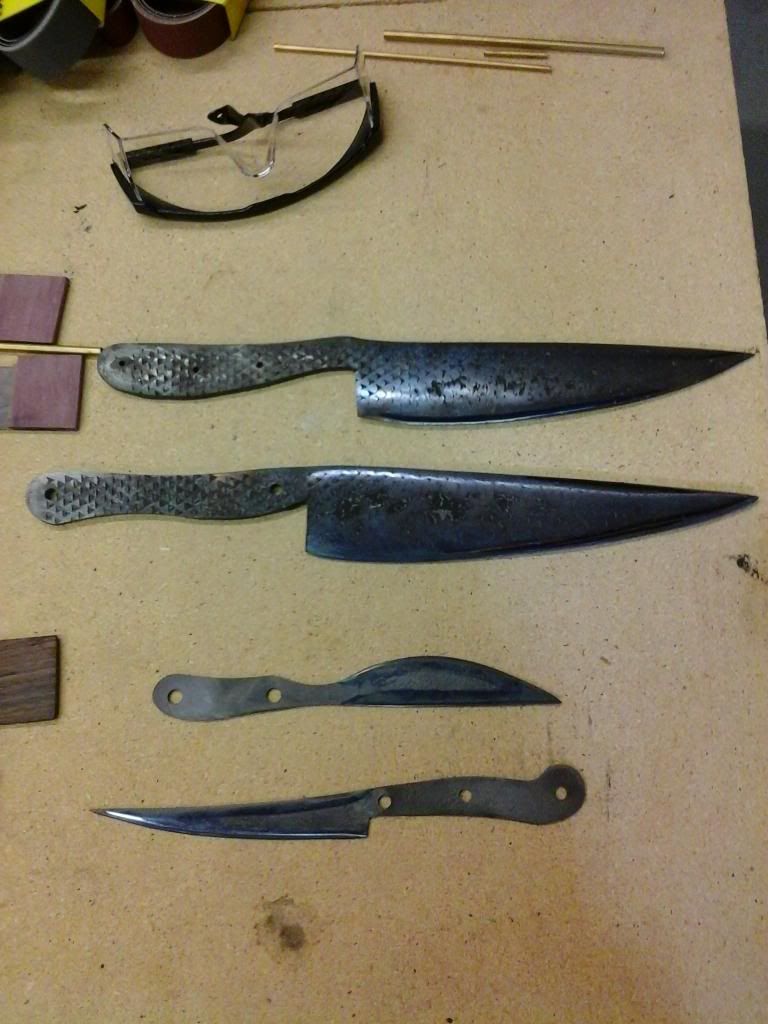
the color chart and my blades match up so my rockwell of 60HR should be fairly close.
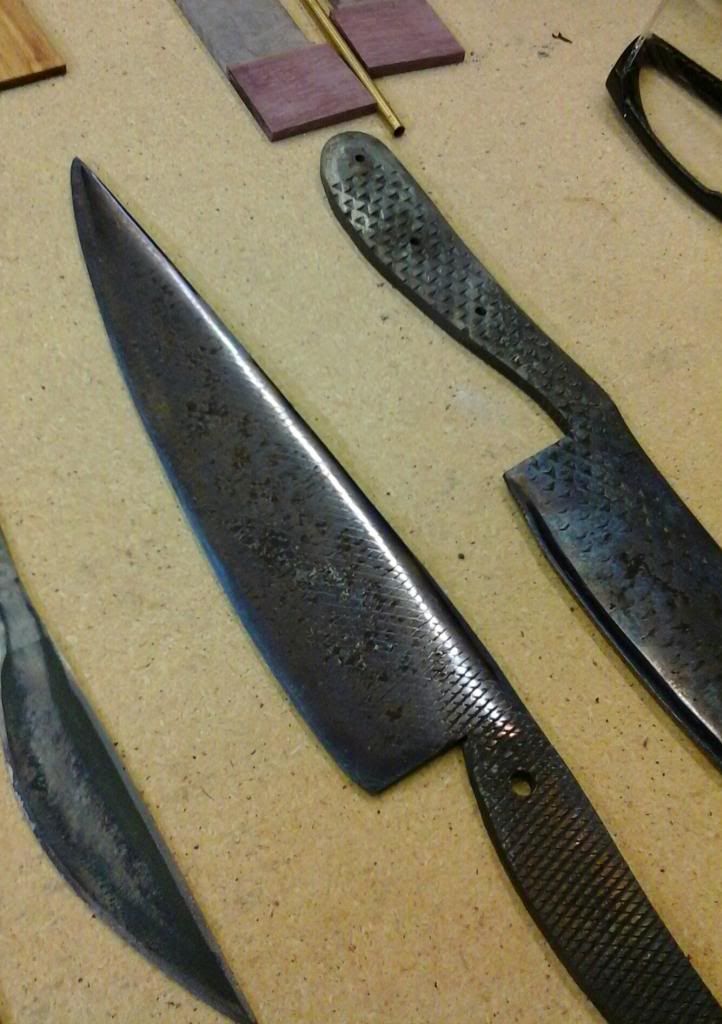
Finishing up:So from here is the fitting of the handle scales and pins and the applying the epoxy. Then the artistic work starts and you can do the sanding/sculpting in the handle work and finish the blades cutting edge and polish.
Fitted scales pinned loosly to alow them to slide to one side or the other while applying epoxy.
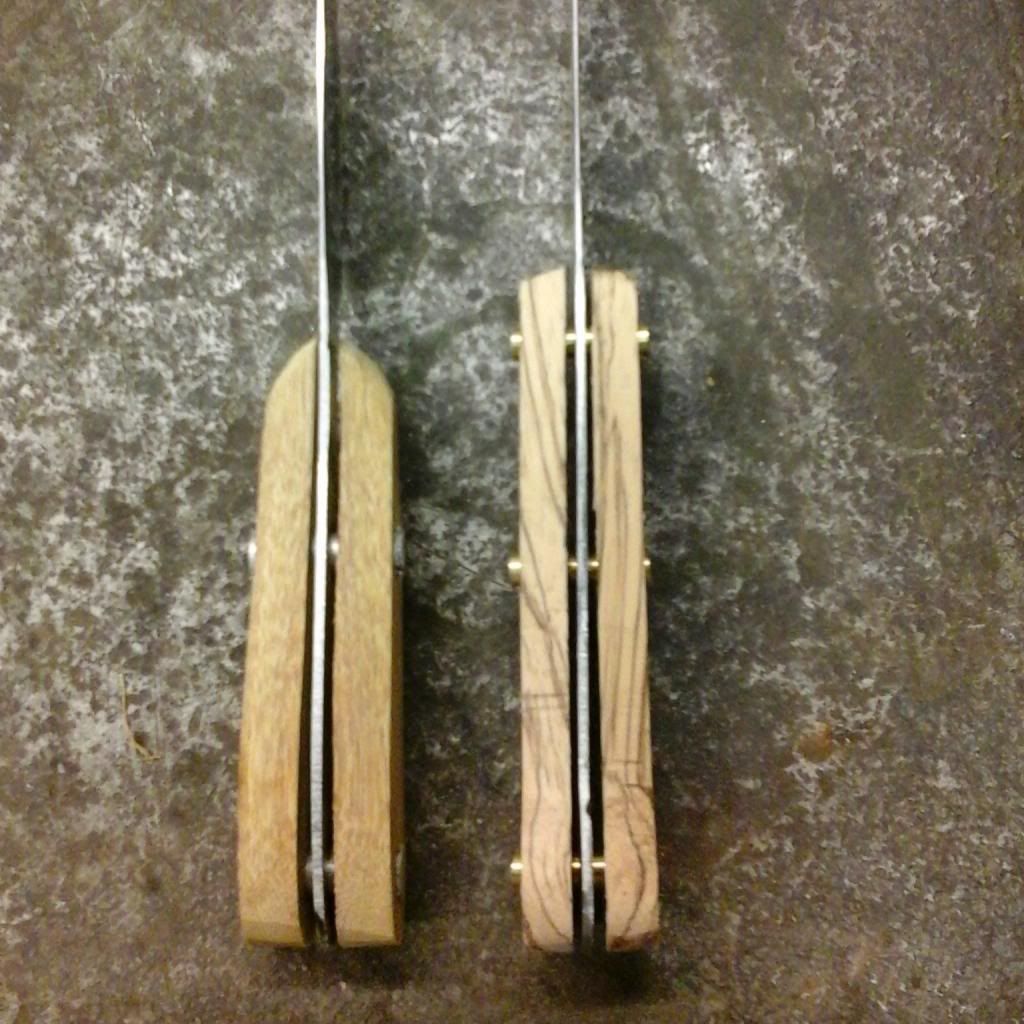
Heres the shape of the serving knife that i created from the tosty chef style from earlier
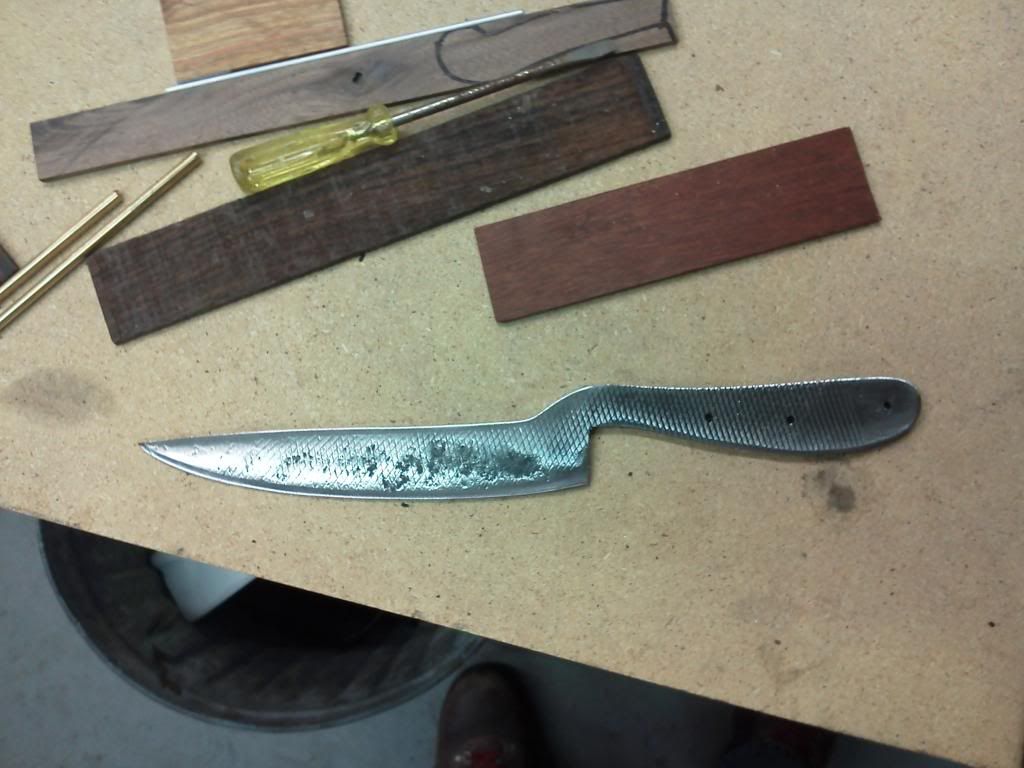
ready for glue
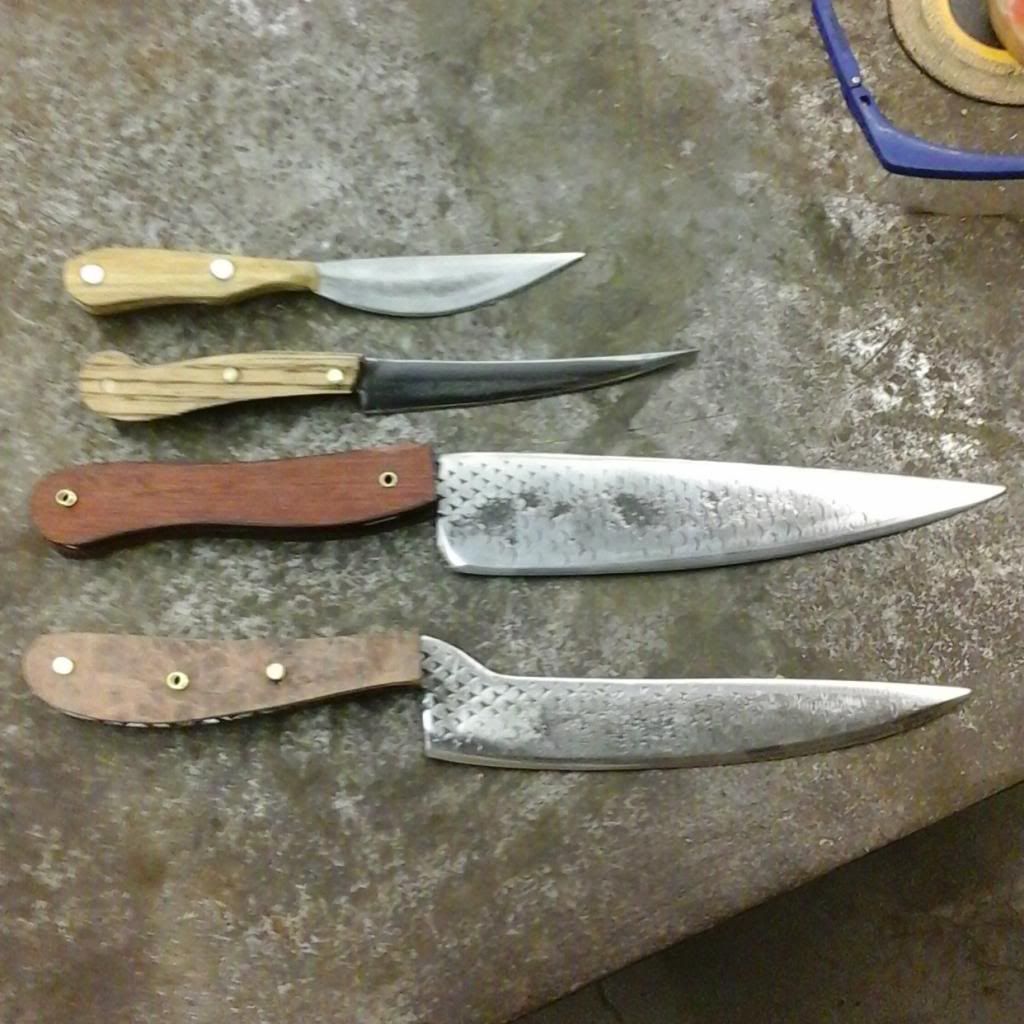
Aggiemethod insures a flawless bond
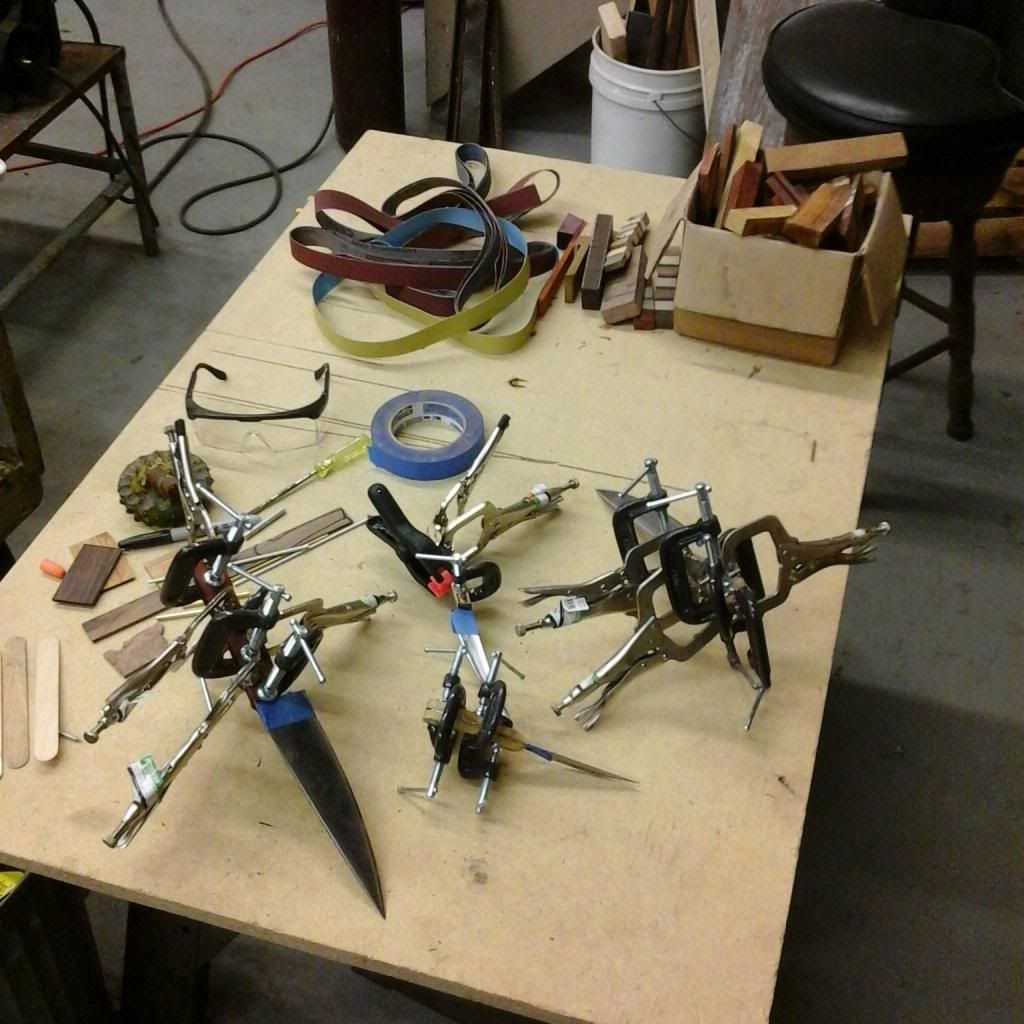
Final sanding and apply the sealant to the handles. I wanted to make the serving knife look fancy since its basicly as decoration. It got a burl handle to dress it up. :thumbup:
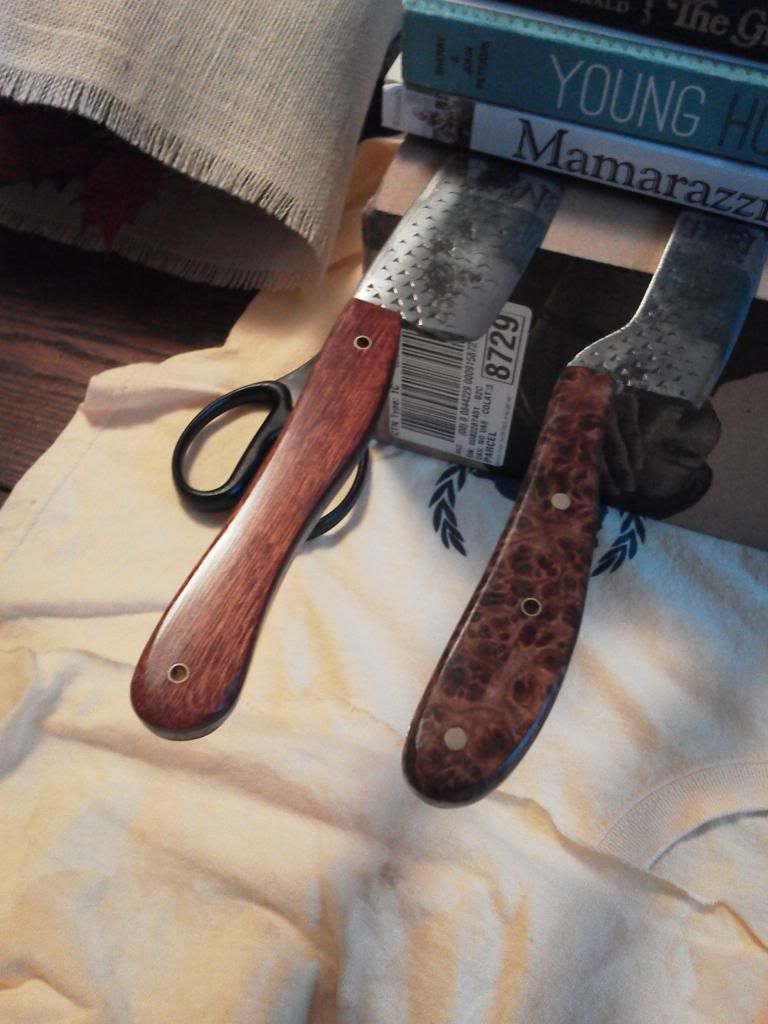
And your done:
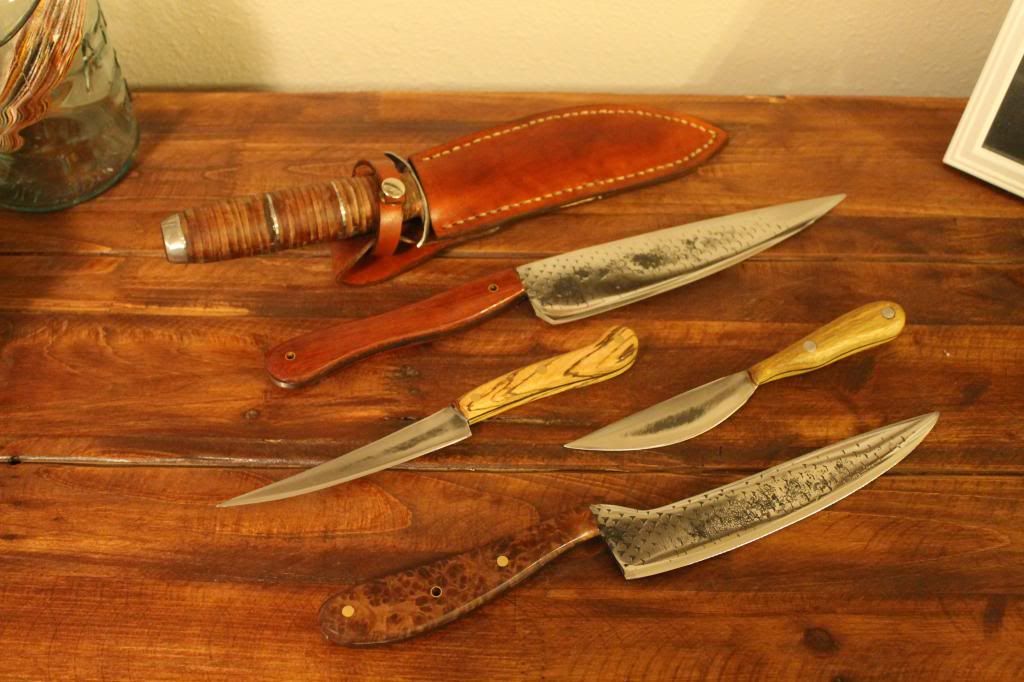
The fillet knife and the deep belly paring knife were cut out of an old cross cut saw. Ive been trying to source more material choices and these seem to be in everyones garage stuck aginst the back wall behind the motorized and electrical tools. The fillet knife has what is my first attempt at differential tempering/hardening and its actually very flexible still but the baldes edge felt really good when I was sanding it. Time will tell but Ill post on that technique after i try it a few more rounds.
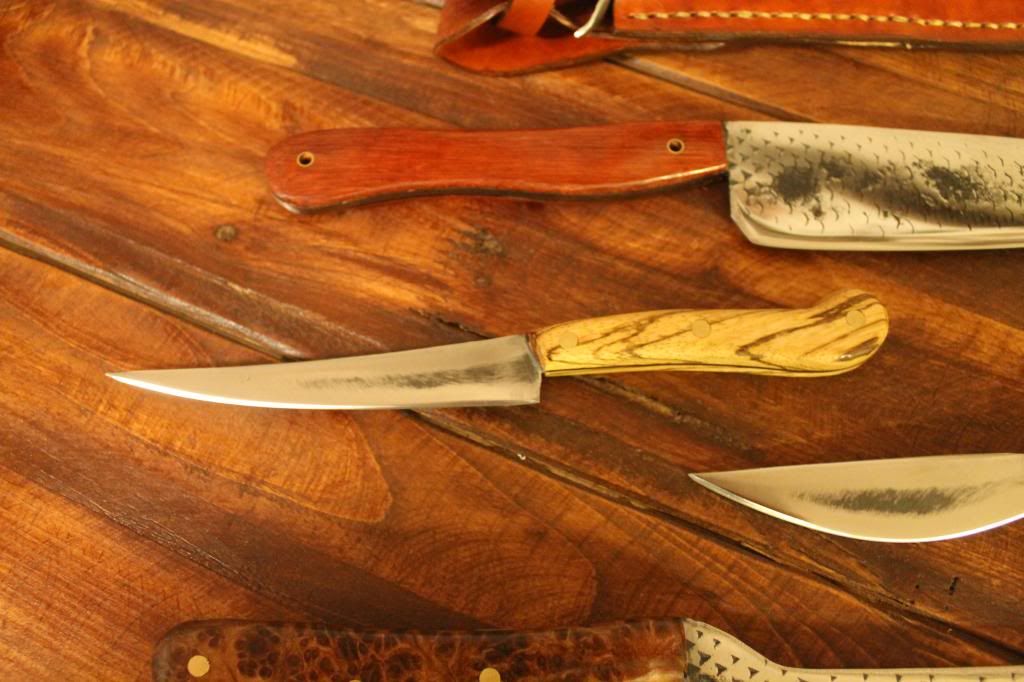
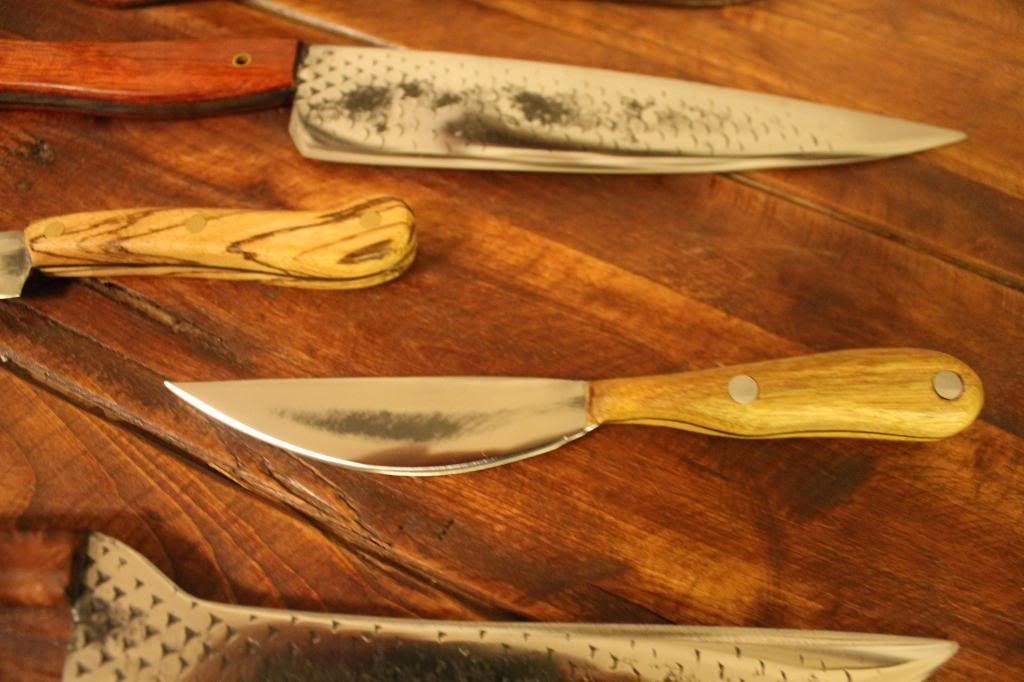
So you probably noticed the other knife in the pictures. This was my first attemp at replication of a "KA-BAR" style hunting knife. Ill do a more detailed post soon but Im working on the second one and its going much smoother than this one did. The fit of the thumb guard was tricky as well as some other stuff.
the one pictured has a stacked leather disc handle that turned out way better than my blade did. Im fixing some blade issues in the second attempt so dont laugh to hard at this one. The sheath was made by Boondock studios here in lakeland florida. He does great work and helped me with the disc cutouts. If i can get my act together this has the potential to become a really cool knife and belt sheath to add to the booth.
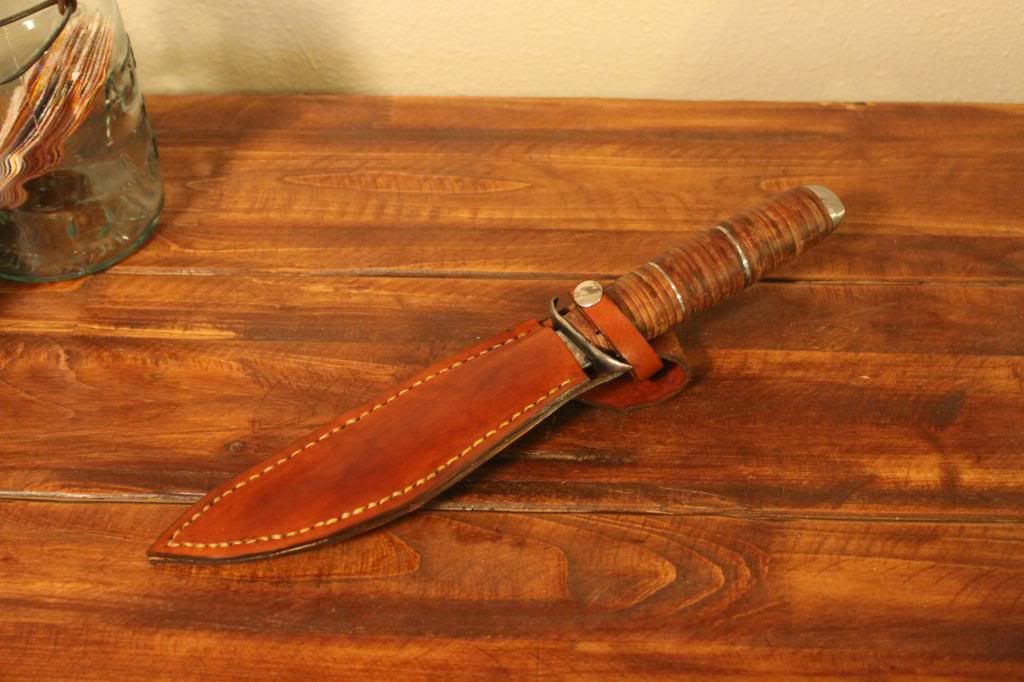
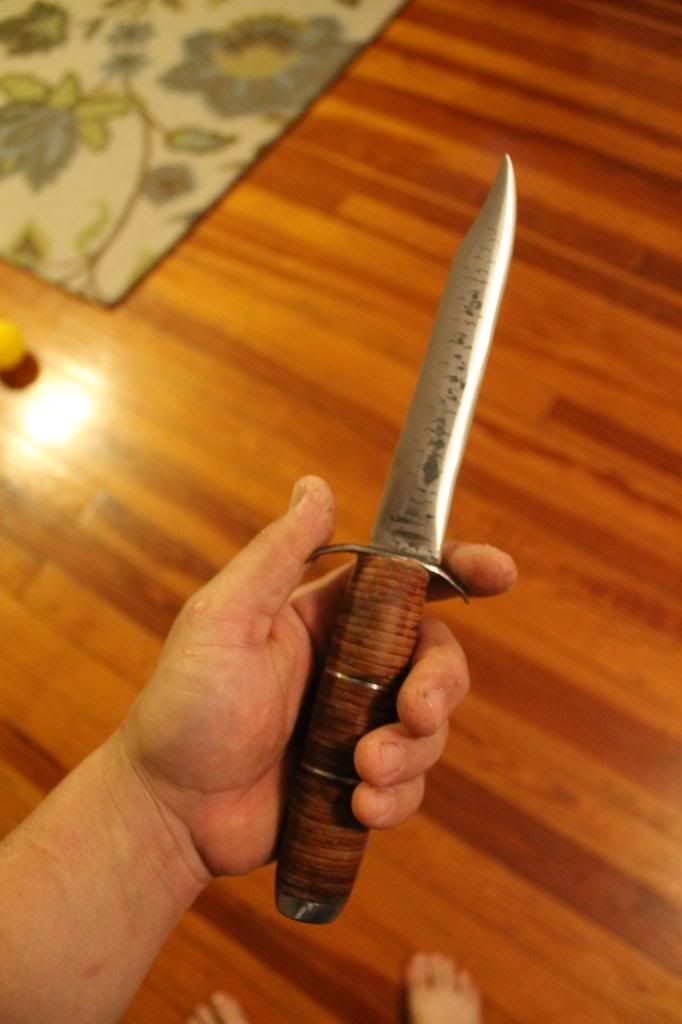
ok, as promised earlier this week here is the list of typical steel types from junkyard materials so now nobody has an excuse not to make stuff.
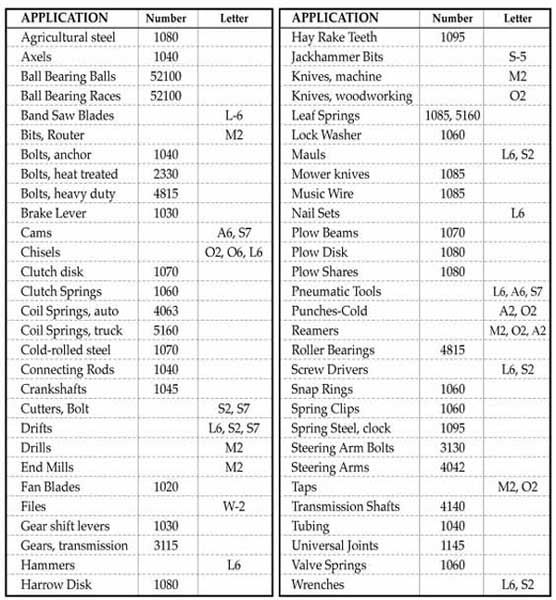
Allright, have a great week and thanks for reading along. I hope someone other than aggie and mysef cares about the technical info. Its alot of reading and Im aware of the time it takes to actually read through instead of just photo hoping so thanks again to you guys using this stuff to make your own work better.
JP
Jarhead, thanks alot! for sure shoot me a message!
step one - wait until your wife has gone to bed and steal the oven for the night!

Ok here are the charts from the previous post reguarding the tolerances for W-2 steel and tempering.
So tempering has been discussed in some previous post so Im not going to be very in depth on the "whys". Instead I would like to use the charts to show how I achieved what i did.
From many discussions with my mentor, researching online, and talking with a fellow "junksteel" Knife maker on instagram i determined that the best Rockwell Hardness for my kitchen type knives is around 60HR. This appers to be the best balance for keeping a sharpend edge and being able to resharpen when needed. If the hardness is to high on the rockwell scale then you can probably put an edge on the knife with your belt sander but you wont be able to achieve it any other way. On the same note if its to soft it wont hold its edge and will need constant maintainence.
So by using the chart to achieve 60 RC my temperature needs to stay at 580deg. How long to soak the steel at temp depends on the type of steel but I have a set time of 1.5hours. I have read that the time is no less than 30 min per 1/4" of thickness but all of my contacts use a set 1.5 hour system so untill i understand it better im sticking with that.
A fun fact Ive learned is that my oven at home is only accurate when set up to 430deg. after that it doesnt regulate the temperature correctly and it gets up to 550plus. This was discoverd by accident when I tried to temper a batch at 450 and the color chart showed it had gotten to the high five hundereds. I turned it down to 430 for the second batch and they came out golden straw colored just like they were supposed to. Then I tempered the cleaever and set it to 450 again and reached the 550plus mark. guess im lucky the fault is working in my favor but let it be a warning that the home oven may not be as correct as you think.
Here are the blades after tempering, I temper them TWICE!! and let them cool complety in between. Thats why I do it late at night so no body disturbs them while they are cooling. Then the next night I repeat the procedure.

the color chart and my blades match up so my rockwell of 60HR should be fairly close.

Finishing up:So from here is the fitting of the handle scales and pins and the applying the epoxy. Then the artistic work starts and you can do the sanding/sculpting in the handle work and finish the blades cutting edge and polish.
Fitted scales pinned loosly to alow them to slide to one side or the other while applying epoxy.

Heres the shape of the serving knife that i created from the tosty chef style from earlier

ready for glue

Aggiemethod insures a flawless bond

Final sanding and apply the sealant to the handles. I wanted to make the serving knife look fancy since its basicly as decoration. It got a burl handle to dress it up. :thumbup:

And your done:

The fillet knife and the deep belly paring knife were cut out of an old cross cut saw. Ive been trying to source more material choices and these seem to be in everyones garage stuck aginst the back wall behind the motorized and electrical tools. The fillet knife has what is my first attempt at differential tempering/hardening and its actually very flexible still but the baldes edge felt really good when I was sanding it. Time will tell but Ill post on that technique after i try it a few more rounds.


So you probably noticed the other knife in the pictures. This was my first attemp at replication of a "KA-BAR" style hunting knife. Ill do a more detailed post soon but Im working on the second one and its going much smoother than this one did. The fit of the thumb guard was tricky as well as some other stuff.
the one pictured has a stacked leather disc handle that turned out way better than my blade did.


ok, as promised earlier this week here is the list of typical steel types from junkyard materials so now nobody has an excuse not to make stuff.

Allright, have a great week and thanks for reading along. I hope someone other than aggie and mysef cares about the technical info.
JP
Jarhead, thanks alot! for sure shoot me a message!
Education through restoration thread link:
http://www.fsjnetwork.com/forum/viewtop ... =12&t=1366
Blacksmithing thread link:
http://www.fsjnetwork.com/forum/viewtop ... f=6&t=1381
http://www.fsjnetwork.com/forum/viewtop ... =12&t=1366
Blacksmithing thread link:
http://www.fsjnetwork.com/forum/viewtop ... f=6&t=1381
-
Florida83FSJCherokee
Topic author - Posts: 196
- Joined: Sat Mar 09, 2013 7:53 pm
- Location: Lakeland , Central Florida
Re: Blacksmith forging project thread idea (pic heavy)
Been chugging away here at the Doghouse this month. Just wanted to post an update of some of the things that have been produced.
Unfortunatly/fortunatly, my real job has been crazy busy. Honestly, its always crazy busy, but there are a few weeks that really leave no time for playing. Ive been putting in late nights at the shop in order to keep up with the market booths inventory. So around 8pm when my kiddo goes to sleep its off to the Doghouse for a few hours to hack away at the never ending....
Some highlights from the last couple weeks are a new round of serving boards, a cool display/mantel shelf, and another attempt at flora forging with some maple leaves.
Here are the boards. These are the biggest sellers at the market. Luckily, they are way easier to make than the butcher block cutting boards. Its been fun to play with grains and tones with in the wood. The guys at woodcraft laugh at me because I spend a long time looking at the woods overall picture instead of quick, straight, and true glances straight to the checkout.
Walnut is the most important to analyze in my opinion since it can vary from light to dark so quickly on the same board. These changes in tone can add really cool dynamics to the finished piece but some for thought and planning are needed. If you get the tones wrong it will look chaotic and unpleaseing.
Anyway, I know...this is a blacksmithing thread, but these came out really sweet.
The left side is maple ambrosia, walnut and padauk. The center is walnut, padauk, and a sliver of red oak. The right is red oak, padauk, yellow heart, and purple heart. Just in case anyone dosent realize it, there is no stain used, just the natural coloring in the wood. The finish is "Watco Buthcher block oil and sealer" so everything is food grade...even the titebondIII.
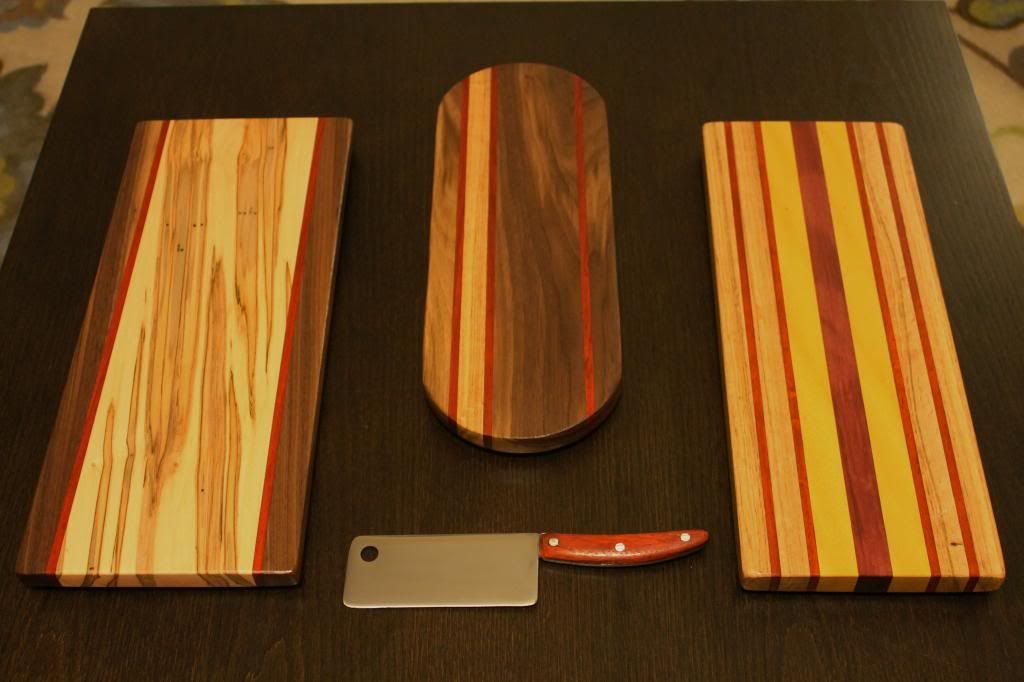
I found some crazy vibrant padauk this last trip to the store and man was it fun to play with. It made a great handle for the lastest "Cheese Cleaver" and I think im going to sell the Ambrosia board with the knife as a set.
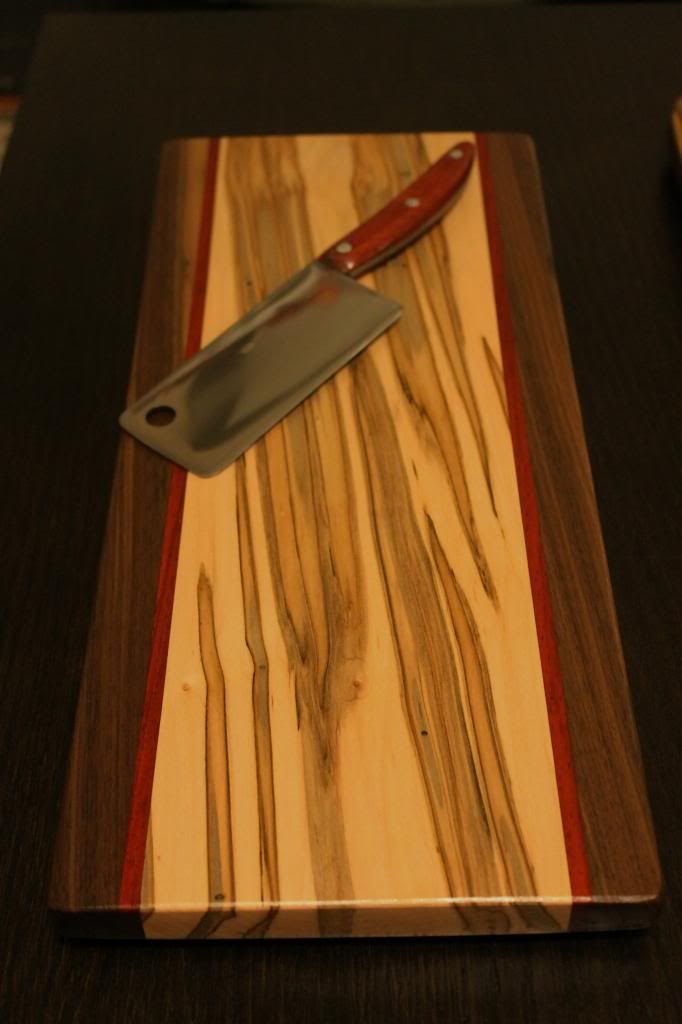
The walnut was a blast to play with. It contrasted the padauk so well.
The radious was provided by a discarded 6" sanding pad.
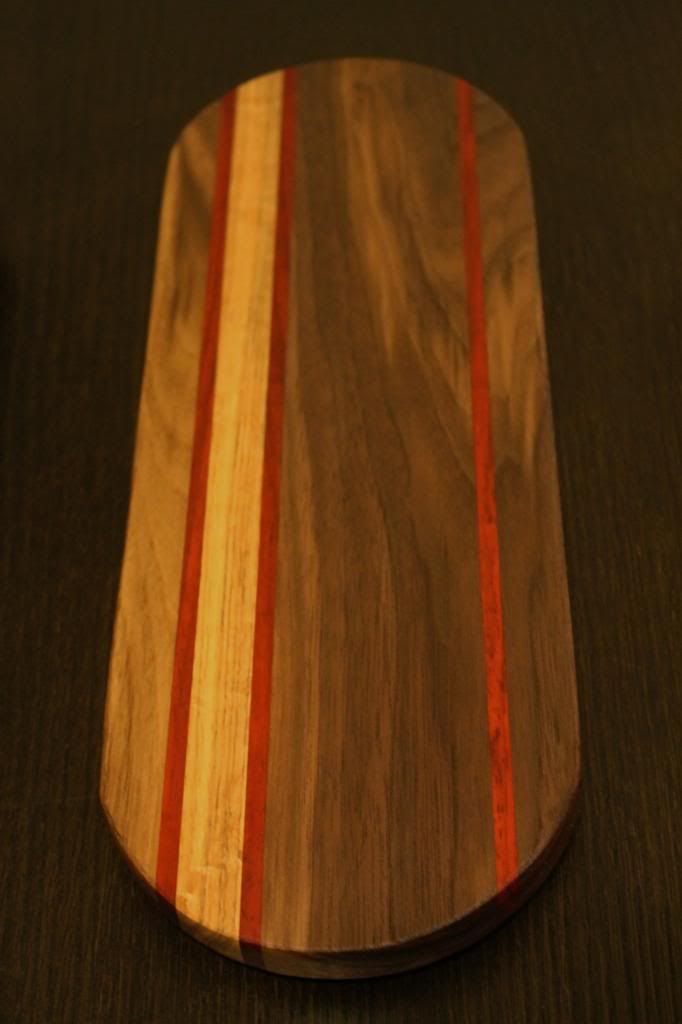
People eat these colorful boards up as fast as I can make them...
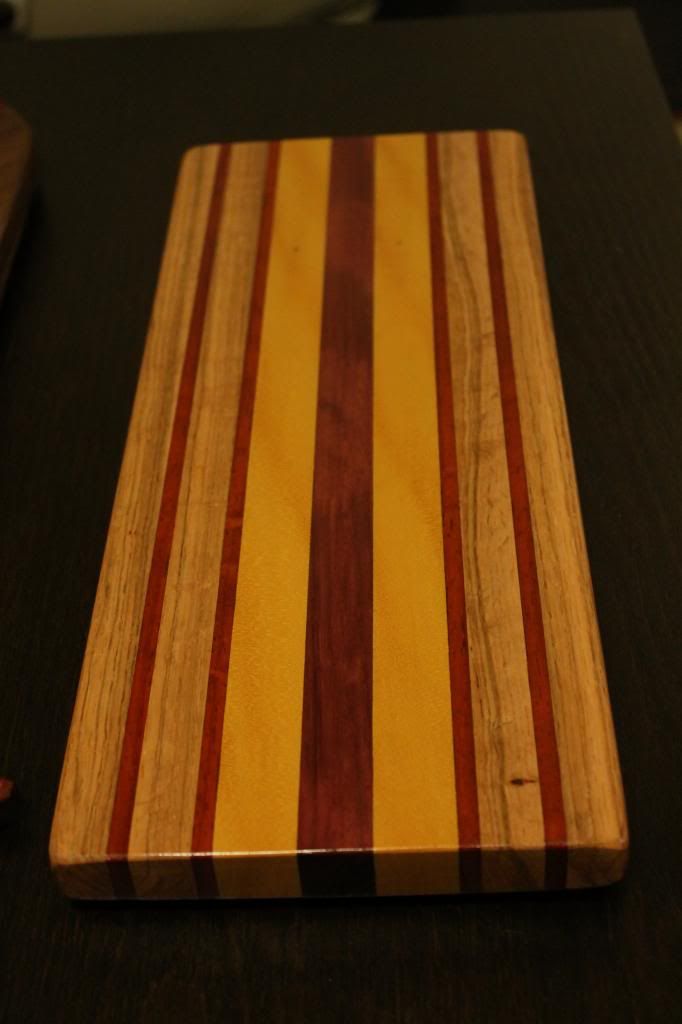
Heres the flip side of the Ambrosia and the walnut boards
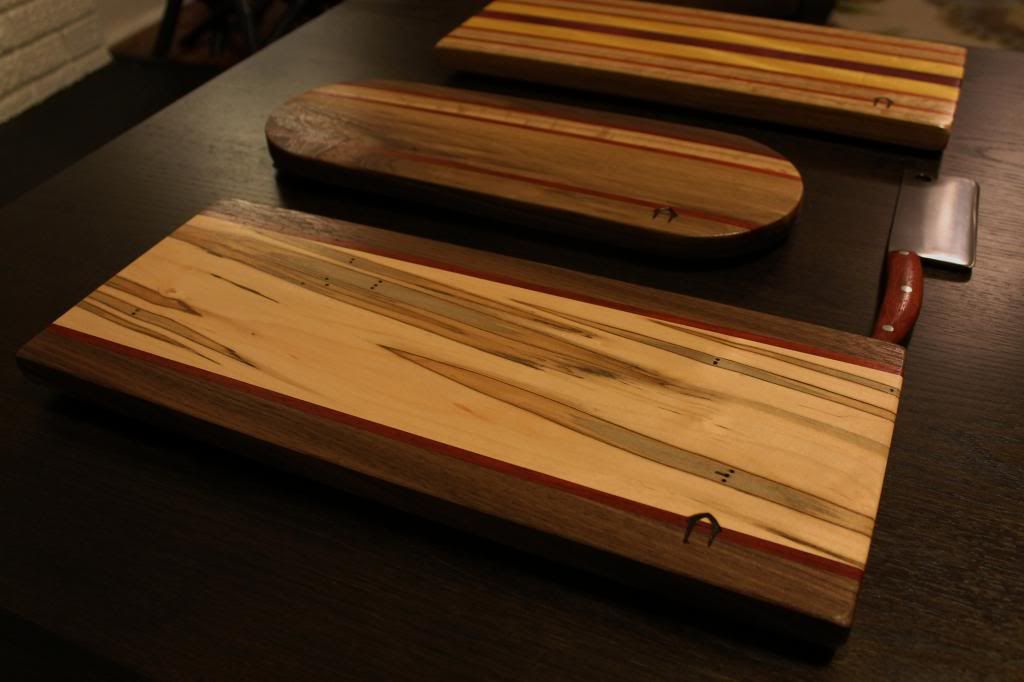
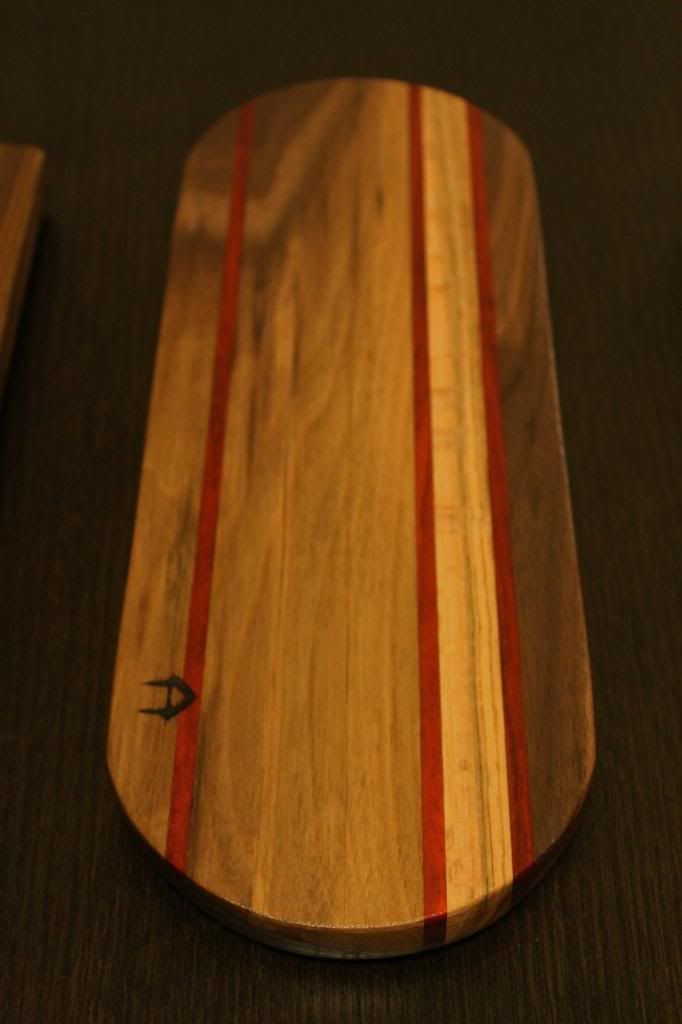
Another fun project was incorporating some salvaged steel I scored walking the closed rail road tracks across from the shop. I was hunting for thrown spikes to use for an up coming knife project, and found these two beauties half buried near some pulled track sections. Im not sure what they were for but the shape was amazing. All I did was get them hot and block brush the rust off, then I welded some 1/8"x1/2" flat bar to the top with holes punched for some screws; oiled the steel and baked it in the forge untill it got nice and black.
The walnut I used for the top was a special piece I have had for a while. Its a perfect pattern, unbroken and colored beautifully. I couldnt bring myself to cut it into strips for serving boards and Im glad I held onto it because it was perfect for this.
I like it plain and simple as a shelf, but my wife suggested I dress it up a little for the market booth. She likes to remind me(alot ) that she was a visual merchandiser before she became a mother... so I take her advise. She's usually right about what makes things sell...I want to keep everything, so i'd rather nothing sold, but I also want the engine for my jeep....
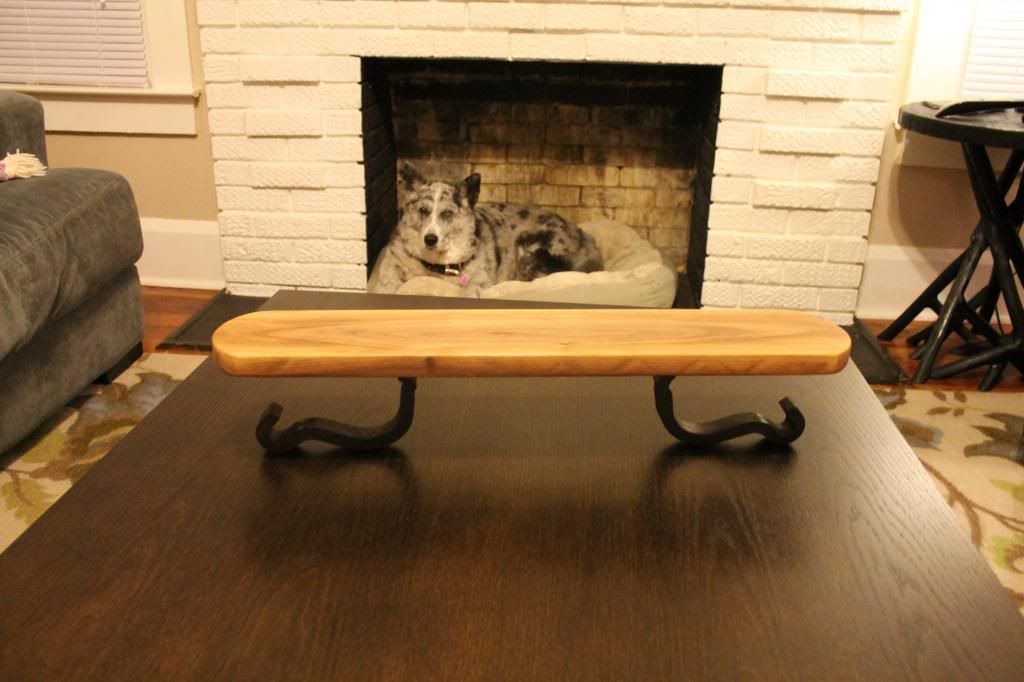
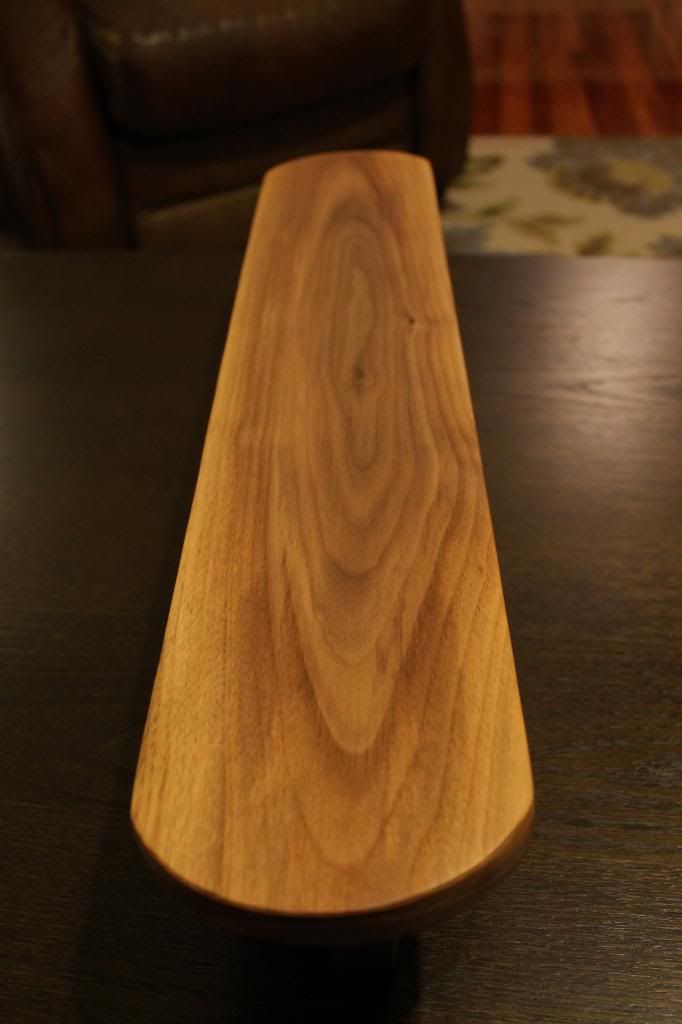
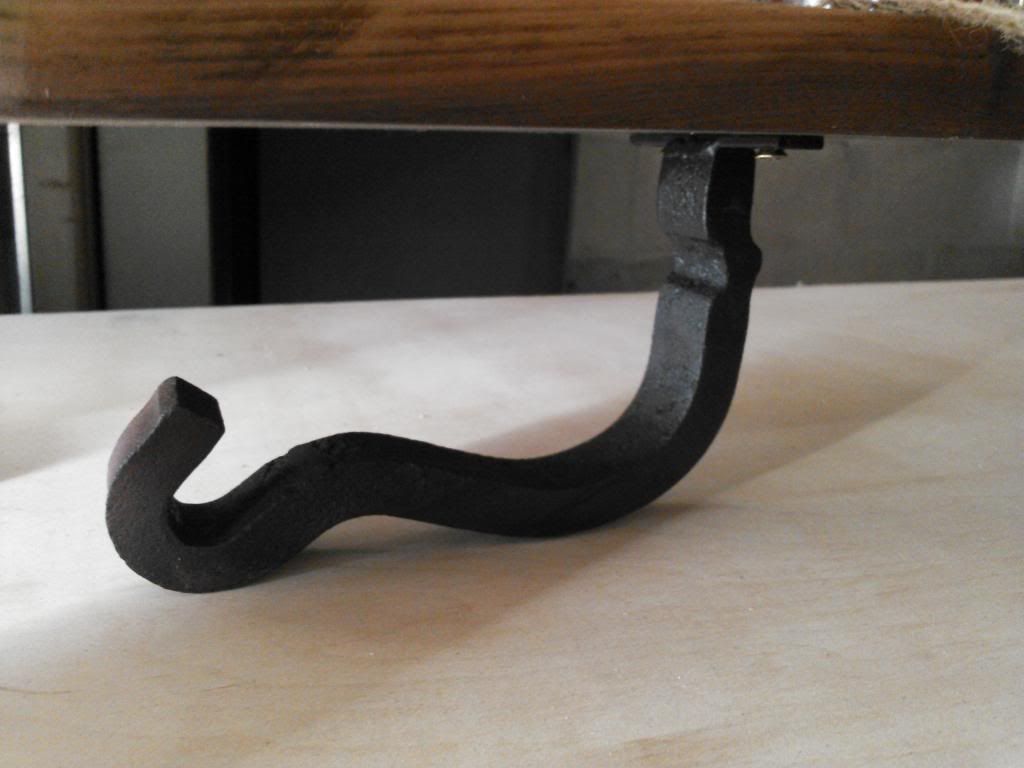
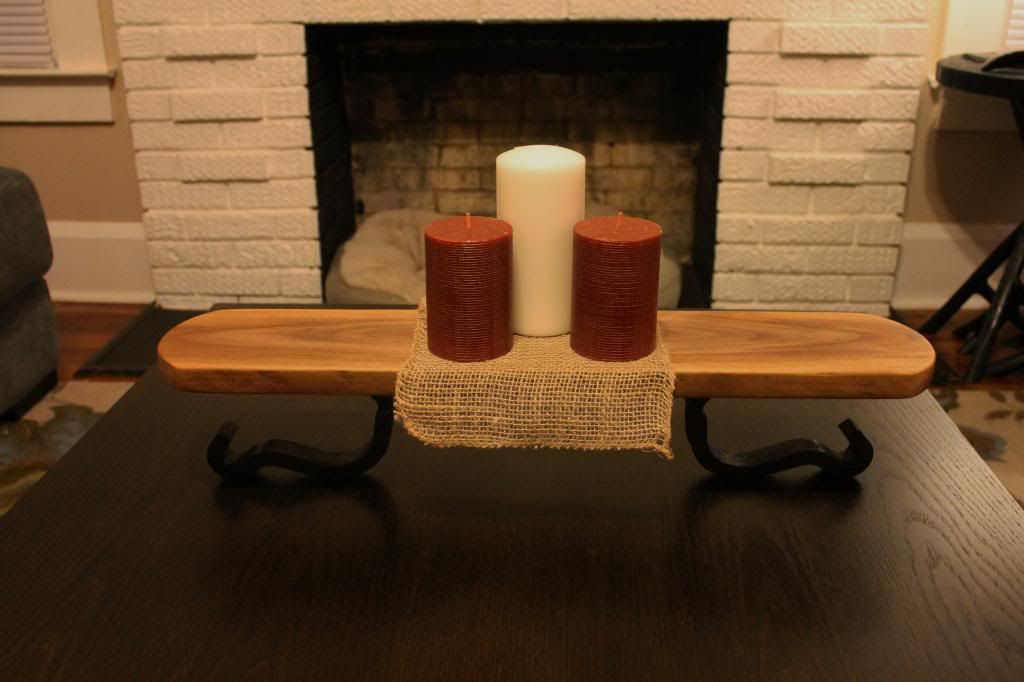
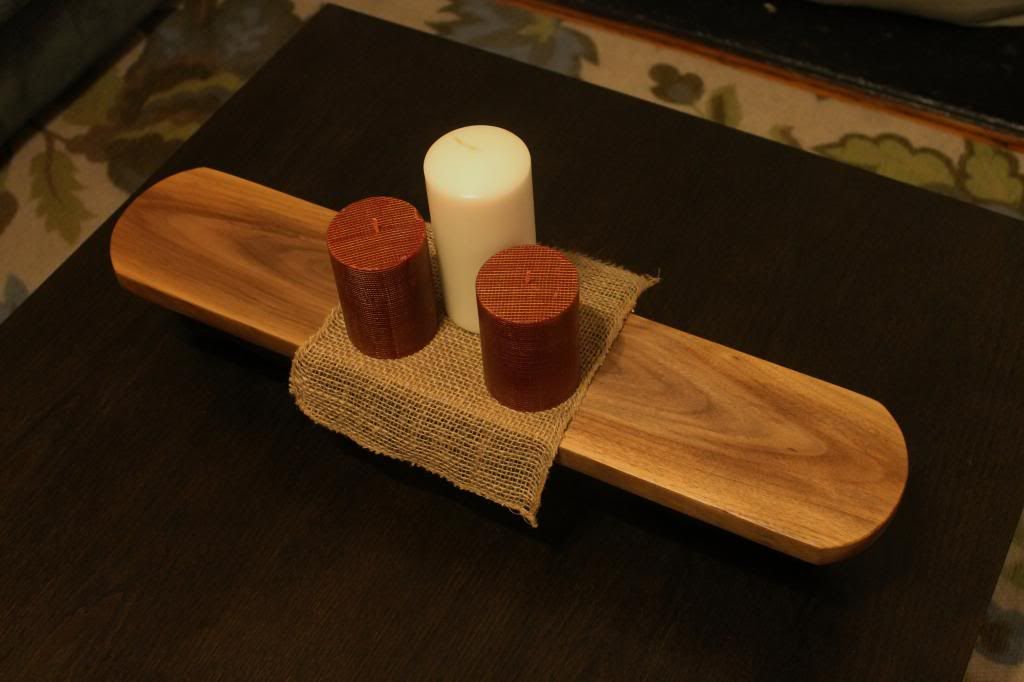
Ive got one last project to post thats actaully blacksmith realted so Ill get going on that and have it up in a few minutes.
JP
Unfortunatly/fortunatly, my real job has been crazy busy. Honestly, its always crazy busy, but there are a few weeks that really leave no time for playing. Ive been putting in late nights at the shop in order to keep up with the market booths inventory. So around 8pm when my kiddo goes to sleep its off to the Doghouse for a few hours to hack away at the never ending....
Some highlights from the last couple weeks are a new round of serving boards, a cool display/mantel shelf, and another attempt at flora forging with some maple leaves.
Here are the boards. These are the biggest sellers at the market. Luckily, they are way easier to make than the butcher block cutting boards. Its been fun to play with grains and tones with in the wood. The guys at woodcraft laugh at me because I spend a long time looking at the woods overall picture instead of quick, straight, and true glances straight to the checkout.
Walnut is the most important to analyze in my opinion since it can vary from light to dark so quickly on the same board. These changes in tone can add really cool dynamics to the finished piece but some for thought and planning are needed. If you get the tones wrong it will look chaotic and unpleaseing.
Anyway, I know...this is a blacksmithing thread, but these came out really sweet.
The left side is maple ambrosia, walnut and padauk. The center is walnut, padauk, and a sliver of red oak. The right is red oak, padauk, yellow heart, and purple heart. Just in case anyone dosent realize it, there is no stain used, just the natural coloring in the wood. The finish is "Watco Buthcher block oil and sealer" so everything is food grade...even the titebondIII.

I found some crazy vibrant padauk this last trip to the store and man was it fun to play with. It made a great handle for the lastest "Cheese Cleaver" and I think im going to sell the Ambrosia board with the knife as a set.

The walnut was a blast to play with. It contrasted the padauk so well.
The radious was provided by a discarded 6" sanding pad.

People eat these colorful boards up as fast as I can make them...

Heres the flip side of the Ambrosia and the walnut boards


Another fun project was incorporating some salvaged steel I scored walking the closed rail road tracks across from the shop. I was hunting for thrown spikes to use for an up coming knife project, and found these two beauties half buried near some pulled track sections. Im not sure what they were for but the shape was amazing. All I did was get them hot and block brush the rust off, then I welded some 1/8"x1/2" flat bar to the top with holes punched for some screws; oiled the steel and baked it in the forge untill it got nice and black.
The walnut I used for the top was a special piece I have had for a while. Its a perfect pattern, unbroken and colored beautifully. I couldnt bring myself to cut it into strips for serving boards and Im glad I held onto it because it was perfect for this.
I like it plain and simple as a shelf, but my wife suggested I dress it up a little for the market booth. She likes to remind me(alot


Ive got one last project to post thats actaully blacksmith realted so Ill get going on that and have it up in a few minutes.
JP
Education through restoration thread link:
http://www.fsjnetwork.com/forum/viewtop ... =12&t=1366
Blacksmithing thread link:
http://www.fsjnetwork.com/forum/viewtop ... f=6&t=1381
http://www.fsjnetwork.com/forum/viewtop ... =12&t=1366
Blacksmithing thread link:
http://www.fsjnetwork.com/forum/viewtop ... f=6&t=1381
-
Florida83FSJCherokee
Topic author - Posts: 196
- Joined: Sat Mar 09, 2013 7:53 pm
- Location: Lakeland , Central Florida
Re: Blacksmith forging project thread idea (pic heavy)
If you want to see what Padauk does to your shop when cut or sanded just look at everything not on the work station...
The last project for this update is Forged Maple leaves.
The inspiration came when a few of these big guys blew down while I was shoeing a horse. I like how big they get compared to the other trees in Florida. Plus the fact that they actually color up, slightly before falling off. :thumbup:
So I wanted to make a center piece that could be used from fall into the holidays. Hoping that I can find a buyer at the market in the next few weeks.
Heres the process:
Cut out some 20 guage steel sheet and traced the leaf onto them with a sharpy.
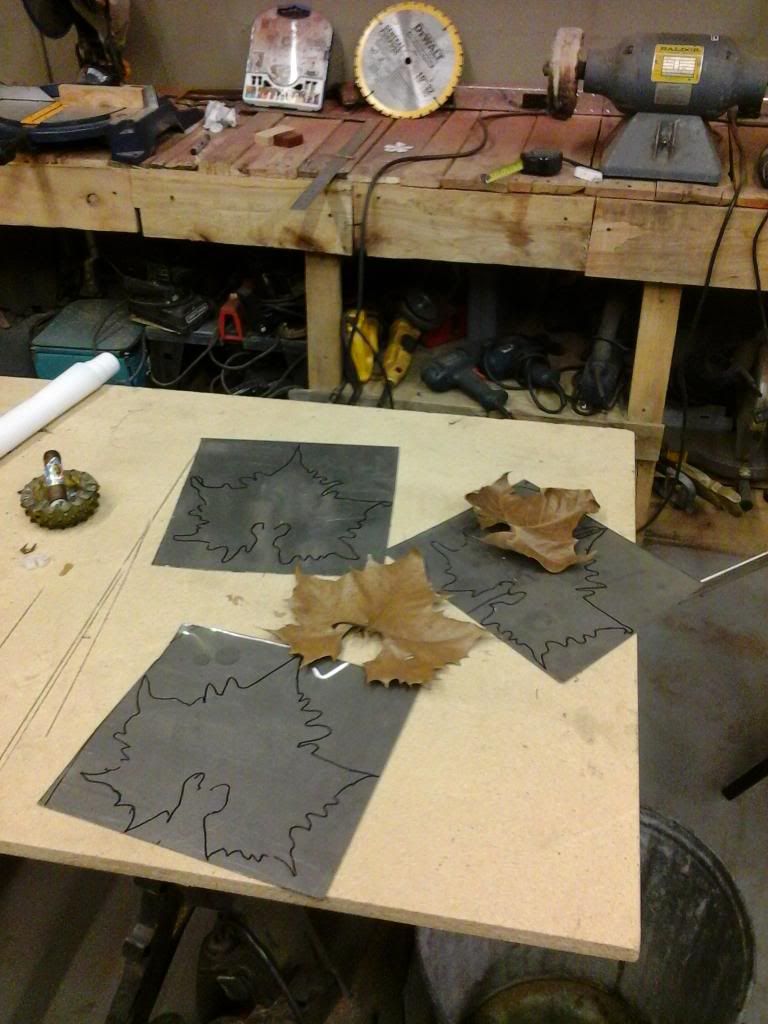
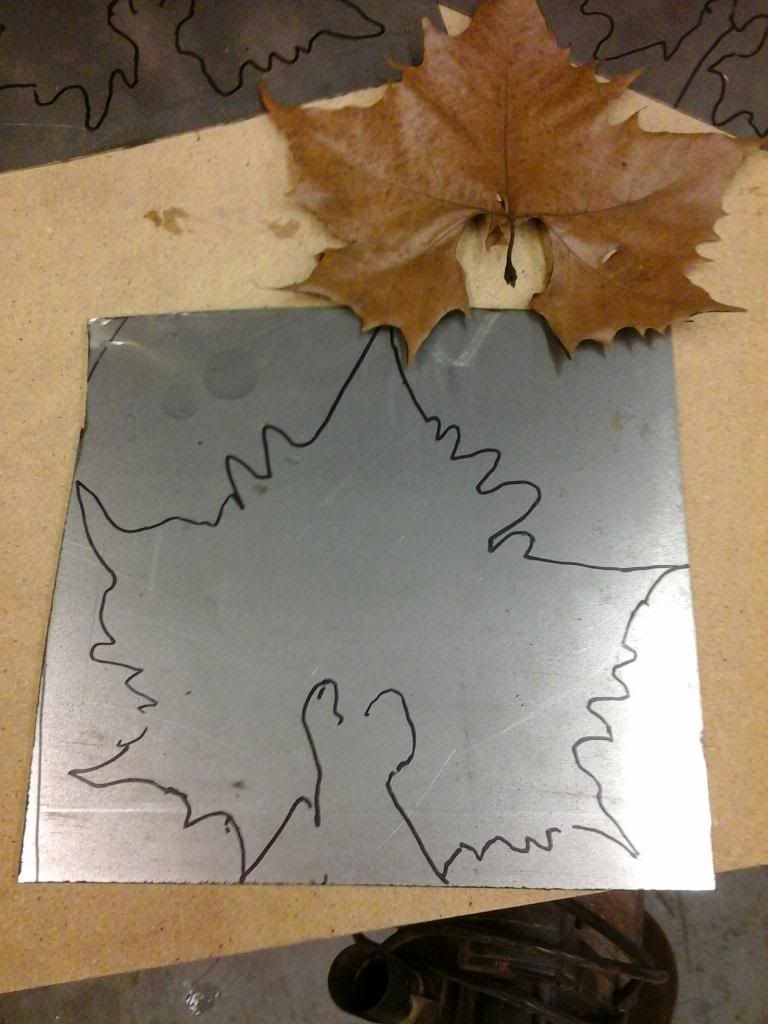
Bandsaw....
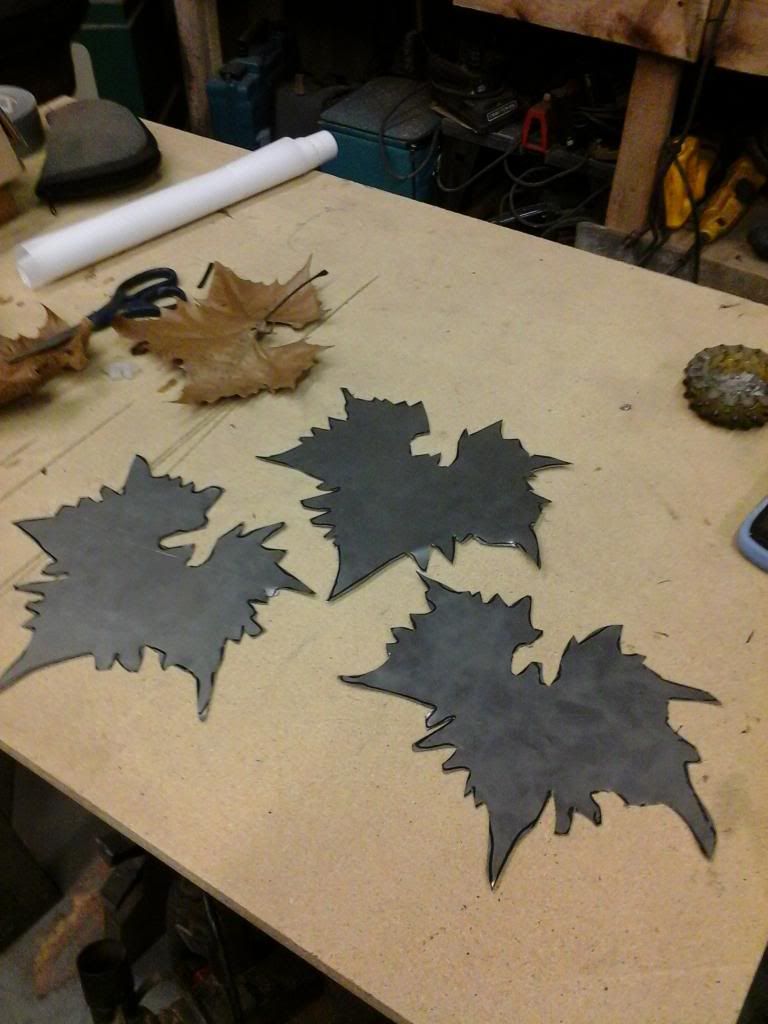
Belt sander to clean everything up...
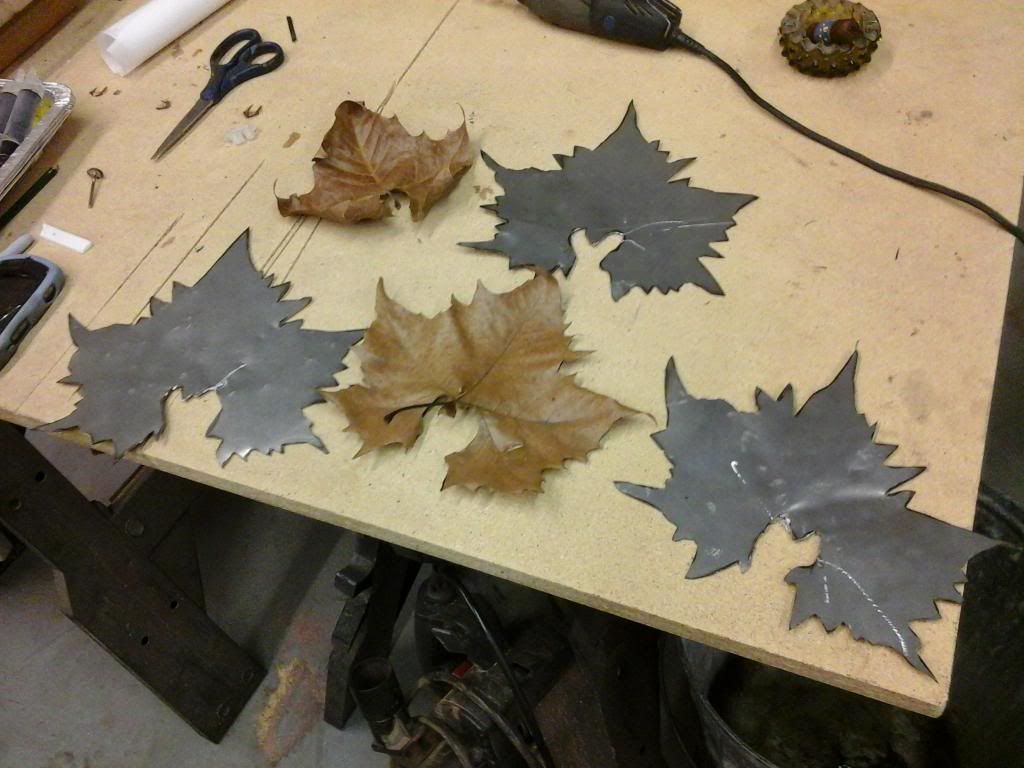
Next I drew out the viens...these things have alot!:willy_nil
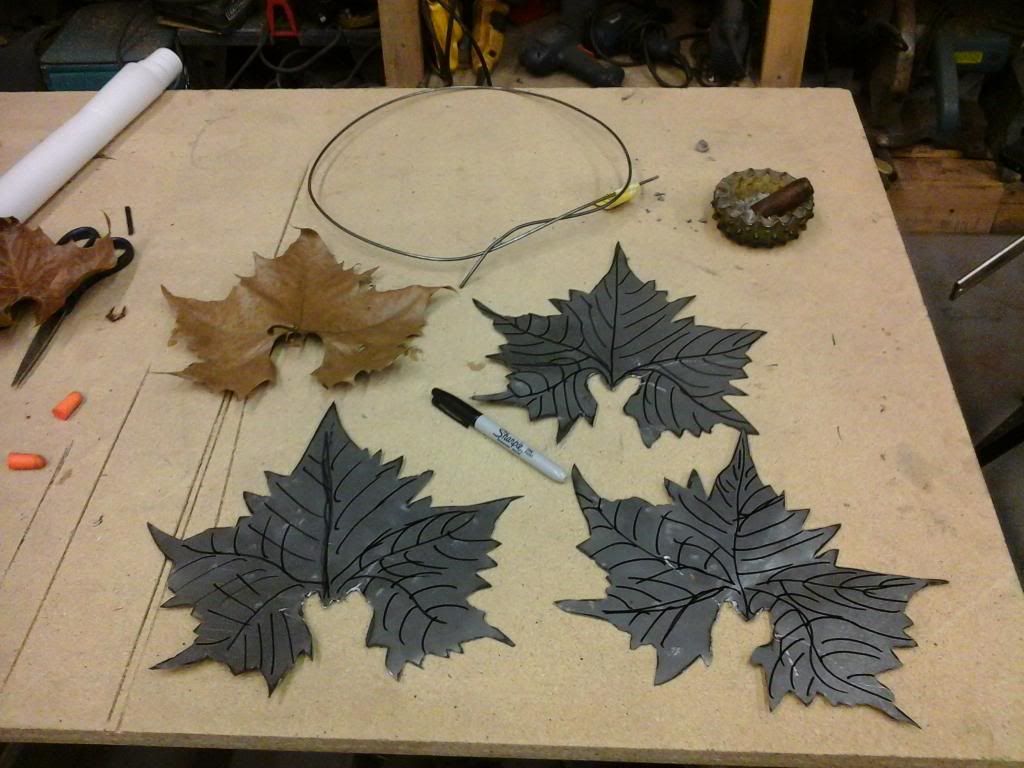
Since there are a combination of straight and curved lines I needed two different fullers. One was crisp with no radious and the other was duller with a slight curve. This let me flow around the pattern when needed, but also cut crisp main lines. The process was the same as other leaves have been, using a block of wood as the backing so that the metal has someplace to go when struck.
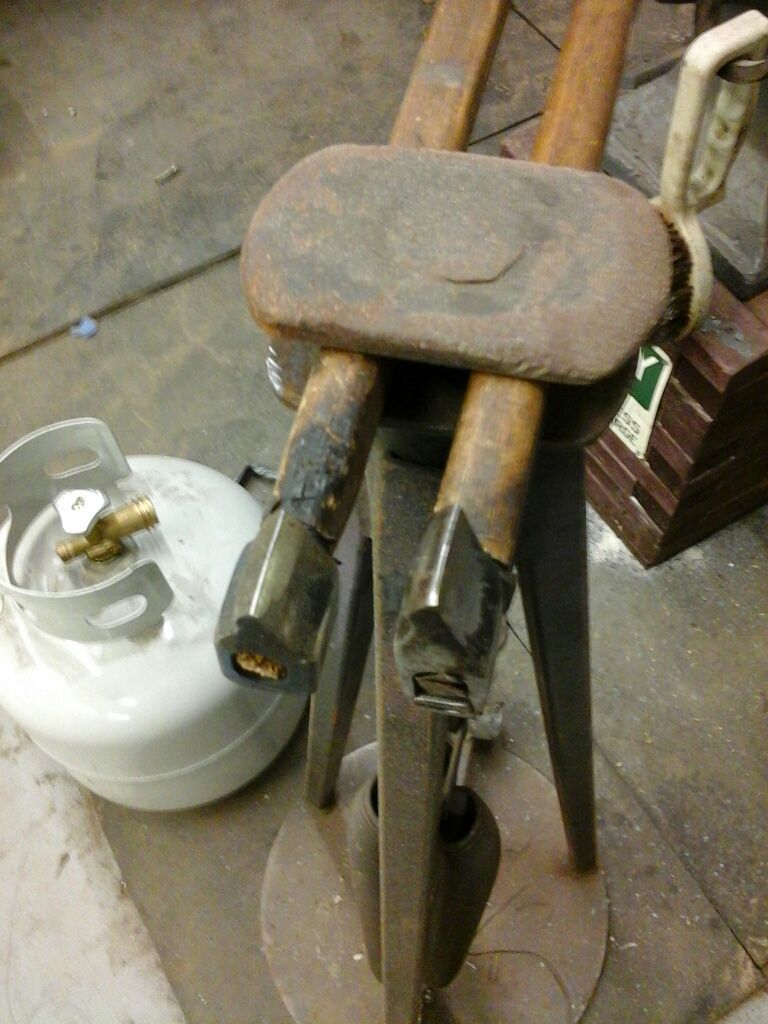
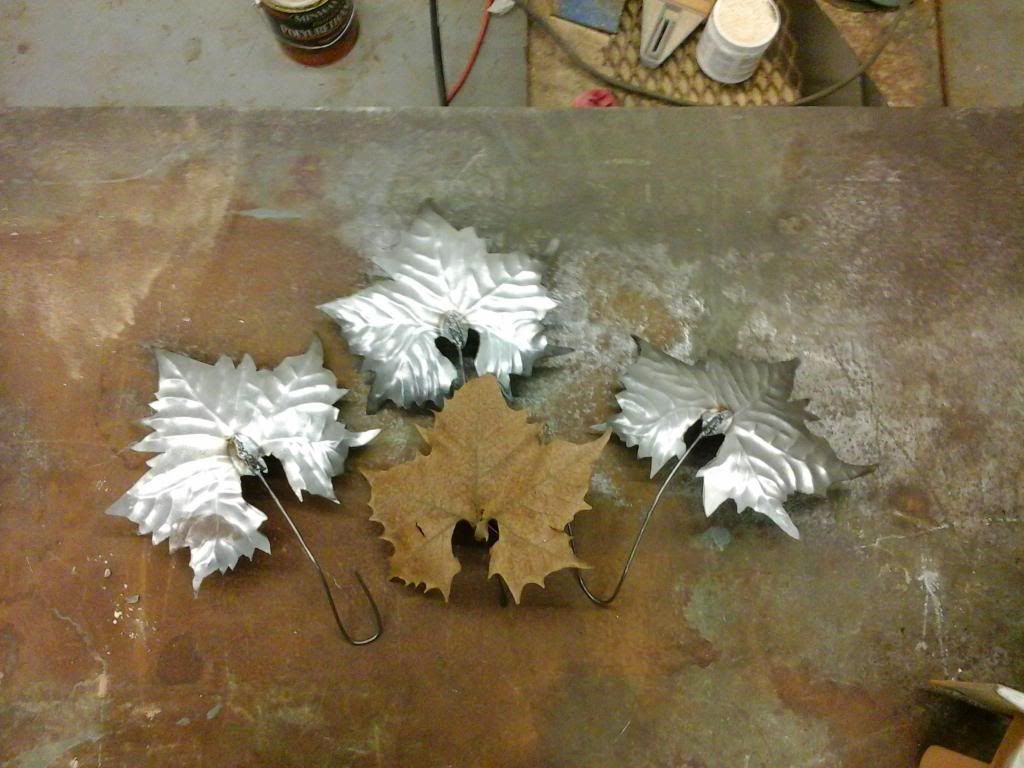
Using the scroll tongs makes the curving and counturing of the leaves easy.
I should note that I was very! carefull not to overheat the steel. I wanted to keep a nice blue/purple tint to the metal. This will make great colors when its brass brushed, but if it gets to hot and turns grey the coloring wont have any depth. It will just be a solid brass color...
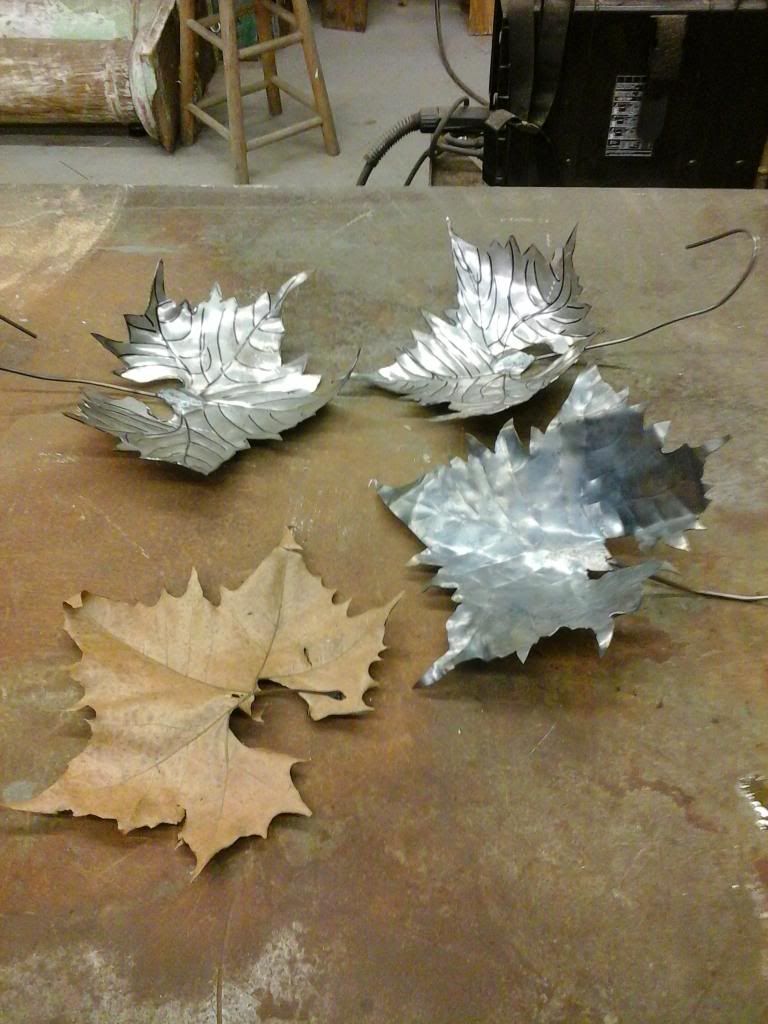
The market makes a great place to do the finish work of projects. I can start and stop with no issues and the time spent talking with folks keeps me from rushing the process.
Here you can see why it was important to keep the blues and purples. Mixed with the brass and stainless steel brushwork it truned out out really slick.
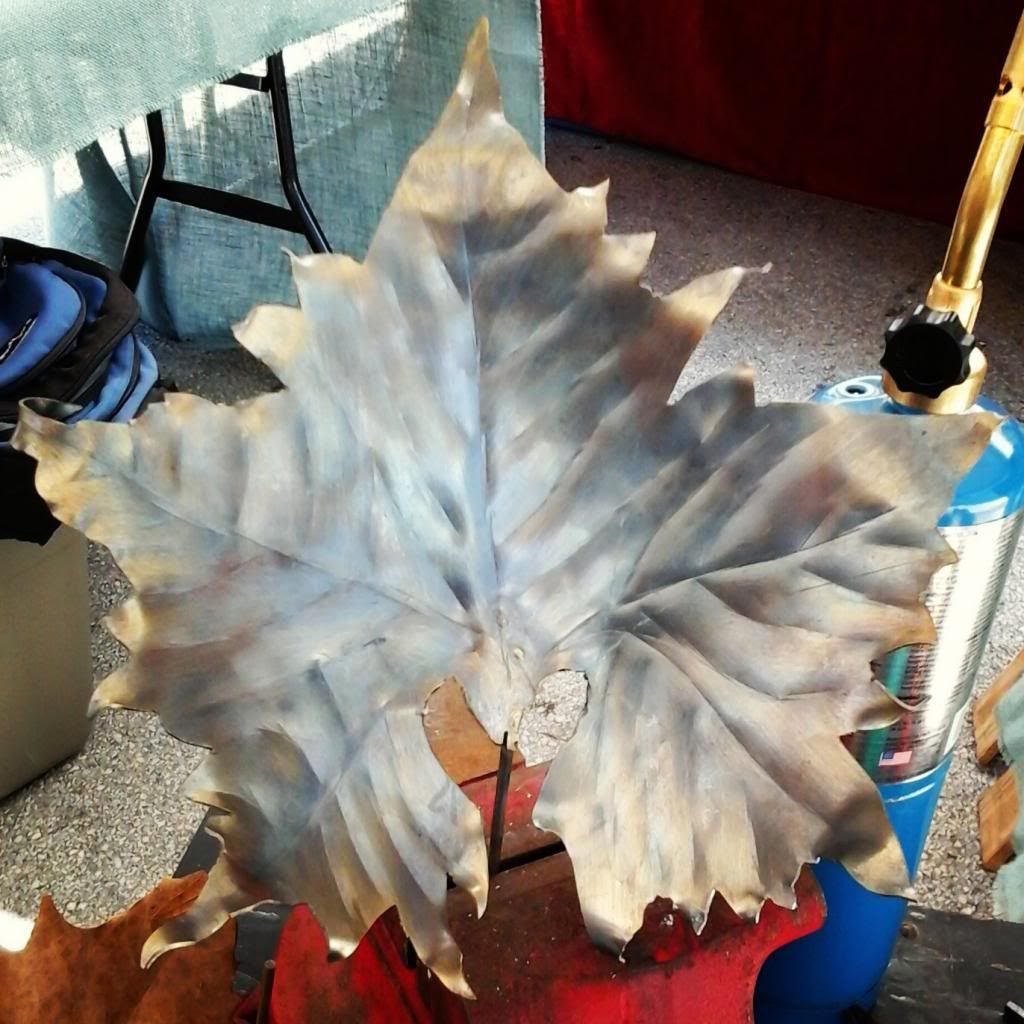
So the rest of the work went into finishing the other two leaves and tweaking the different down turns in order to get the leaf to sit evenly with a flat section in the center. The stems were not working with me so I removed them. I spent a couple different sessions trying to incorporate them, but sometimes what you want and what's possible just dont mix.
With then leaves evend up I could add the glass cups and arrange the leaves around the stilted glass candle holder. I used the leavesto make a "hook and lock" system with the curved outer edges to lock them together. It took some tweaking but it's well worth not having to weld them. Plus this way the buyer can use them in different settings if they wish.
So here's the finshed product. Its unfortunatly not as colorfull on film as it is to the eye, but you can get a general feel for it.
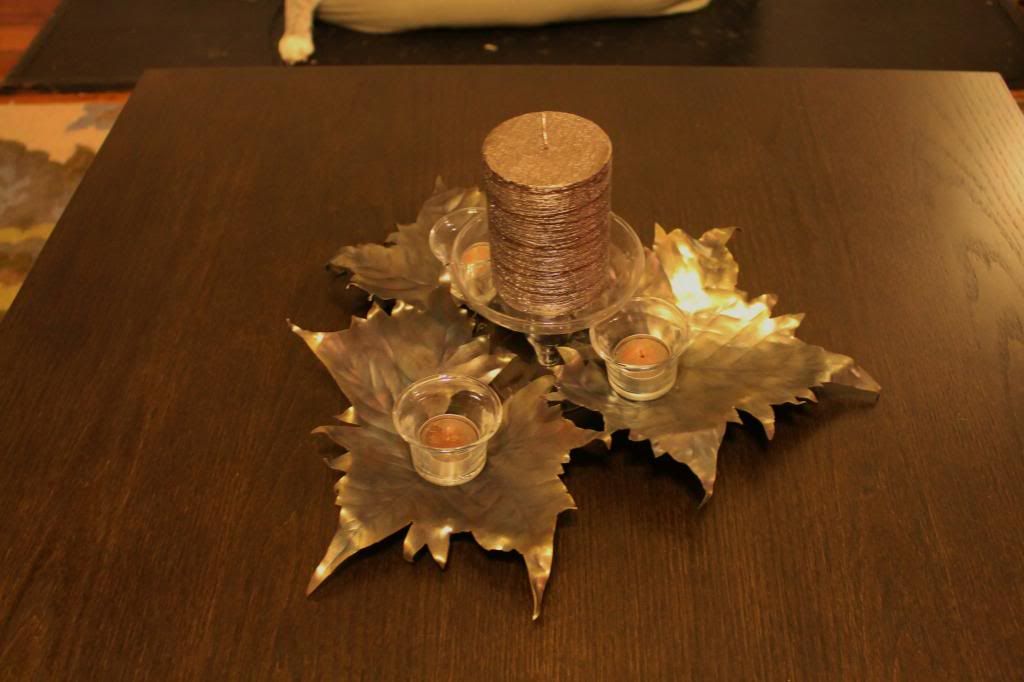
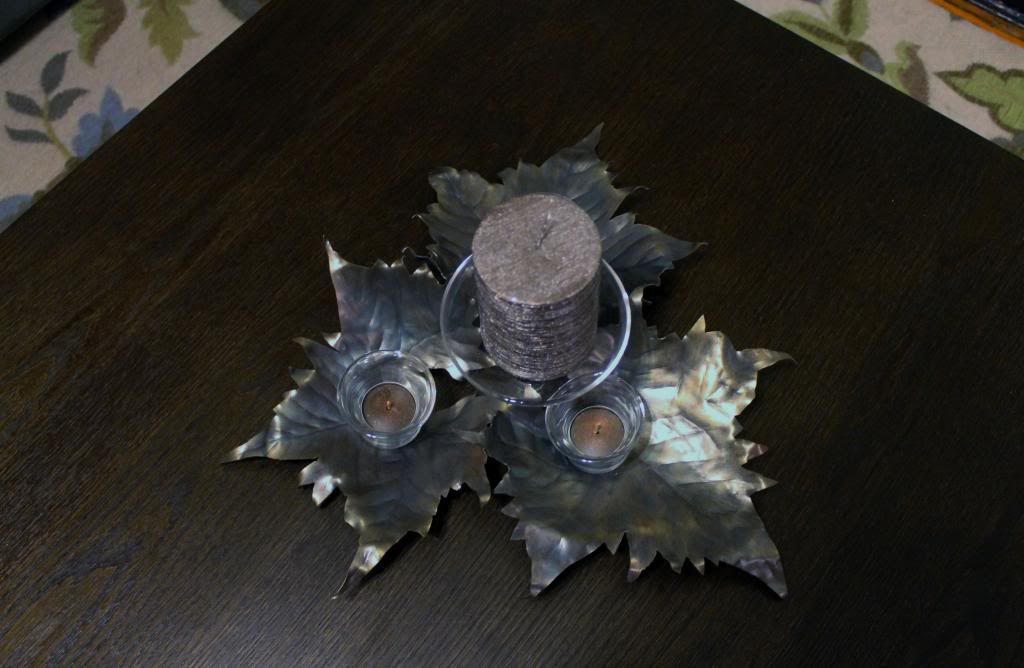
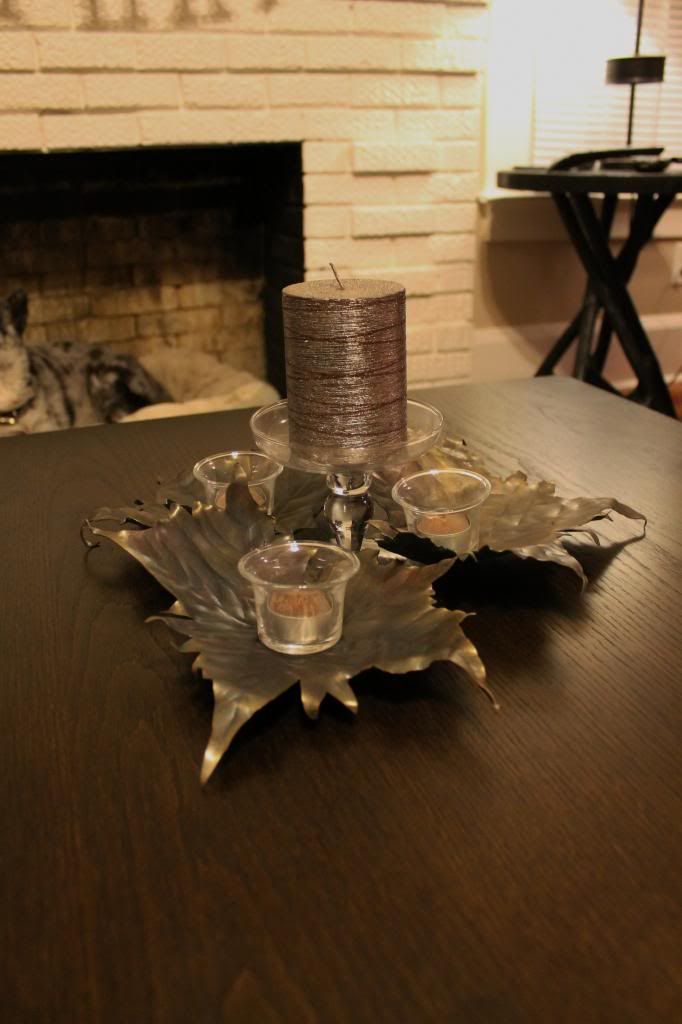
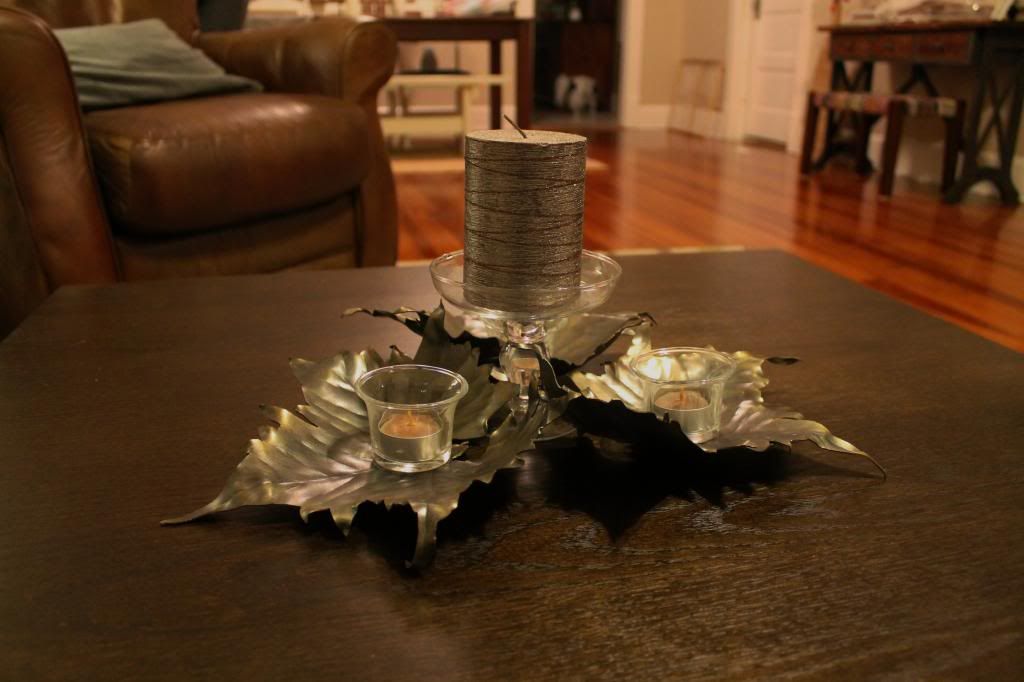
The candle choices for the season are Christmas based, but it could easily have orange and yellow fall colored candles for earlier in the year.
Well, Thats what I got for the time being. Lots of Irons in the fire so as they finish up I put together another update.
Thanks for looking and as always let me know if you have any question!
Thanks
JP
The last project for this update is Forged Maple leaves.
The inspiration came when a few of these big guys blew down while I was shoeing a horse. I like how big they get compared to the other trees in Florida. Plus the fact that they actually color up, slightly before falling off. :thumbup:
So I wanted to make a center piece that could be used from fall into the holidays. Hoping that I can find a buyer at the market in the next few weeks.
Heres the process:
Cut out some 20 guage steel sheet and traced the leaf onto them with a sharpy.


Bandsaw....

Belt sander to clean everything up...

Next I drew out the viens...these things have alot!:willy_nil

Since there are a combination of straight and curved lines I needed two different fullers. One was crisp with no radious and the other was duller with a slight curve. This let me flow around the pattern when needed, but also cut crisp main lines. The process was the same as other leaves have been, using a block of wood as the backing so that the metal has someplace to go when struck.


Using the scroll tongs makes the curving and counturing of the leaves easy.
I should note that I was very! carefull not to overheat the steel. I wanted to keep a nice blue/purple tint to the metal. This will make great colors when its brass brushed, but if it gets to hot and turns grey the coloring wont have any depth. It will just be a solid brass color...

The market makes a great place to do the finish work of projects. I can start and stop with no issues and the time spent talking with folks keeps me from rushing the process.
Here you can see why it was important to keep the blues and purples. Mixed with the brass and stainless steel brushwork it truned out out really slick.

So the rest of the work went into finishing the other two leaves and tweaking the different down turns in order to get the leaf to sit evenly with a flat section in the center. The stems were not working with me so I removed them. I spent a couple different sessions trying to incorporate them, but sometimes what you want and what's possible just dont mix.
With then leaves evend up I could add the glass cups and arrange the leaves around the stilted glass candle holder. I used the leavesto make a "hook and lock" system with the curved outer edges to lock them together. It took some tweaking but it's well worth not having to weld them. Plus this way the buyer can use them in different settings if they wish.
So here's the finshed product. Its unfortunatly not as colorfull on film as it is to the eye, but you can get a general feel for it.


The candle choices for the season are Christmas based, but it could easily have orange and yellow fall colored candles for earlier in the year.
Well, Thats what I got for the time being. Lots of Irons in the fire so as they finish up I put together another update.
Thanks for looking and as always let me know if you have any question!
Thanks
JP
Education through restoration thread link:
http://www.fsjnetwork.com/forum/viewtop ... =12&t=1366
Blacksmithing thread link:
http://www.fsjnetwork.com/forum/viewtop ... f=6&t=1381
http://www.fsjnetwork.com/forum/viewtop ... =12&t=1366
Blacksmithing thread link:
http://www.fsjnetwork.com/forum/viewtop ... f=6&t=1381
-
Florida83FSJCherokee
Topic author - Posts: 196
- Joined: Sat Mar 09, 2013 7:53 pm
- Location: Lakeland , Central Florida
Re: Blacksmith forging project thread idea (pic heavy)
Decided to have some fun this week, despite the fact that there really isnt any time for fun.
Im gonna have to get in gear tomorrow. Still need to finish up a few knives and a butcher block that got ordered as christmas gifts so I can get them sent out by thier delivery/completion estimates. Not that these orders arnt fun side projects, but sometimes my brain needs to figure out a solution to unfinished thoughts or ideas to clear out the dust.
It was kinda getting a little draggy in the shop so I needed to change up the pace. Its been a while since I just plain turned something into something else. I find a great deal of therapy in projects like this. How to hit the metal, what temp, how hard, and what to do about the finish work... working on these issues in real time keeps my head spinning and tends to cler out the clutter of overthinking. Plus i like when you start with an object/shape and its toatly different at the end of the process.
Rail Road Spike Knives are not my idea...These things have been made 10,000 different ways by 10,000 different blacksmiths and knife makers. I personally had never tried it before so it seemed straight forward enough to just dive in.
Since i had another round of serving boards to manage and some glue up waiting periods i knocked out a few spike blades.
Started with some Rail Road Spikes I scored while walking the closed sections of track behind the shop. These three were rusted a little but had good clean edges and no deep pitting. To clean them up I got them hot and used the block and wire brushes to knock the scale off.
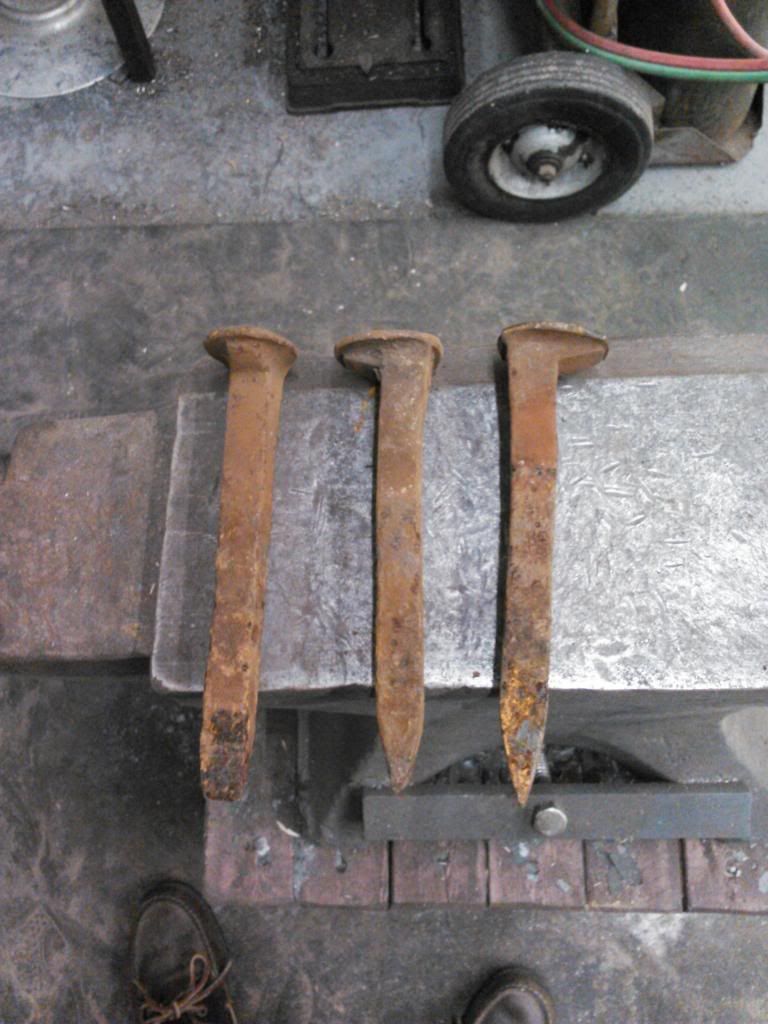
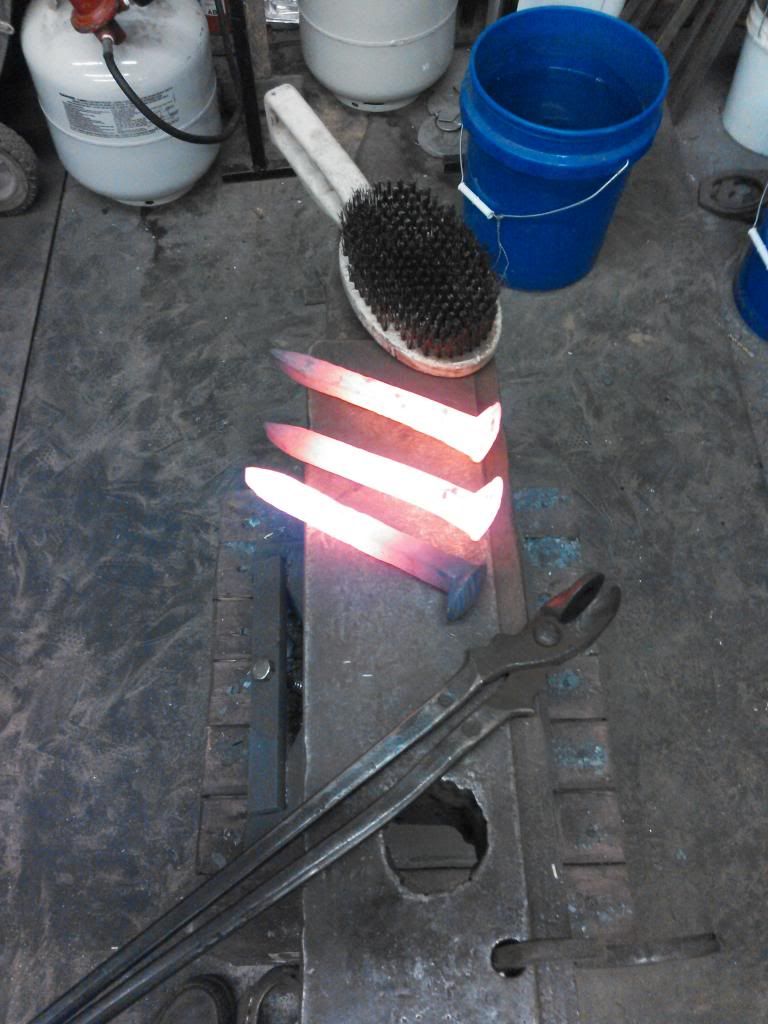
Next i used my big shop vise and put some different twist into the upper half of the spikes. I didnt really think this out to much, kinda just twisted til i was happy, but i did make sure to mark the starting points on each one before twisting.
Here the rough twist. If you didnt see the post on twisting metal jump back a few pages to see the details of how this happens.
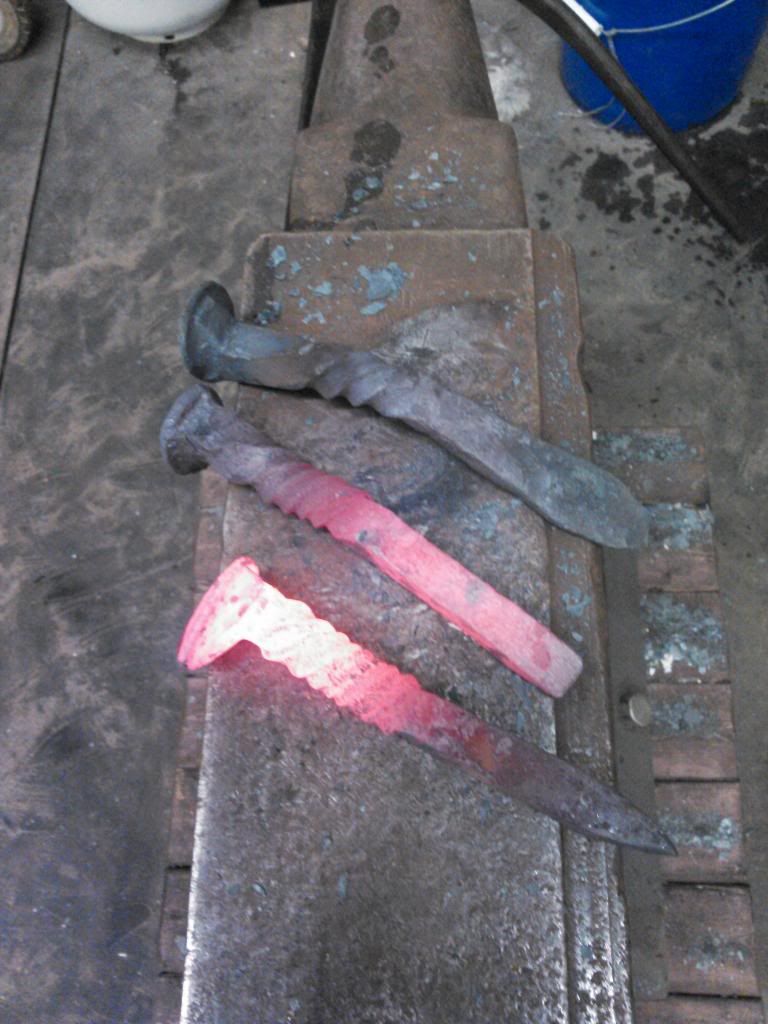
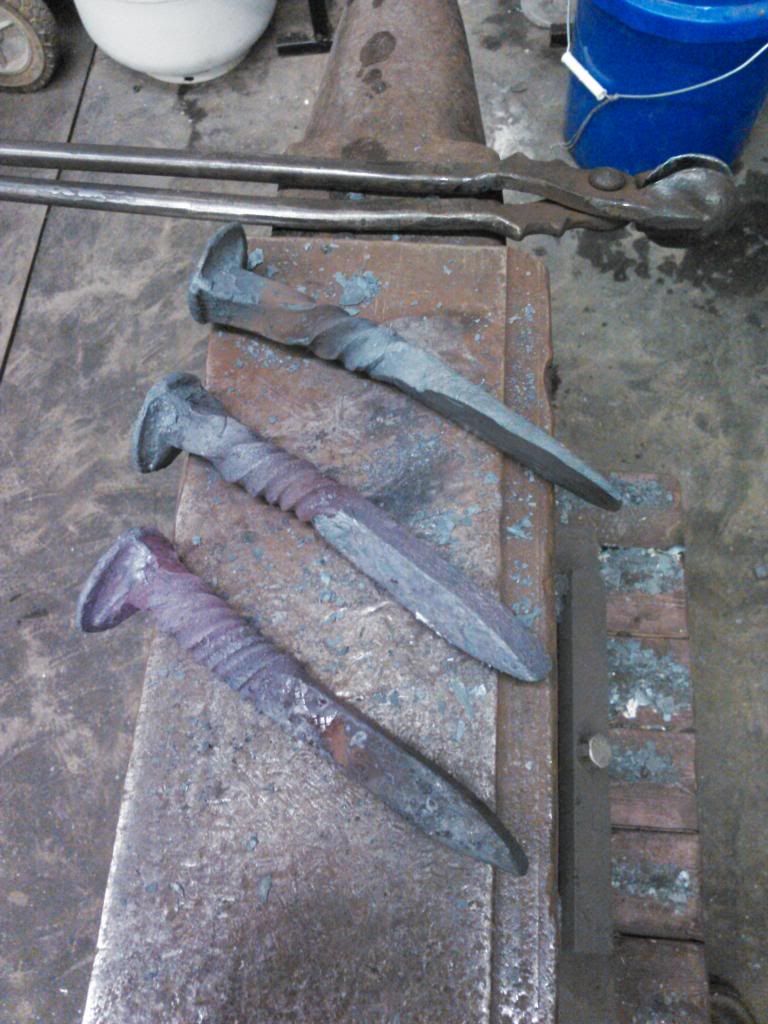
Now the therapy...
GET IT HOT AND WAIL ON IT!
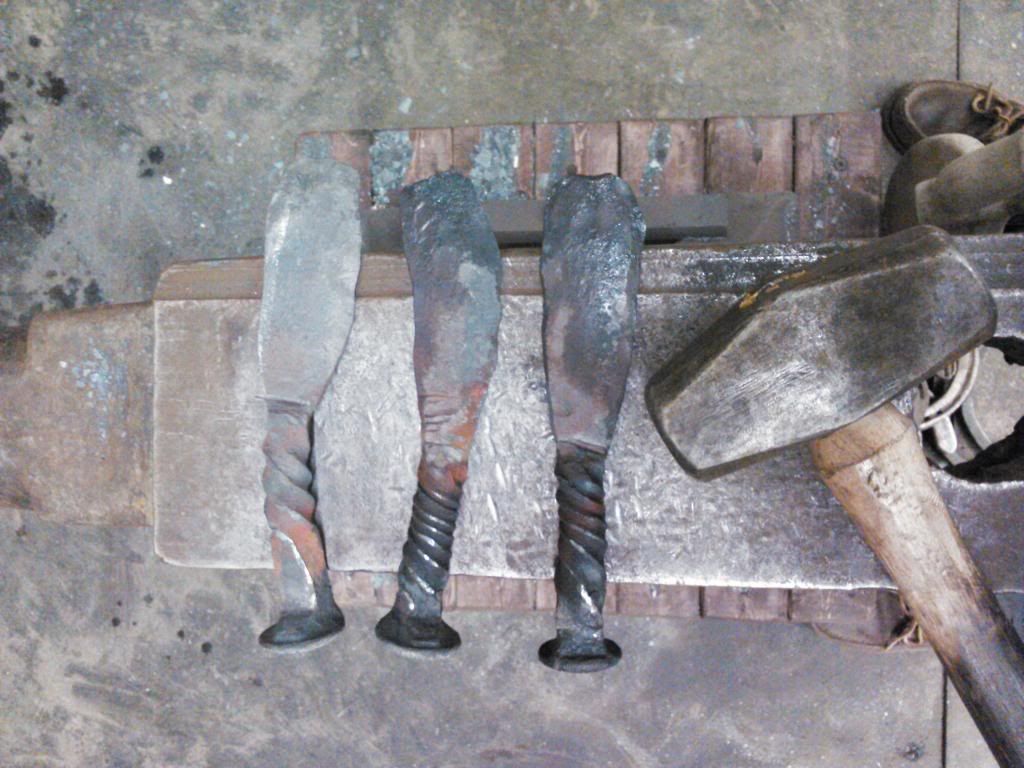
The steel wasnt as tough as I thought it would be. I was under the impression that this was going to be very dense high carbon 1080 1070 type stuff. If it was it sure didnt feel like it.
I drew out the different blades i wanted with a soap stone. Usually I would go to the band saw but ther wasnt alot of material to remove so I let Mr. Baldor have a little extra steel for lunch.
He likes aged metal, must be like stinky cheese to a ginder...
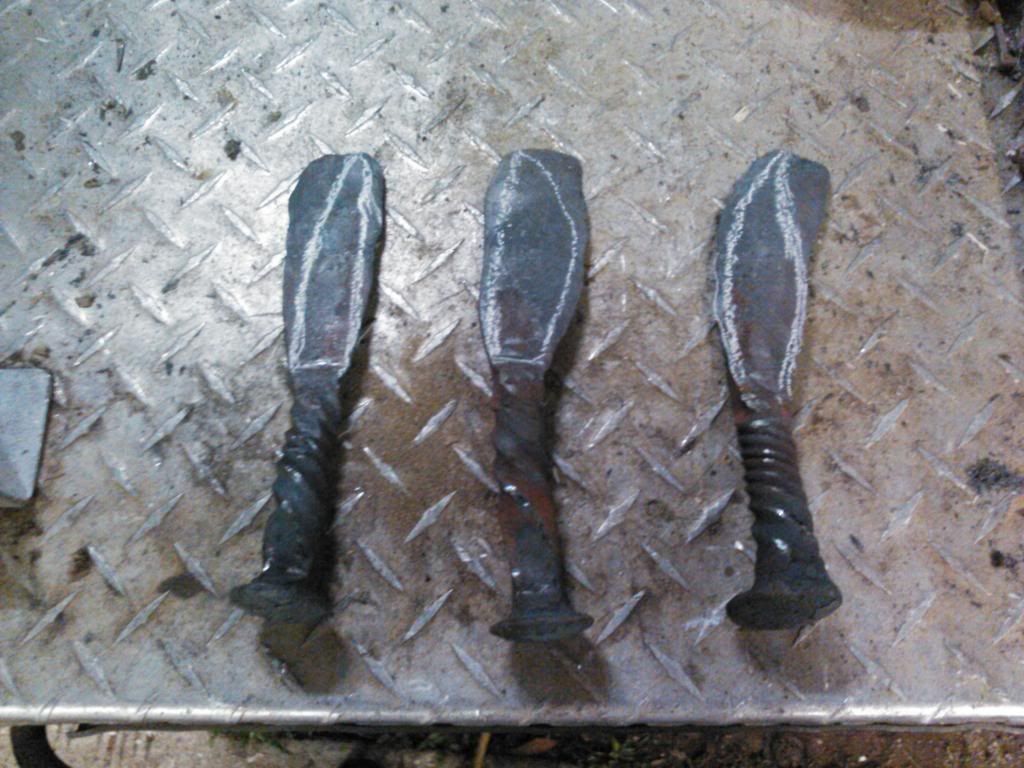
here the roughed out blanks. The one on the left has the cutting eged ground into the blade and some cleaning has been done to the twist work.
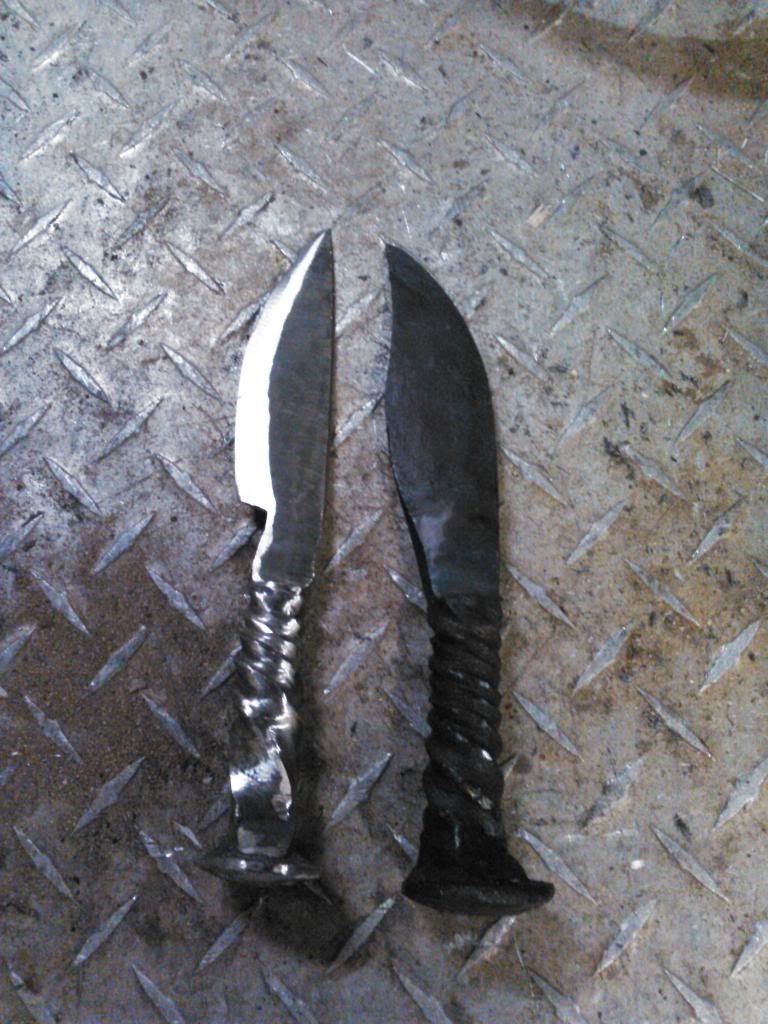
And....an hour or so later i had the blades rough ground with the twist nicely evened up.
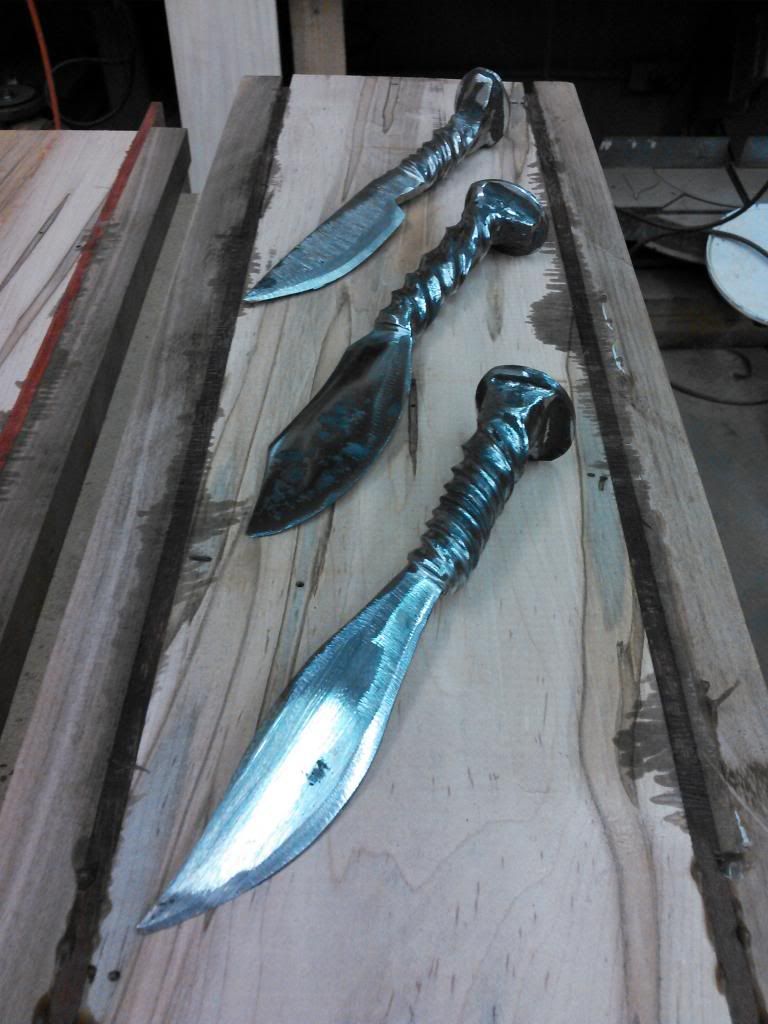
You will probably notice between this photo and the next that the butt ends of the handles will be different. In my haste I didnt think about which side of the spike i was flattening and i made the blade edge on the worng side of the handle for two of the knives... this sucked because I had to use the torch to heat the butt end and twist them around accordingly. One of them didnt have enough material left to do the full twist needed so that knife got an "intentional" rear facing head. live, learn, and adapt.
Next step is to fine tune the handle work and to finish grind the blades.
I took them up to 600grit and then used my buffer/cloth wheels with a few different rouges to put the shine to them. :thumbup:
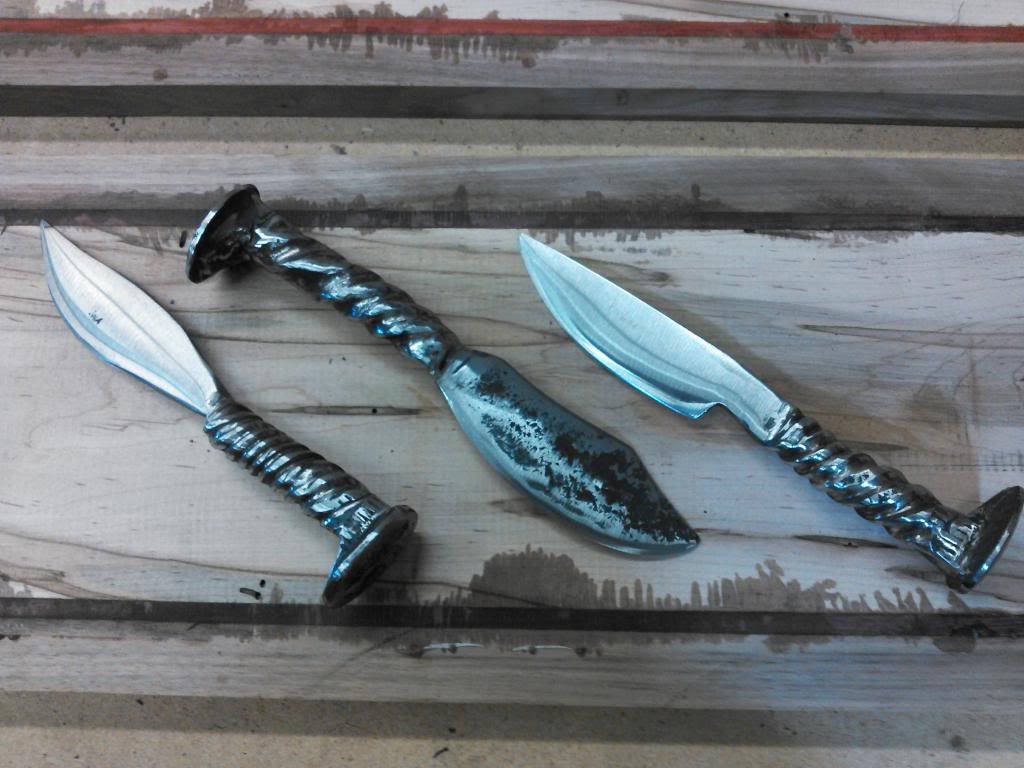
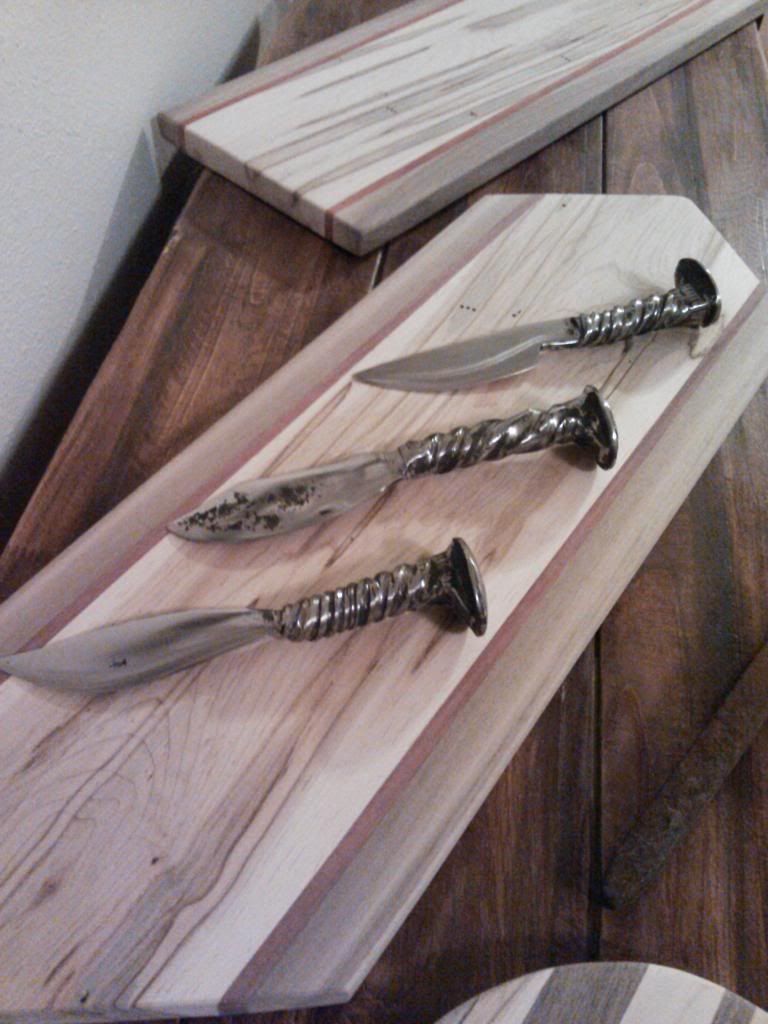
So You could leave them here and they would be cool, but...Ive been having alot of fun lately with the tempering color scale...I know, your tired off hearing about color to heat comparisons...this time however its going to be used to give a RAD! effect on the blades before I finish them.
Like i said before, 10,000 different spike knives so you kinda got to find cool ways to make stuff like this your own.
Off to the house for a little soak in the oven.
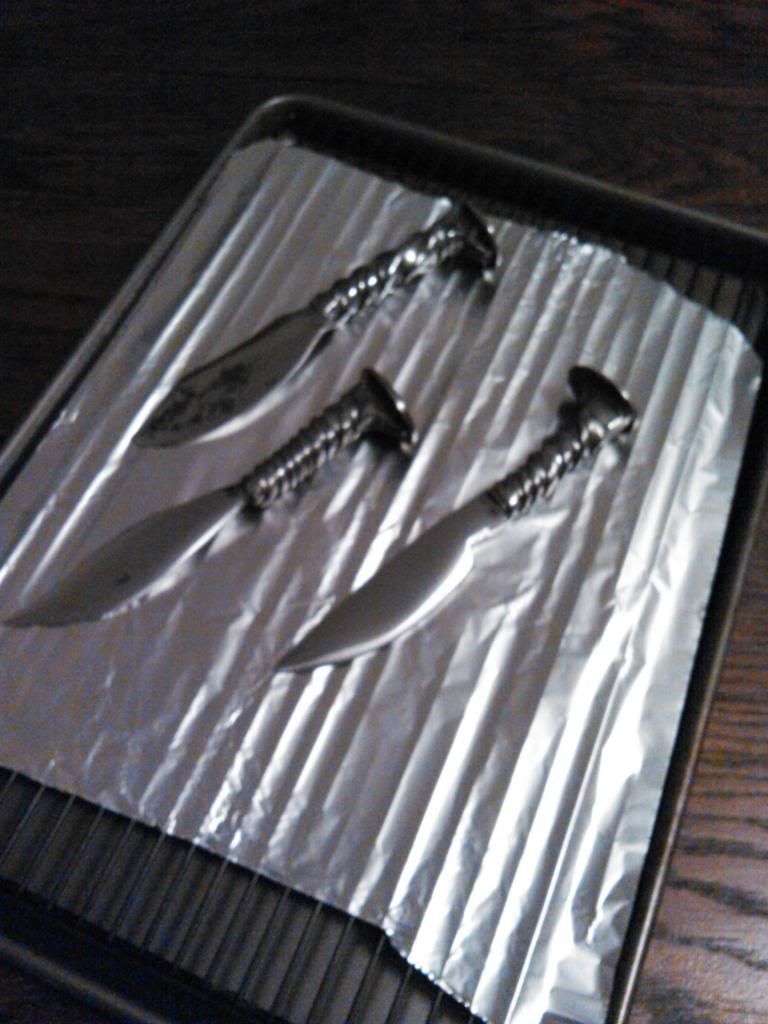
After 2 hours at 500deg.
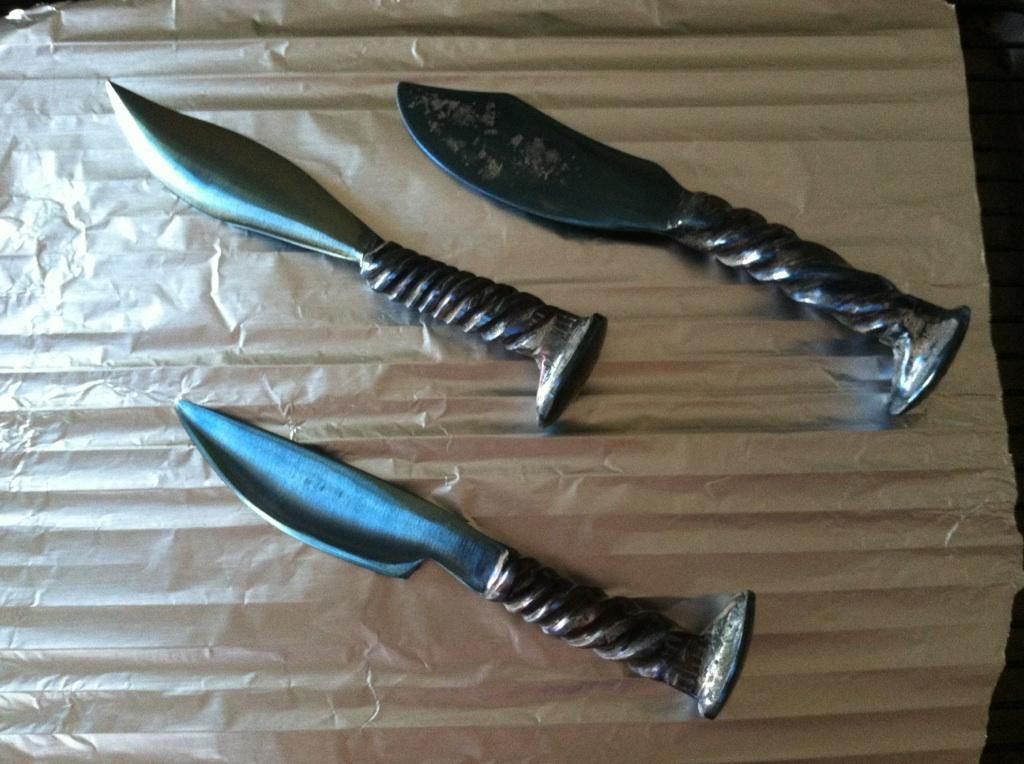
Youve all seen the knives turn this cool blue gold contrast but it is very thin and while it last the normal handling stresses it smears and distorts when its wiped hard or washed. To stabalize eveything they all got 2 coats of minwax Polycrylic Ultra Clear Coat sealer.
So here are the finished railroad spike knives
or...what i have dubbed them...
Martha Stewarts prison shanks....
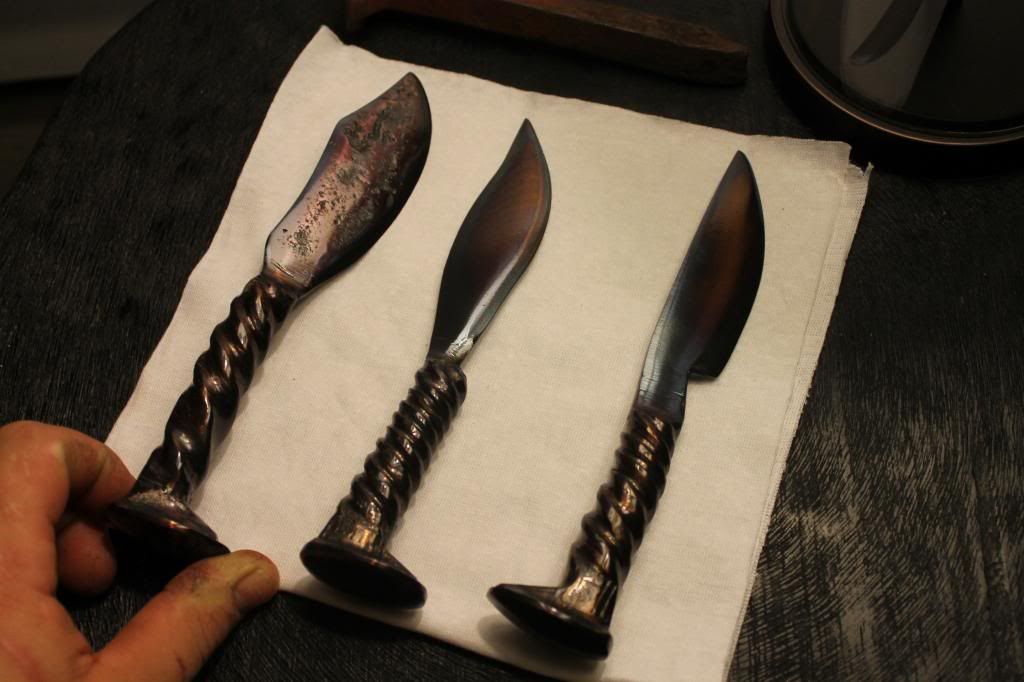
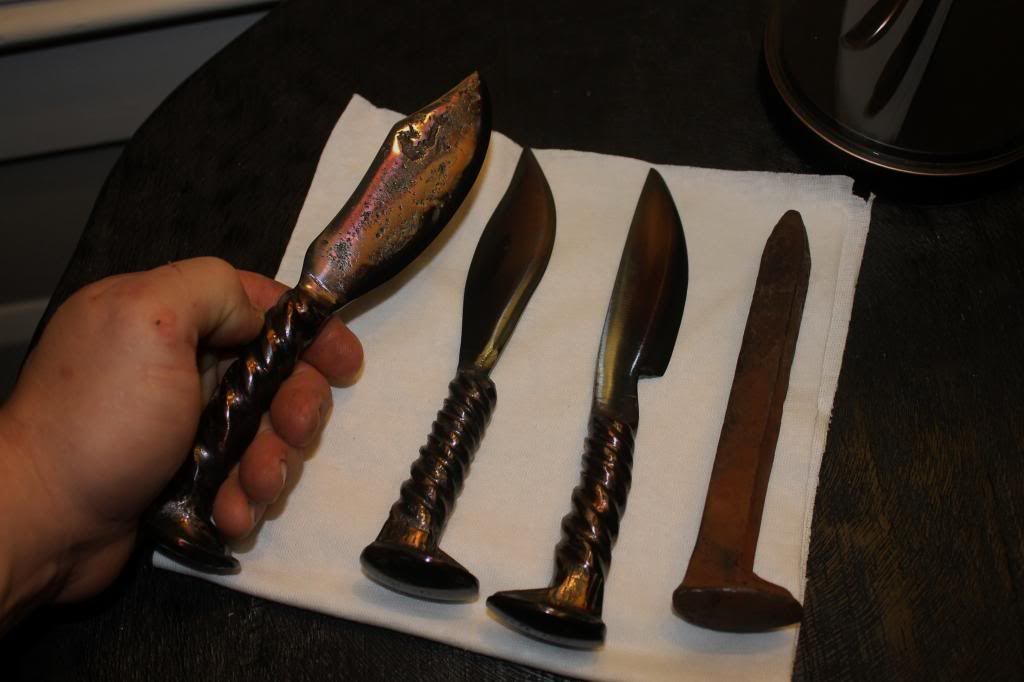

this ones definitly a while collar prison weapon!
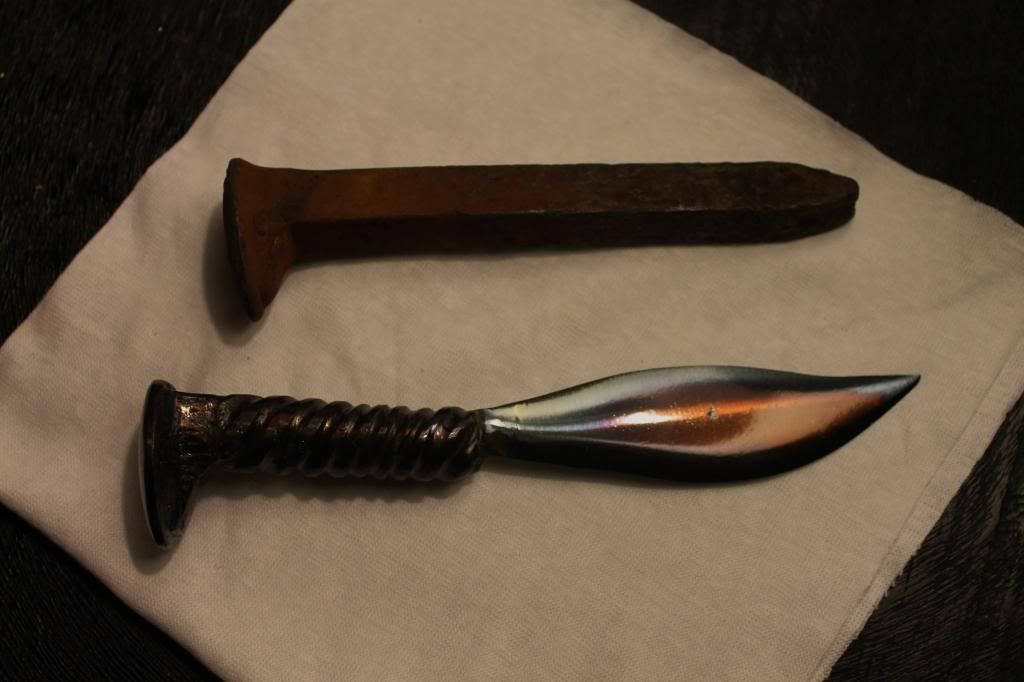
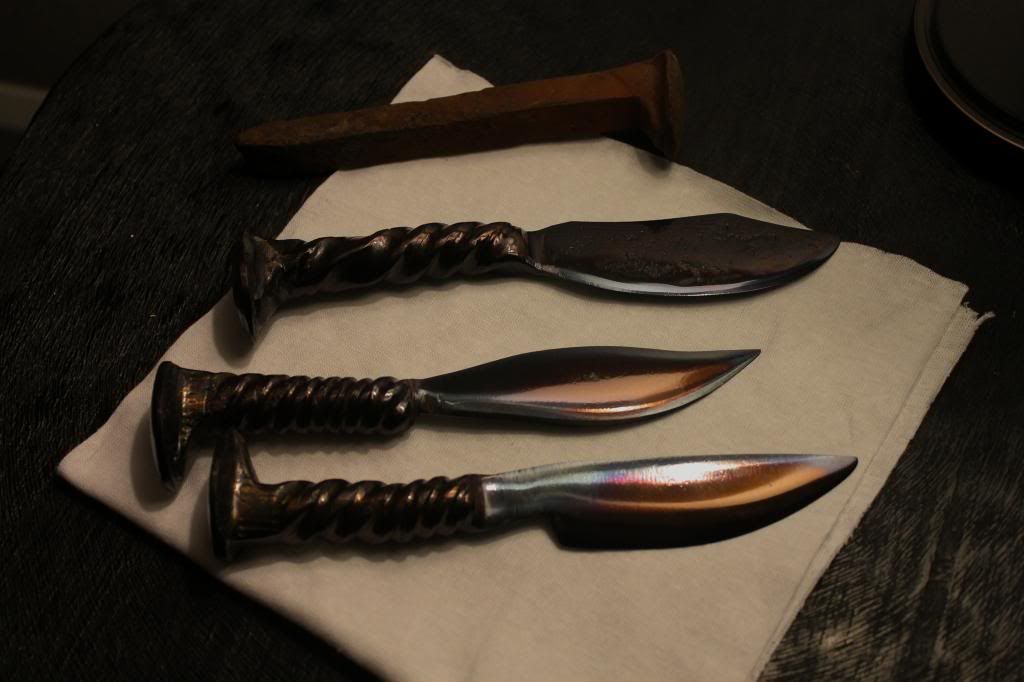
These will make some cool gifts this holiday and I can cross Railroad spike knife off the list of projects to try.
Have a good sunday, Ill try to post up the currnet knife builds photos once they are finished. No new info so just pictures this go round...
Thanks,
JP
Im gonna have to get in gear tomorrow. Still need to finish up a few knives and a butcher block that got ordered as christmas gifts so I can get them sent out by thier delivery/completion estimates. Not that these orders arnt fun side projects, but sometimes my brain needs to figure out a solution to unfinished thoughts or ideas to clear out the dust.
It was kinda getting a little draggy in the shop so I needed to change up the pace. Its been a while since I just plain turned something into something else. I find a great deal of therapy in projects like this. How to hit the metal, what temp, how hard, and what to do about the finish work... working on these issues in real time keeps my head spinning and tends to cler out the clutter of overthinking. Plus i like when you start with an object/shape and its toatly different at the end of the process.
Rail Road Spike Knives are not my idea...These things have been made 10,000 different ways by 10,000 different blacksmiths and knife makers. I personally had never tried it before so it seemed straight forward enough to just dive in.
Since i had another round of serving boards to manage and some glue up waiting periods i knocked out a few spike blades.
Started with some Rail Road Spikes I scored while walking the closed sections of track behind the shop. These three were rusted a little but had good clean edges and no deep pitting. To clean them up I got them hot and used the block and wire brushes to knock the scale off.


Next i used my big shop vise and put some different twist into the upper half of the spikes. I didnt really think this out to much, kinda just twisted til i was happy, but i did make sure to mark the starting points on each one before twisting.
Here the rough twist. If you didnt see the post on twisting metal jump back a few pages to see the details of how this happens.


Now the therapy...
GET IT HOT AND WAIL ON IT!

The steel wasnt as tough as I thought it would be. I was under the impression that this was going to be very dense high carbon 1080 1070 type stuff. If it was it sure didnt feel like it.
I drew out the different blades i wanted with a soap stone. Usually I would go to the band saw but ther wasnt alot of material to remove so I let Mr. Baldor have a little extra steel for lunch.
He likes aged metal, must be like stinky cheese to a ginder...

here the roughed out blanks. The one on the left has the cutting eged ground into the blade and some cleaning has been done to the twist work.

And....an hour or so later i had the blades rough ground with the twist nicely evened up.

You will probably notice between this photo and the next that the butt ends of the handles will be different. In my haste I didnt think about which side of the spike i was flattening and i made the blade edge on the worng side of the handle for two of the knives... this sucked because I had to use the torch to heat the butt end and twist them around accordingly. One of them didnt have enough material left to do the full twist needed so that knife got an "intentional" rear facing head.
Next step is to fine tune the handle work and to finish grind the blades.
I took them up to 600grit and then used my buffer/cloth wheels with a few different rouges to put the shine to them. :thumbup:


So You could leave them here and they would be cool, but...Ive been having alot of fun lately with the tempering color scale...I know, your tired off hearing about color to heat comparisons...this time however its going to be used to give a RAD! effect on the blades before I finish them.
Like i said before, 10,000 different spike knives so you kinda got to find cool ways to make stuff like this your own.
Off to the house for a little soak in the oven.

After 2 hours at 500deg.

Youve all seen the knives turn this cool blue gold contrast but it is very thin and while it last the normal handling stresses it smears and distorts when its wiped hard or washed. To stabalize eveything they all got 2 coats of minwax Polycrylic Ultra Clear Coat sealer.
So here are the finished railroad spike knives
or...what i have dubbed them...
Martha Stewarts prison shanks....


this ones definitly a while collar prison weapon!


These will make some cool gifts this holiday and I can cross Railroad spike knife off the list of projects to try.
Have a good sunday, Ill try to post up the currnet knife builds photos once they are finished. No new info so just pictures this go round...
Thanks,
JP
Education through restoration thread link:
http://www.fsjnetwork.com/forum/viewtop ... =12&t=1366
Blacksmithing thread link:
http://www.fsjnetwork.com/forum/viewtop ... f=6&t=1381
http://www.fsjnetwork.com/forum/viewtop ... =12&t=1366
Blacksmithing thread link:
http://www.fsjnetwork.com/forum/viewtop ... f=6&t=1381
-
Florida83FSJCherokee
Topic author - Posts: 196
- Joined: Sat Mar 09, 2013 7:53 pm
- Location: Lakeland , Central Florida
Re: Blacksmith forging project thread idea (pic heavy)
ok part two for the evening...
Here are the finished serving boards from this week, seems like alot of guys are doing or thinking about doing stufff like this since there have been serveral post or threads started/updated about it.
hopefully this gives you all some ideas:
If a blacksmith can do it anyone can!
Heres the info:
Maple/Ambrosia with walnut boarders. Red heart wood and purple hearwood accents.
The center is rounded with a 6"sanding pad as the template and has walnut and ambrosia striping with a yellowheart and purple heart accent in the center.
I learned this week how to use a piece of oak clamped to the saws table top to make a "zero clearance" tolerance with my table saw blade. Its safe if done correctly but get help if your not totally sound with the process. Last thing you want is that blade bucking the boards back up and into your face.
Im hoping to do alot of this fine accent work in the future.
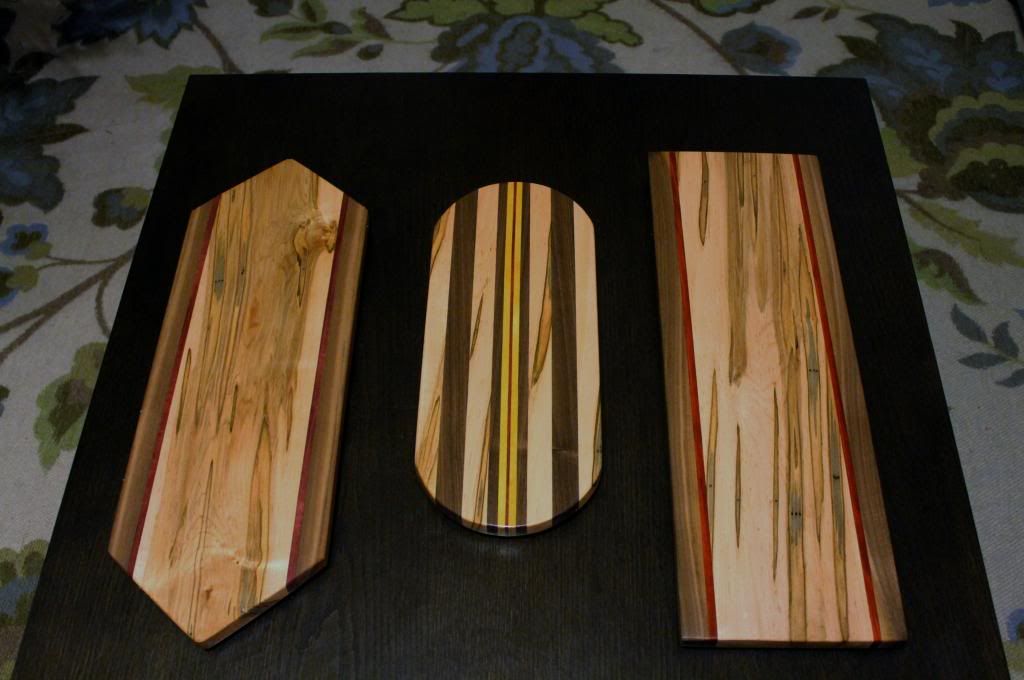
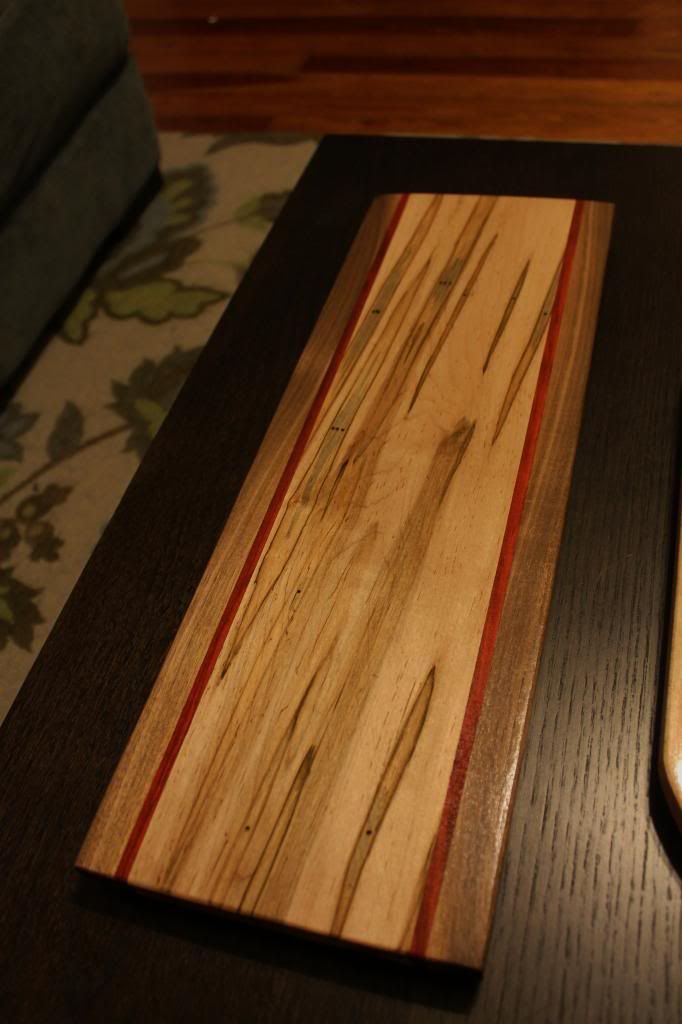
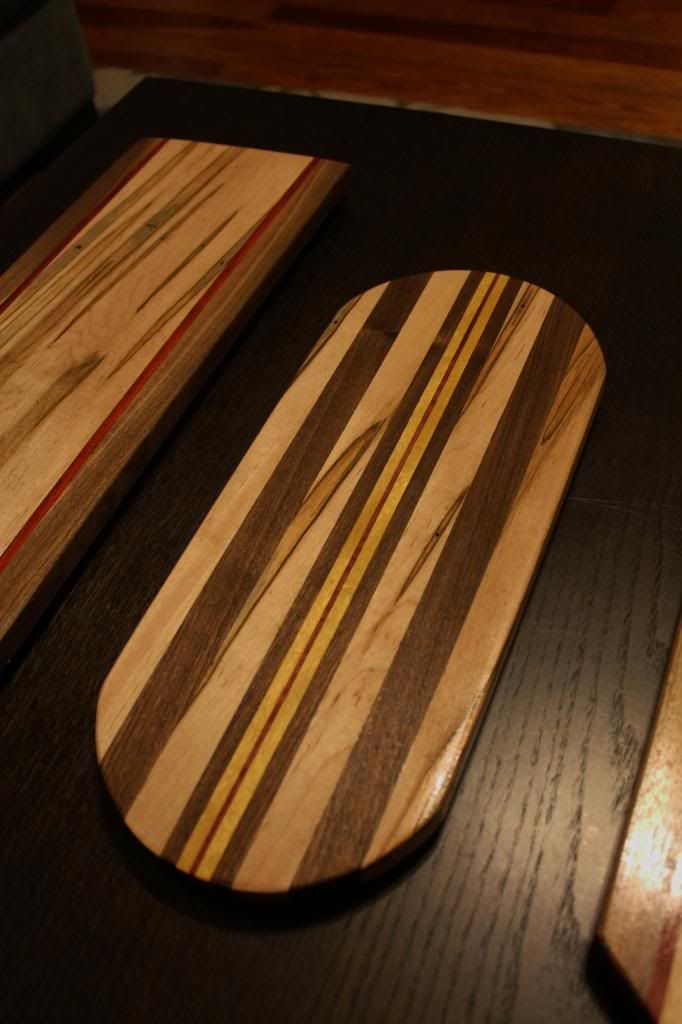
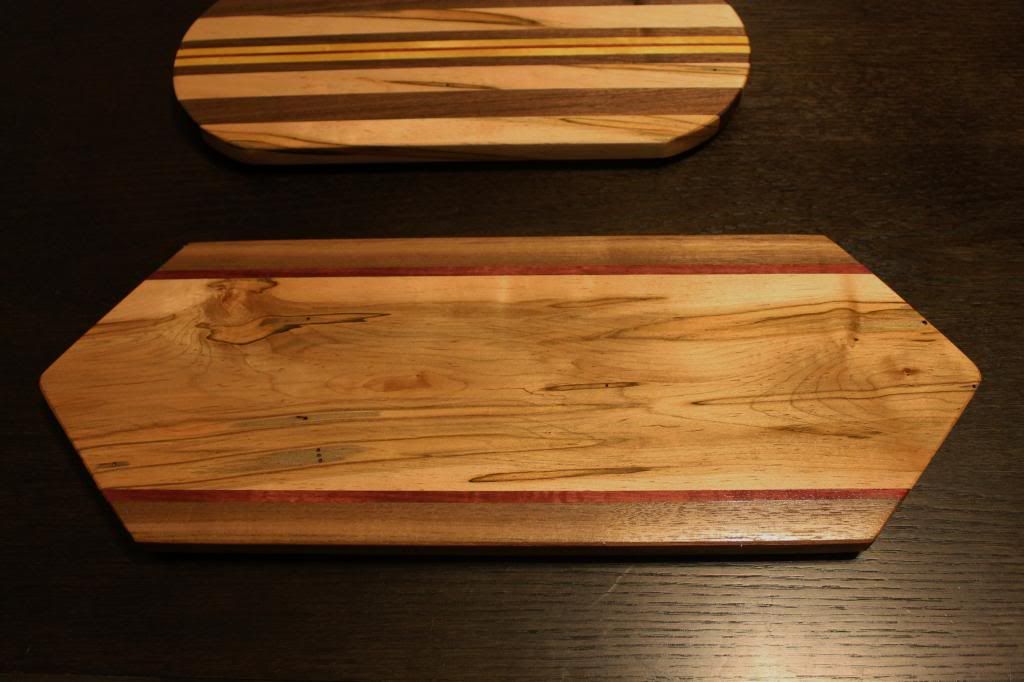
The flip sides
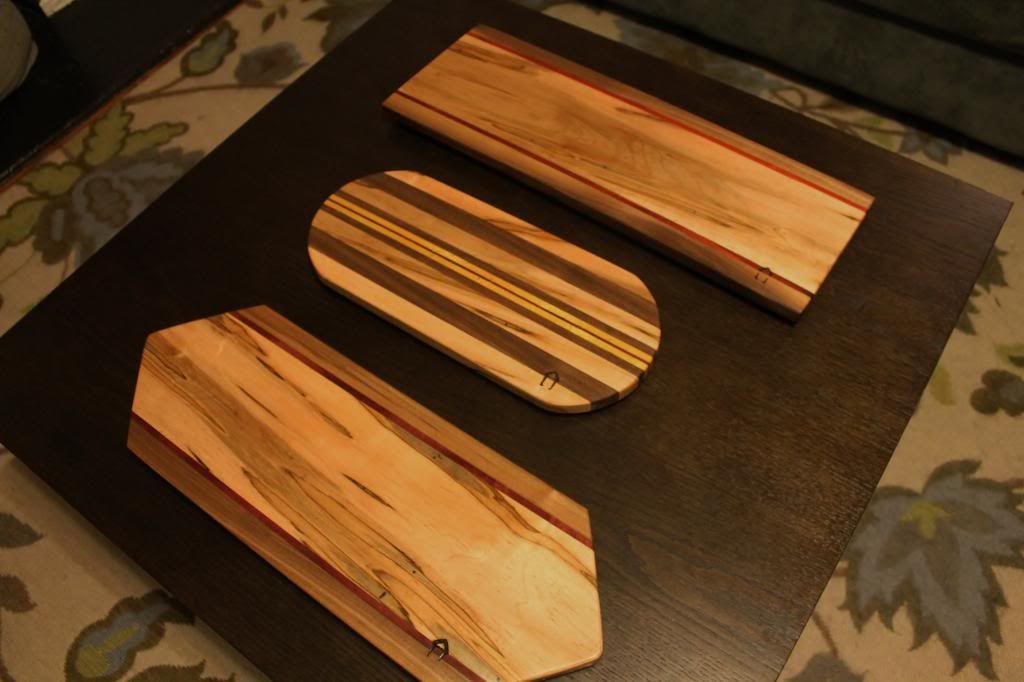
All have been sanded with a 3x21belt sander at 40 grit to plane it down and remove any glue/unevenness. (I will say that with the "aggiemethod and the magical cauls" this first rough sanding is really more about the glue removal since there really isnt any buck to the pieces anymore) :thumbup:
Edge work is just done with the DA sander on low, with an 80grit disc. Then everything gets 80-120-220grit and the endgrain edges get 400 grit as the final grade.
Watco butcher block oil and sealer with easy 600grit in between coats... 2 coats per side...
Hope you guys trying these board project out can use some of that info. If you havent go read Aggierailraods blog...its basiclly a very detailed posting like these but he really explains why the wood acts the way it does and explains the steps needed to prevent and correct it. Its honestly made stuff like these boards easy and fun to do since im not sanding all my problems away before i even get started...
heres the link: http://howtoforengineers.blogspot.com/
Allright,
have a good night,
have a good week and be safe,
JP
Here are the finished serving boards from this week, seems like alot of guys are doing or thinking about doing stufff like this since there have been serveral post or threads started/updated about it.
hopefully this gives you all some ideas:
If a blacksmith can do it anyone can!
Heres the info:
Maple/Ambrosia with walnut boarders. Red heart wood and purple hearwood accents.
The center is rounded with a 6"sanding pad as the template and has walnut and ambrosia striping with a yellowheart and purple heart accent in the center.
I learned this week how to use a piece of oak clamped to the saws table top to make a "zero clearance" tolerance with my table saw blade. Its safe if done correctly but get help if your not totally sound with the process. Last thing you want is that blade bucking the boards back up and into your face.
Im hoping to do alot of this fine accent work in the future.


The flip sides

All have been sanded with a 3x21belt sander at 40 grit to plane it down and remove any glue/unevenness. (I will say that with the "aggiemethod and the magical cauls" this first rough sanding is really more about the glue removal since there really isnt any buck to the pieces anymore) :thumbup:
Edge work is just done with the DA sander on low, with an 80grit disc. Then everything gets 80-120-220grit and the endgrain edges get 400 grit as the final grade.
Watco butcher block oil and sealer with easy 600grit in between coats... 2 coats per side...
Hope you guys trying these board project out can use some of that info. If you havent go read Aggierailraods blog...its basiclly a very detailed posting like these but he really explains why the wood acts the way it does and explains the steps needed to prevent and correct it. Its honestly made stuff like these boards easy and fun to do since im not sanding all my problems away before i even get started...
heres the link: http://howtoforengineers.blogspot.com/
Allright,
have a good night,
have a good week and be safe,
JP
Education through restoration thread link:
http://www.fsjnetwork.com/forum/viewtop ... =12&t=1366
Blacksmithing thread link:
http://www.fsjnetwork.com/forum/viewtop ... f=6&t=1381
http://www.fsjnetwork.com/forum/viewtop ... =12&t=1366
Blacksmithing thread link:
http://www.fsjnetwork.com/forum/viewtop ... f=6&t=1381