Dave's 76 Cherokee

Area to show off your Custom Build threads.
Post Reply
User avatar

Topic author
243
Posts: 740
Joined: Sat Mar 16, 2013 7:32 am
Location: Texas

Re: Dave's 76 Cherokee

Post by 243 »

Reflections of one week on the road....LOVE IT :D

No failure to start, run, or stay running...

Just what I remember from my years in the Waggie from 2000-2003, people love the FSJ, I had people talk to me sitting in traffic and many others who smiled, waved or said "that's cool" or "nice Jeep". One guy at work said "what's that, an old Suburban" and a guy on the jobsite said, "is that your Bronco" :P

That's OK though, both are cool classics that stand out in the crowd with the FSJ.


Going back to the beginning, this is how it started:

I joined IFSJA in '01 after inheriting a '76 Waggie that was rusted beyond recognition, I swapped the 401/T400/QT to a '79 Waggie and drove it for a few years out of necessity, bought a '75 for the factory slots and razor grille and parted it out and then bought a '76 Cherokee with a blown 360 but a fantastic body. Parted out the '79, sold the 401 and stored all the spare parts in the garage with the Cherokee for years with big plans to build it but finally let it go, no money, no tools, no time and eventually filed for divorce. I was honestly sick for two weeks after I sold the Cherokee, I had never felt that way about any vehicle in my life and I have owned a bunch.

#1 1976 Wagoneer (401/T400/QT Donor)

Image


#2 1979 Wagoneer (Daily Driver)

Image

Image


#3 1975 Wagoneer (Slot and razor grille donor, seriously rusted out basket case]

Image


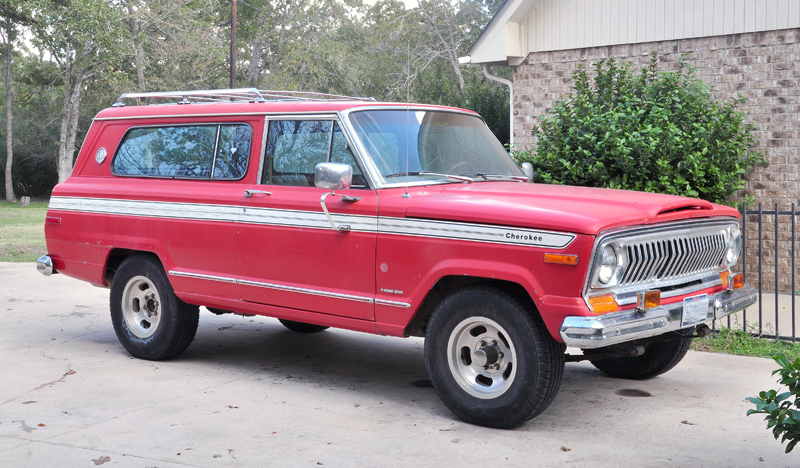
#4 1976 Cherokee (amazingly nice, showroom shiny interior, very little rust)

Image


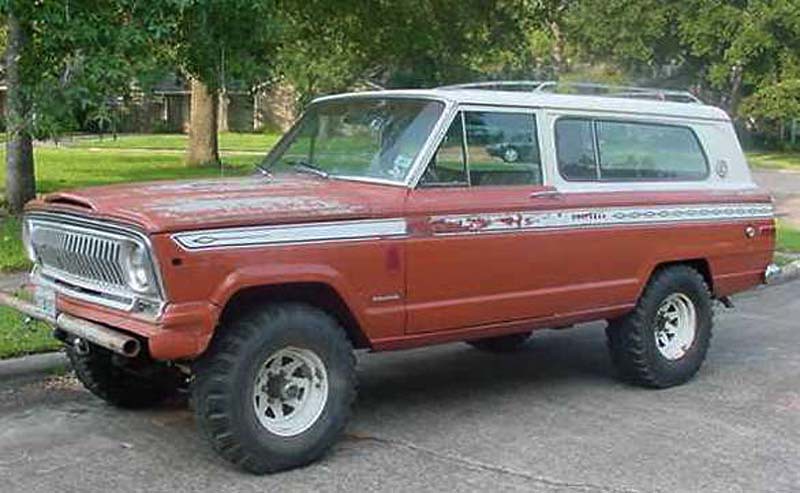
#5 1978 Cherokee (Great to be back in an FSJ)

Image


I am approaching this build a bit different, where the 1976 Cherokee was supposed to be a TBI 350 with a single serpentine belt system backed by a GM T400 case with a AMC QT output shaft, this will be the an LSx/4L60/NP241. Because I enjoy driving it I will build it and drive it; I spent 5 years building the CJ and that is just too long.

After week one, it looks like I have to do the following to keep it roadworthy and reliable:

1. One rear wheel bearing and change the fluid.
2. QT chain and vacuum pot.
3. Front axle seals.
4. Universal joints
5. T400 fluid and filter.
6. New exhaust, dual 2.5" with Hooker Aero Chambers, 99% will remain in place with the LSx.

I am ordering a 1227747 chip from Bill H. and VSS and will install the TBI, not required for roadworthy and reliable but definitely cleaner running and easier cold starts and driveablity.

Hope you all have a great, safe Thanksgiving!


.
Last edited by 243 on Thu Nov 27, 2014 6:20 pm, edited 1 time in total.
1978 Cherokee NT, 5.3/4L60/NP241 in Progress
User avatar

Stuka
Site Admin
Posts: 11845
Joined: Thu May 12, 2011 5:53 pm
Location: CA
Contact:

Re: Dave's 76 Cherokee

Post by Stuka »

I remember when you got that '76. Too bad you couldn't keep it. Your current one looks great!


Sent from my iPhone 6 using Tapatalk
2017 JKU Rubicon
Pevious Jeeps: 1981 J10, 1975 Cherokee, 2008 JK, 2005 KJ, 1989 XJ
User avatar

Topic author
243
Posts: 740
Joined: Sat Mar 16, 2013 7:32 am
Location: Texas

Re: Dave's 76 Cherokee

Post by 243 »

You have a good memory, that was a decade ago :D

The 78 "looks" better than the 76 but the 76 was truly nice, it only needed lower quarters from the lowest seam down and some minor dents repaired. The 78 needs some floor pan work, both quarters, pretty much top to bottom from the wheelwell back and it has lots of hail dents. I will probably replace the hood and the roof won't have to be perfect but I know the dents are there.

I bought a gallon of Ospho after reading and researching for months, maybe a year.

Image

My first test was to spray the angle iron that I used to make the fuel tank support, it was a little rusty but I brushed it and sprayed it with Ospho and after a few months, is still a clean gray color. My second test was to spray my heavily rusted vise and grinder stands, one is made with a manhole cover base and the other an 18-wheeler brake drum and a 4x4 I-beam. They both developed the white "ash" that needs to be brushed away but I am not planning to paint either at the moment.

I am pretty confident Ospho will work well on the Jeep, I will use it in a garden sprayer with a homemade flexible wand to get the nozzle down in the cracks, holes and other inaccessible spaces to kill the rust, or at least slow it down to a crawl.
1978 Cherokee NT, 5.3/4L60/NP241 in Progress
User avatar

Topic author
243
Posts: 740
Joined: Sat Mar 16, 2013 7:32 am
Location: Texas

Re: Dave's 76 Cherokee

Post by 243 »

I replaced the passenger side wheel bearing this morning and what I anticipated to be a one hour job took two, most of the wasted time dicking around with the shop press. I took it for a spin and first, the whine is still audible so either the other wheel bearing is also worn out or one of the differential bearings. And second, the dang Jeep shook bad, I thought the mirrors were going to fly off and I spent an hour and a half at Discount Tire on Thursday so I took it back.

After another hour and a half they had the wheels off and I told the kid to knock the weights off and start over, but there were not any on the front. One tire was off 7 ounces and another 4.25 ounces, they had already balanced two before I told them not to stack the weights but that didn't matter, even one layer was hitting the caliper. I told them to mount the weights right behind the slots and that worked, and I also had the kid break down one tire three times and spin it to get the 7 ounces down to 4 and then re-balance. They finally got it finished and were probably happy to see me go, but it was done as it was supposed to be the first time. I am not complaining, Discount has gone over and beyond every time I had an issue.

There is still some minor vibration but I ran it up to 80 and it feels okay, maybe a u-joint is bad.

I spend the afternoon doing minor repairs, the replacement side markers would not fit properly in the factory housings so I took them all off and sanded the edge of the lenses and replaced the screws with the correct ss oval head screws. One reverse light quit so I pulled both taillights and moved the ground from the factory location to the housing side, cleaned all the terminals, coated all with dialectic grease and put it back together. Faded side markers, blinkers and taillights bug the crap out of me so I didn't mind replacing the side markers and the turn signals when I broke them. I am watching for a set of new taillight lenses but I bought a can of VHT Blackout (red) to experiment. I washed the lenses with Dawn and dried them with compressed air, then I sprayed two light coats on the inside. They definitely look more red and much, much better to me; it will be hard to see in the pictures but look at the upper portion of each lens, the drivers is painted and you can see it's quite a bit darker than the passenger side.

After editing the photo I can see my bumper is way out of alignment.

Image


.
1978 Cherokee NT, 5.3/4L60/NP241 in Progress
User avatar

jsinajeep
Posts: 1850
Joined: Tue Aug 23, 2011 8:25 pm
Location: Brownsburg Indiana

Re: Dave's 76 Cherokee

Post by jsinajeep »

I will try to get a picture to you of the center piece tomorrow.
User avatar

Topic author
243
Posts: 740
Joined: Sat Mar 16, 2013 7:32 am
Location: Texas

Re: Dave's 76 Cherokee

Post by 243 »

jsinajeep wrote:I will try to get a picture to you of the center piece tomorrow.
Sounds good...
1978 Cherokee NT, 5.3/4L60/NP241 in Progress
User avatar

Topic author
243
Posts: 740
Joined: Sat Mar 16, 2013 7:32 am
Location: Texas

Re: Dave's 76 Cherokee

Post by 243 »

It turned out to be a great day to wrench on the Jeep, warm, breezy and I managed to get a few needed tasks finished:

I installed the power steering gear and it feels much better with a few degrees less than 3 turns lock to lock. It takes a little more effort to steer and I am not sure if the other gear was flat worn out this it's tighter and not leaking. I broke my pitman arm puller and it's guaranteed for life but I don't know where I bought it.

I also noticed the wheel stop bolts don't even come close to axle.

I spent a good three hours working on the dome/courtesy light circuit and finally have the drivers side jamb switch working both courtesy lights and the headlight switch turns them off and on, the passenger side jamb switch is toast. I did run a dedicated ground from the battery to a brass bolt in the e-brake bracket and tied all the grounds to the bolt including a dash cluster ground. I did find the tailgate window switch is missing the ground, possibly had something to do with its flaky operation. I will probably go out tonight and pick up a cheap dome light and courtesy lights, the factory lights are broken; I want a dome light so it's more obvious when the courtesy lights stay on.
1978 Cherokee NT, 5.3/4L60/NP241 in Progress
User avatar

Topic author
243
Posts: 740
Joined: Sat Mar 16, 2013 7:32 am
Location: Texas

Re: Dave's 76 Cherokee

Post by 243 »

What a great day, three in a row and I accomplished a lot, especially the little things that make a difference in the daily commute.
  • The courtesy lights are working and zipped tied in place for now, I don't see where they are supposed to be located.
  • Installed the fuel gauge temporarily in the glove box...on Thanksgiving Day I was warming it up and it ran out of gas in the driveway, definitely a necessity.
  • Installed dual power outlets, one for the phone and the other for the GPS, also in the glove box.
  • Installed a fuel pump relay.
  • Installed new defrost ducts...yeah, get to use the defroster in the morning.
  • Discovered a wire labeled trans kick-down, took a few hours to figure out what they hell it was...yeah, no more manual shifting and it works great!
  • Cleaned all the sH!t out of the back.
  • Vacuumed the inside and drove it to gas up and hit the car wash.
  • Figured out my ash tray has no balls...wimpy.

I also tried out Pilot brand 1156 and 1157 LED's, the brake, blinker and taillights look better to me, more red and brighter. They blinkers flashed a little faster, snappy but the dash lights would not flash. The reverse lights looked brighter and matched the LED license plate light. Since the blinker indicator on the dash did not flash, and they seem to be just a tad short and take a lot of effort to seat in the sockets I may take them back.
1978 Cherokee NT, 5.3/4L60/NP241 in Progress

twisted frame
Posts: 637
Joined: Wed Mar 27, 2013 9:41 am
Location: Massachusetts

Re: Dave's 76 Cherokee

Post by twisted frame »

Interested in pics of your outlet installation in the glovebox. Did mount them to the metal dash opening of the glovebox? Do you still have the black cardboard piece in there? Thanks!
73 J4000. 360, MC 2100, T18A, D20, stock closed knuckle Dana 44 front, 60-2 rear. Warn Lock-O-Matics, Warn/Belleview electric winch, true duals with glasspacks, old-school front diff skid plate, used 265 Toyos on 16" AR wheels.
User avatar

Topic author
243
Posts: 740
Joined: Sat Mar 16, 2013 7:32 am
Location: Texas

Re: Dave's 76 Cherokee

Post by 243 »

<grin> the QT switch is missing the knob, nut and faceplate, the cardboard is in the garage and the gauge and outlets are flopping around on the evaporator...kinda looks like "that closet" in the house that nobody wants to look at :shock:
1978 Cherokee NT, 5.3/4L60/NP241 in Progress
User avatar

Topic author
243
Posts: 740
Joined: Sat Mar 16, 2013 7:32 am
Location: Texas

Re: Dave's 76 Cherokee

Post by 243 »

The 360 smells like it's running rich so I decided to do an ignition tune-up along with some upgrades.

I stopped by Autozone on the way home from work and bought a cap adapter, cap, rotor, inexpensive Ford 460 8mm wires, Ford TFI coil, GM module and Delco platinum plugs. I ate dinner to let it cool down and immediately found I bought a bolt down cap adapter and needed a snap on. I pulled the #8 plug and found the previous owner installed Bosch platinum plugs and they looked new so I headed back to the parts store. I returned the plugs, swapped the cap adapter and made it home about 8:00 and went to work. I found a 12v ignition wire and hooked up the new coil, swapped the wires and fired it up, sounded good so I grabbed the timing light and it was sitting at 5 BTC, I bumped it to 15 BTC and took a spin around the neighborhood.

It felt strong and pulled hard, definitely better than three hours ago and bet it would bark the tires if the Turbo 400 had a decent shift kit...not that I would do that with a questionable Quadratrac chain.

Up until today, all I have done is replace the previous crapped out carb with the a NOS MC2100 and set the idle mixture with a vacuum gauge, vacuum is 20 hg and pretty steady. Tomorrow I will make sure the distributor is using manifold vacuum rather than ported vacuum, bump the plug gap from .030 to .045, check total advance and idle mixture again. I HATE carburetors but the doggone 360 runs pretty darn good with the MC2100.

I found a auto restoration shop in town that is now building exhaust systems, I will wait until my next check in January and take it in. I was planning to use Hooker Aero Chambers but after listening to a bunch of YouTube videos, I think they will be too loud. I ran Flowmaster 2-chambers on multiple vehicles and absolutely loved the sound, enduring the Houston heat and humidity to hear the song every time I drilled it. Of course, I was in my 30's and now at 50, I am feeling I will be a little more conservative, so I am split between Super 44's and 50's.

I have had two people this week ask how much I would sell it for, I told them both 10K and they both said "wow".......my reply, I love my Jeep and that is what it would take to let it go.
1978 Cherokee NT, 5.3/4L60/NP241 in Progress
User avatar

Topic author
243
Posts: 740
Joined: Sat Mar 16, 2013 7:32 am
Location: Texas

Re: Dave's 76 Cherokee

Post by 243 »

Oh, and I replaced the steering gear this past weekend, the replacement is a 3 bolt and the original is a 4 bolt, the original box felt squirrely but it had a light effort that I prefer, the replacement box has a higher effort but it may be the pump is shot, and the turning radius on both sucks. I am not happy with the steering, it feels like there is play in the wheel but I have not had a chance to see if steering wheel movement transmits immediately to the wheels. It may be the rag joint that I plan to replace with an XJ lower or it may be worn tie-rods, in any event, I think I am keeping my original steering gear since the core charge was not much and try rebuilding it. I watched a bunch of videos over the weekend and it does not seem that difficult.
1978 Cherokee NT, 5.3/4L60/NP241 in Progress
User avatar

Topic author
243
Posts: 740
Joined: Sat Mar 16, 2013 7:32 am
Location: Texas

Re: Dave's 76 Cherokee

Post by 243 »

This evening I pulled the Motorcraft ignition module that was/is leaking goo down the inner fender and salvaged the wires and plugs. Took an or so and mounted the HEI module to a piece of aluminum angle and bolted it to the factory location. I did this mostly as preventative maintenance thinking the factory module may leave me sitting on the side of the road. I also pulled each plug, re-gapped to .045 and checked the compression, each cylinder was 130-135 psi so it appears to be wearing well, the FSM calls for 140 psi minimum but this is not a long term engine. However, with that news I am plowing on and will order a chip from Bill H. and get the TBI installed.
1978 Cherokee NT, 5.3/4L60/NP241 in Progress
User avatar

Topic author
243
Posts: 740
Joined: Sat Mar 16, 2013 7:32 am
Location: Texas

Re: Dave's 76 Cherokee

Post by 243 »

The time I spent dicking with the 2100 this past Thursday was irritating and reminded me how much I hate carbs; so I moved the TBI from the fireplace to the coffee table and verified what I need to make the swap. I went to Oreilly's last night to exchange the carb kit and picked up a throttle body tune-up kit, Bosch O2 sensor, spark plug fouler (O2 bung) and temperature sensor. I have several MAP, TPS and IAC sensors as well as injector spares on hand to hold on buying new.

I have two harnesses chopped and ready to fit and fabricated a throttle body to manifold adapter quite a while back.

I ordered a USB to serial adapter suggested by babywag and hope to have fewer issues getting WinALDL and TunerPro working on my laptop.

Image
1978 Cherokee NT, 5.3/4L60/NP241 in Progress
User avatar

Stuka
Site Admin
Posts: 11845
Joined: Thu May 12, 2011 5:53 pm
Location: CA
Contact:

Re: Dave's 76 Cherokee

Post by Stuka »

A move in the right direction :)


Sent from my iPhone 6 using Tapatalk
2017 JKU Rubicon
Pevious Jeeps: 1981 J10, 1975 Cherokee, 2008 JK, 2005 KJ, 1989 XJ
User avatar

Topic author
243
Posts: 740
Joined: Sat Mar 16, 2013 7:32 am
Location: Texas

Re: Dave's 76 Cherokee

Post by 243 »

Boy that is the truth!

I spent way to much time thinking about every detail of the CJ project but I have taken the opposite approach with the Cherokee with a plan to not sweat the details but keep it safe, reliable and drivable if at all possible...the TBI project will save me from myself and some hillybilly-hack-fab work the last week or so. I could have sworn I had some leftover 6061 plate and plenty of small machine bolts to secure the module but no dice, so a quick install of the module using what I could find in the trash pile. Duct tape that slipped off a 12v connection, cheap butt connectors, nice heat shrink butt connectors not complete, bare terminals and what you don't see is the plastic master cylinder bleeder fitting used as a nut for the wood screw holding one end of the module; it works, but it's fugly and not at all safe.

Image


Now the carb spacer fits the profile of hillbilly-hack-fab but I am proud of it. I could not find a piece of 3/4" - 1" thick plastic or aluminum locally so I bought a short piece of Red Oak and carved it out with a hatchet, it actually worked after I sanded it flat on the kitchen counter. If I planned to run a Motorcraft 2bbl or 4bbl I would trash the POS spacer and thick insulator and make a nice phenolic spacer with the router, a couple of normal gaskets and rock on.

Image


I wanted more time but we had family in town all day yesterday and breakfast this morning kept me away from the garage until 11:00. I started the TBI install and really hoped to crank it over tonight but it just didn't happen, I did get a good start and no real hiccups other than needing to make a run for 5/16 x 1 allen bolts for the adapter that I made months ago. I spent too much time dicking around with the O2 sensor bung and had to grind out the first attempt after getting a weld booger in the threads of the bung; I put an old sensor in the second bung before I welded it and then I was good to go.

The TB install was a breeze, I ground off the GM throttle cable stud and the ball stud on the MC 2100 bolted on below the GM location and the throttle works perfect, full travel using the factory bracket. While I was at it, I pulled the cruise control bellows and the old ignition coil and tossed them in the dump pile, there was a ton of rat chit on the intake too, hopefully that was while it was sitting at the previous owners place.

I have not cut the harness, for now I made my connections to the ignition and fuel pump relays, connected the O2, MAP, IAC, TPS and temperature sensors and tagged all the grounds. I thought was going to have an issue with the temperature sensor but found a plug in the water outlet that worked perfectly. While I was messing around I found a cracked vacuum connection for the trans and repaired that while I was laying on the engine, I also need a new PCV valve and possibly the grommet considering it is very loose.

The last batch of TBI parts I bought included most of the braided stainless/nylon fuel lines from the donor, unfortunately, they are both about 6" short from connecting direct to my hard lines. So I need to round up a few barb fittings and join my nylon lines to the factory lines, should be able to get the parts tomorrow.


So I have a fairly short list before I power up and set the IAC, TPS and timing:

Connect the fuel hoses.

Connect the grounds.

Put a fuse between the battery and 12v feeds.

Fab another ALDL cable.

Phase the distributor.

Connect the distributor and coil.


Image

Image

Image

Image


.
1978 Cherokee NT, 5.3/4L60/NP241 in Progress
User avatar

Topic author
243
Posts: 740
Joined: Sat Mar 16, 2013 7:32 am
Location: Texas

Re: Dave's 76 Cherokee

Post by 243 »

Last night I was pretty sure I had the "no fuel" issue narrowed down to the module so on the way home this evening, I picked up a module and two injectors just in case. After a little dicking around, set the TPS to .53v and was able to get it running long enough to set the base timing to "0". Shut it down and set the IAC by "ear" since my china'loca USB to serial adapter is still in route. It actually sounds pretty good considering I just plugged in the 1227747 ADTZ (5.0 TH400 ECM) to get it running, I think I have another chip around the shop with a 5.7 ECM. I think I will chew my nails off waiting for Bill's chip that should be here any day.

https://www.flickr.com/photos/126363598 ... 852413770/
1978 Cherokee NT, 5.3/4L60/NP241 in Progress
User avatar

Topic author
243
Posts: 740
Joined: Sat Mar 16, 2013 7:32 am
Location: Texas

Re: Dave's 76 Cherokee

Post by 243 »

Well, I had a great day that ended with a good long drive around town with the TBI running slicker'n goose poop :D

I was datalogging for the first half hour or so then I just cruised around town, mixed driving up to 60 mph or so for the first half of drive on backroads and then I jumped on the highway to head home running 75-80 around 2750. The heavy fuel smell is gone and it idles so nice, all the time.

Over the next few days I will clean up the rats nest of wires, shorten the harness and move the ECM inside, replace the PCV valve and get an air filter of some type. Next project will be swapping out the steering shaft followed by the water pump.

I feel confident it's running well enough that I will probably make a run to Houston to go shoot with a buddy.
1978 Cherokee NT, 5.3/4L60/NP241 in Progress
User avatar

Stuka
Site Admin
Posts: 11845
Joined: Thu May 12, 2011 5:53 pm
Location: CA
Contact:

Re: Dave's 76 Cherokee

Post by Stuka »

Awesome!


Sent from my iPhone 6 using Tapatalk
2017 JKU Rubicon
Pevious Jeeps: 1981 J10, 1975 Cherokee, 2008 JK, 2005 KJ, 1989 XJ
User avatar

Topic author
243
Posts: 740
Joined: Sat Mar 16, 2013 7:32 am
Location: Texas

Re: Dave's 76 Cherokee

Post by 243 »

It rained pretty much all day Saturday and Sunday but I completed a lot of items yesterday. I needed a number of items especially an air cleaner housing for the TBI so I tried a junkyard about 20 miles away and found what I needed and more: an air cleaner assembly from a Chevy 1500, 12V power block from an S-10 and a large grommet from a Chevy 1500 (hopefully 1.5").


I spot welded the cold air butterfly in the snorkel open and cut, extended and welded the offset air cleaner lid bolt and installed a fresh air filter. It is a lot quieter now and looks close to factory, not that I care but it does.

I cut out the rats nest of wires and moved the ECM under the dash, hard wired the RS232 adapter that Tony linked in the TBI thread, and installed a check engine LED that does not work but I am not sure if it's supposed to come on unless there is a code. The ECM and fuel pump relays are temporary, I want to find a relay and fuse block assembly and mount it permanently.

I picked up an HF fuel gauge and mounted temporarily on the frame and confirmed the fuel pressure, my other gauge was reading 2.5 lbs static and pegged at 15 lbs while running so I was not sure.

I drilled a 1.5" hole in the firewall just up and to the right of the heater but later found 1.5" grommets unavailable locally. I hope the grommet I pulled off the Chevy will work, it's close but I have not measured it.

The AMC PCV grommet was rotten, the HELP part unavailable locally so I ordered one off Ebay. I decided I wanted to switch to a 90 degree PCV valve so I pulled the grommet and went to Autozone, I found a part that was close but not exact in dimensions but using the large diameter valve, it all worked perfectly and I ran a new vapor hose from the rear to the front of the TB.

I found the windshield washer pump circuit working and the pump spinning, then I found lines were clogged or broken and the hose was attached to the reservoir with silicone and leaking; after an hour of work repairing stuff, I found the pump to spinning but has no pressure. OReilly had a pump so I bought one last night.


Today will be easy, I need to replace the fuel pressure gauge with a filter, install a new rearview mirror and install the washer pump.

I also have a Delco 4-horn setup to install, I found two Caddy horns a week ago and installed those but 6 horns should wake up the knuckleheads sitting at green lights looking down at their phones. Those phones would be damn "smart" if they went black when the lights turned green.


It seems to be more fun to drive each time I repair or upgrade, I have short list for the next few weeks:

1. Install ZJ lower shaft...the first inch of travel from center is quite vague.

2. Order and install tailgate seal...I think I am getting some exhaust fumes into the cab from that location.

3. Order and install temperature gauge.

4. Order and install tailgate channels and test electric window operation, if all is good find a new switch; and if not, order manual window conversion.

5. Find the horrendous knocking sound near the passenger side rear inner fender.

6. Order and install VSS.

7. Verify the hot air butterfly in the passenger side manifold is open.

8. The flywheel must have some worn teeth and probably needs to be replaced, I really hope it lasts until I replace the QT chain.
1978 Cherokee NT, 5.3/4L60/NP241 in Progress
Post Reply