1986 Grand Wagoneer -Bakydnutbstr

Show off your FSJ photos and videos!
User avatar

Topic author
Bakydnutbstr
Posts: 43
Joined: Sat Feb 08, 2020 7:33 am

1986 Grand Wagoneer -Bakydnutbstr

Post by Bakydnutbstr »


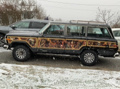
I’ve had this jeep round 16 yrs sat in yard for a few yrs then moved upstate NY Catskills region in 2014 and dismantling started. I do swimming pools in Westchester County NY so the off season is when I got to work on her. Many parts have been touched from window registers to tail gate switch for rear gate window.
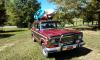
I still have an issue with fuel as a holly fuel control system had been put in many yrs before it’s destine to be replaced w injected carb. Well here’s some pics I’ve taken along the way
OH it was all done in a two car garage by myself and my Laura no other entities helped. Any parts bought are from jeep part dealers.Image
Image
Image
Image
Image
ImageImage

Image
Image
Image
Rusty metal primer inside frame and outImage
ImageImage
Image
Image
Image
Image
Image
Image
Image
Image


Sent from my iPad using Tapatalk
User avatar

Topic author
Bakydnutbstr
Posts: 43
Joined: Sat Feb 08, 2020 7:33 am

1986 grand Wagoneer debut

Post by Bakydnutbstr »

More picsImage
Image
Image
Image
Image
Image
Image
Image
Image


Sent from my iPad using Tapatalk

Srdayflyer
Posts: 423
Joined: Mon Mar 18, 2019 2:08 pm

Re: 1986 grand Wagoneer debut

Post by Srdayflyer »

very nice, i like the mossy oak wood grain replacement, interior looks great too
did you recover the seats? if not the oem covers look great :fsj: :fsj: :fsj: :fsj:

2Beers
Posts: 6
Joined: Tue Nov 21, 2023 6:20 am

Re: 1986 grand Wagoneer debut

Post by 2Beers »

very cool!!
User avatar

Topic author
Bakydnutbstr
Posts: 43
Joined: Sat Feb 08, 2020 7:33 am

Re: 1986 grand Wagoneer debut

Post by Bakydnutbstr »

The seats and rear [not shown] are factory, pics are crummy very bad detail.
User avatar

dodgerammit
Posts: 1445
Joined: Wed Jan 11, 2017 11:20 pm
Location: Middle TN

Re: 1986 grand Wagoneer debut

Post by dodgerammit »

Love the non-original "woodgrain" in the original Jeep style!
Always have liked when people do a slightly different graphic for the main panels.

There's a guy on the Fakebook group that has the stars and stripes over barnwood graphic on his baltic blue rig.
Another person has a very light woodgrain within the darker, factory color border.
Both are very unique without going crazy.

The interior camo would just be too much for me with the outside already sporting it, but it is done very nicely.
Definitely something to be proud of and enjoy on the road! :-bd
84 Grand Waggy-Radio Flyer (Garnet Red/3M Ebony Metallic woodgrain, with honey interior) AMC 360 :cry: 2004 4.8LS/Advance Adapter/727/242 D44/AMC20 Serehill tailgate and headlight harnesses :fsj: Ongoing thread-viewtopic.php?t=11897

92 Wrangler Islander 4.0/32RH/231 D30/D35 RHD
User avatar

Topic author
Bakydnutbstr
Posts: 43
Joined: Sat Feb 08, 2020 7:33 am

Re: 1986 grand Wagoneer debut

Post by Bakydnutbstr »

Thanks , the camo is just rear 4 panels and head liner visors also .Wanted to feel like I’m in “THE GREAT OUTDOORS” while I drive her and yes it’s a reference to the movie.


Sent from my iPad using Tapatalk
User avatar

Topic author
Bakydnutbstr
Posts: 43
Joined: Sat Feb 08, 2020 7:33 am

Re: 1986 Grand Wagoneer debut by Bakydnutbstr

Post by Bakydnutbstr »

Just learning to use tap talk and sorry for repeats


Sent from my iPad using Tapatalk
User avatar

Topic author
Bakydnutbstr
Posts: 43
Joined: Sat Feb 08, 2020 7:33 am

I’ll go backwards through my process of making her beautiful again -Bakydnutbstr

Post by Bakydnutbstr »

Sent from my iPad using Tapatalk
Last edited by Bakydnutbstr on Tue Jan 16, 2024 12:41 pm, edited 1 time in total.
User avatar

Topic author
Bakydnutbstr
Posts: 43
Joined: Sat Feb 08, 2020 7:33 am

1986 Grand Wagoneer - try photos again-Bakydnutbstr

Post by Bakydnutbstr »

I’ll go backwards through my process of making her beautiful againImage
Image
Hub is in good shape ,magic marker added color permanent if not do it again!
Image
The bumper had little spots on it cleaned polished scrubbed still spots came back when dry.
So lacquer thinnered front and rear bumper spots came backImage 
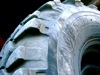
try one more thing tire wet spray soaked them rubbed it in by hand been bout a month No spots or streaks on aluminum ,don’t dry it -wipe lightly should feel slippery.
Image
Image
Just LOOKS Ominous,gotta love emImage
So nice,a clear lacquer is on rim from factory but lacquer thinner fixed that ,looks better clean. Clean before tape
Image
The wheels took time but worth it
Image
Image
Peel tape 20 mins after painting Don’t let dry , it maybe a little takie


Sent from my iPad using Tapatalk
User avatar

Stuka
Site Admin
Posts: 11812
Joined: Thu May 12, 2011 5:53 pm
Location: CA
Contact:

Re: 1986 Grand Wagoneer - try photos again-Bakydnutbstr

Post by Stuka »

I merged your four topics together so that they are now all in the same thread. You can just reply to this post to add more.

And, great looking Waggy!
2017 JKU Rubicon
Pevious Jeeps: 1981 J10, 1975 Cherokee, 2008 JK, 2005 KJ, 1989 XJ
User avatar

Topic author
Bakydnutbstr
Posts: 43
Joined: Sat Feb 08, 2020 7:33 am

Re: 1986 Grand Wagoneer - try photos again-Bakydnutbstr

Post by Bakydnutbstr »

Thanks
But can I delete one post I put up
I keep messing up some how and get repeated photos
User avatar

dodgerammit
Posts: 1445
Joined: Wed Jan 11, 2017 11:20 pm
Location: Middle TN

Re: 1986 Grand Wagoneer - try photos again-Bakydnutbstr

Post by dodgerammit »

Love the color matched wheel accents! I'm gonna redo my gray version into gold on my ride soon. Thinking about doing a gold/black or gold/red center cap treatment. I have a couple of broken ones I can play around with. Those pics gave me some ideas.
84 Grand Waggy-Radio Flyer (Garnet Red/3M Ebony Metallic woodgrain, with honey interior) AMC 360 :cry: 2004 4.8LS/Advance Adapter/727/242 D44/AMC20 Serehill tailgate and headlight harnesses :fsj: Ongoing thread-viewtopic.php?t=11897

92 Wrangler Islander 4.0/32RH/231 D30/D35 RHD

letank
Posts: 4030
Joined: Wed Oct 03, 2012 9:16 pm
Location: SF bay area

Re: 1986 Grand Wagoneer - try photos again-Bakydnutbstr

Post by letank »

Very good ideas for the camo schem. and nice wheel job how to repaint those darn oxidized rims
Michel
74 wag (349 Kmiles... parked, next step is a rust free body)
85 Gwag (229 Kmiles... the running test lab)
User avatar

Topic author
Bakydnutbstr
Posts: 43
Joined: Sat Feb 08, 2020 7:33 am

Re: 1986 Grand Wagoneer - try photos again-Bakydnutbstr

Post by Bakydnutbstr »

Paint rims, I picked up 2 cans of aluminum primer as it bonds (etches) the surface , clean oxidized blisters small blade screw driver . The center area of wheel I used a gallon can to make circle. Washed rims in B-tub hot water dish soap,scrub brush to get final oils off it,dry .


Sent from my iPad using Tapatalk
User avatar

Topic author
Bakydnutbstr
Posts: 43
Joined: Sat Feb 08, 2020 7:33 am

Re: 1986 Grand Wagoneer - try photos again-Bakydnutbstr

Post by Bakydnutbstr »

More work on GWImage
Rear tailgate window switch,note off set -broken need new ‘TGW’ HAS NEW SWITCH,perfect fit a little $$$ ,but ya need it you need it.
Image
New switch in place works great!
Image
New window carrier & clips ,found out best way to install window is to remove carrier set rear window on blanket-s another person is going to be needed to hold window on edge, lay strip filler across bottom edge of window while pressing bottom carrier onto window .
Take your time,then slide back into tail gate , install clips .

Image
My old head liner has sags over driver and passenger ,used heat type foam to stick to roof , also used water heater wrap (sliver bubble type) in between roof and head liner for heat deflection works well.
Image
Roof painted
Image
Yes I painted it in stages - undressing after painting roof.
Floor protector Used for covering .
Image
First wrap Christmas paper -rips easy
Image
Minor dings
Image
Slight depression on hood


Sent from my iPad using Tapatalk
User avatar

Topic author
Bakydnutbstr
Posts: 43
Joined: Sat Feb 08, 2020 7:33 am

Re: 1986 Grand Wagoneer - try photos again-Bakydnutbstr

Post by Bakydnutbstr »

Image
Had small blisters so… I picked at em - wound up with this. Image made a nest inside rocker, vaced out , painted inside epoxy , welded patch, bondo, some more sanding red putty the line came out straight.
Image
Image
Unexpected place for rot ,hammered areas to remove any internal rust flakes, braze patches use epoxy putty to cover and smooth out areas prime ,paint .
Image
Image
Body mounts replaced ,originally tried to use impact gun to remove body bolt but… the factory square flat nut yup,it spun round &. round inside its housing.
I used a dremel w small cut off blade. Cut open on 3 sides bent open flap ( so it can be rewelded closed) ,next part bites sawzalled the bolt off inside housing, l did cut with nose on would be easier with it off.
Image
Used industrial sealant on welded spots
Image
Paint epoxy paint. Couple times
Image
More fun,you know at least one bolt had to break ,but not 4 of em. Yup both sides ,I thought the ends might be hard - they came out real easy. Sure am glad the nose is off now cuz I did the other side with it on.
Image
ALL BETTER, chased the other bolt holes also


Sent from my iPad using Tapatalk
User avatar

Topic author
Bakydnutbstr
Posts: 43
Joined: Sat Feb 08, 2020 7:33 am

Re: 1986 Grand Wagoneer - try photos again-Bakydnutbstr

Post by Bakydnutbstr »

Image
Camo-ed head liner, use high temp spray glue to adhere to liner board, cut out for lights

Image
Bubble wrap insulation ,25’x4’ roll, don’t use near generated high heat (next to exhaust,interior roof lights)
Leave edge clear 3/4”+-, so liner board can fit back into track
Image
My arm rests ,most of em ,had screw pass way broken
Used 3/8 tube lined it up with pin pushed through to keep alinement glued in place put broken parts in to fill space when glued
Image
I tried expanding foaming glue on other holes ,ok also,
Leave for cure time before use
Image
Nice new,stainless bolt nylon nut for spare tire
Image
Spare rim ,cleaned,painted back side black epoxy paint front white epoxy.
Image
Ahhh some more fun, while doing things noticed hose was crooked , unscrewed you see results, too many threads. Very surprised it hadn’t leaked.
Image
Good tool,may use it once not much call for it but,when ya need it , ya need it. Cleaned up nice, new hose went right in.
Image
New motor mounts, so much easier w nose clip off.


Sent from my iPad using Tapatalk
User avatar

Topic author
Bakydnutbstr
Posts: 43
Joined: Sat Feb 08, 2020 7:33 am

Re: 1986 Grand Wagoneer - try photos again-Bakydnutbstr

Post by Bakydnutbstr »

Image
New rotors, pads,calipers & hoses,races & bearings
Image
The other side
Image
Backing plate had spots of rust through
Used epoxy putty to fill and shape
Image
Image

Image
Made dust/stone shield from gallon bottle
Image
Cut to same dimensions
Image
Painted w rust paint w added hardener
Image
Backing plate painted and shield in place
Sealant used to hold in place


Sent from my iPad using Tapatalk
User avatar

Topic author
Bakydnutbstr
Posts: 43
Joined: Sat Feb 08, 2020 7:33 am

Re: 1986 Grand Wagoneer - try photos again-Bakydnutbstr

Post by Bakydnutbstr »

Image
Reference pic ,changed all brake parts ,old parts shown
Image
Drums & shoes replaced before move to now home.
Image
I like sound of a cherry bomb muffler
Image
Hanger
Image
Tried leveling pipe but would touch shock at over the axel hump, the tail pipe is stainless steel
Image
Tip of pipe
Image
New diaphram
Image
All new brake lines w so pebble guard,cupronickel lines nice to work with forming ends (nippling) a bit harder to form.
Image
400 degree heat shield on firewall and area facing headers on diaphragm


Sent from my iPad using Tapatalk
Post Reply