Before you begin, you will want to decide how you are going to set up your steering. You MUST switch to either a crossover steering, or a full high steer setup, in order to keep proper steering geometry. I was originally going to use the crossover kit from Bj's Off Road, but the kit was on indefinite back order, so I was forced to go another route. After looking for advice here for other options, I decided to go with the high-steer setup and ended up locating some flat top steering knuckles with high steer arms on e-bay. If you decide to go with the crossover setup, you will only need the passenger side knuckle. then you will just need to make yourself a drag-link to go from the steering box to the top steering arm. Then you can use the original tierod, or make a new one to mount to the lower arms to link the front wheels. For the high-steer setup, you need both knuckles and will make the same kind of y-link setup that was originally used, which keeps all your steering components above the springs. You will see the finished product later in the post.

Well, let's get started! I started with the front axle. I removed the axle and set it up on jack stands, which made it very stable for working on. The perch for the side that is on the tube is pretty easy. Tad's instructions, included in the kit, are easy to follow. I have a digital angle finder that made it a cinch to set the angle of the new perch. It is magnetic and has a set-to-zero function, that allowed me to stick it to the original perch and set it to zero. Then I simply set it on the top of the new perch and when the finder read zero, I tacked it in place. Piece of cake!


The differential side took quite a bit more work, but it isn't difficult. first of all, the first lip of the old u-bolt channel needed to be cut off, in order to get the new perch positioned correctly and also give room for welding. It took some time, but actually wasn't as bad as it looked when I started. Then it was just a matter of getting the new perch positioned and welded.


Another important bit of grinding comes on the bottom side if the differential, where the inboard u-bolt will now seat. You need to create a channel through some material next to the original perch, enough so the u-bolt makes good contact all the way around the bottom.

Perches complete!

At this point it was time to put the axle back onto the Jeep, so i could continue to the next step, which was the steering knuckles. I just felt it was easier to change the knuckles with the axle attached firmly to the Jeep, so it was good and secure for the work that needed to be done. I rented a ball joint remover/installer from Autozone to press in the new ball joints, but just used the old fork and hammer to remove the old knuckles. I forgot to get pics of this process, but here is a shot of the completed new knuckle. Also shown is the modified original spring plates, that needed to be cut and re-welded so I could hook up the swaybar. I learned this trick from Tad, in another thread. http://www.ttsfabworks.com/tech/80-91SO ... Plates.pdf Another thing shown in the first pic is the new bump-stop I used from the rear of a 2003 Chevy Silverado.


Next up was the custom tierod / draglink. I ordered my kit from WFO concepts http://www.wfoconcepts.com/pr/Full-High ... /4295/4298 It comes with everything you need. Just cut the pipes to length, weld in the bungs and your good to go. The only issue I had was that the tierod end that attaches to the pitman arm is a bigger size and I would have needed to ream out the pitman arm, so I just bought a new original end from Napa. It was another $60.00, but it was sure easier. When I hooked up my new tierod, I just set the old one in the original, lower steering arms. Then I adjusted the new tierod to fit in the upper arms and when everything was all hooked up, I removed the old tierod and it got me VERY close to the right alignment, until I get it in for final adjustment. In the last pic, you will also see the new extended brake lines and the quick disconnect swaybar arms.


For my application, I had to do a modification to my cross member, so my driveshaft would clear at full extension. I cut and boxed a channel that the shaft can drop into. This may not be a problem with an original drivetrain, but with mine being a 5.3/4L60-E/NP241, the t-case is further back.

Moving onto the rear shackle flip. This part is not nearly as involved as the SOA conversion. Other than the shackle flip kit, you will only need a longer brake line and vent tube. Shown here is the section of the original front mount for the rear spring that needed to be removed to accept the new one. The instructions said to remove about 3/4" from the bottom, but mine ended up being about an inch, in order to get the part of the mount that attaches to the bottom of the frame to sit flat. After lining up the spring bolt hole with the original like Tad tells you to in his instructions I double checked my placement for the brackets by measuring from the back of the front spring to the center of the hole in the new front bracket. Then it was just a matter of clamping the bracket in place and drilling 4 holes to mount it. Two in the bottom of the frame and two through the side of the old bracket.


For the rear shackle mount, I somehow forgot to get a pic of the plate that needed to be cut out for the new bracket, but it is clearly shown in Tad's instructions. He also explains how to adjust the ride height by an inch or so. Once I had that figured out, I double checked my measurement between the spring mount holes for each side of the Jeep, to make sure they were the same. Then it was just 6 holes and bolts to complete the job!


One more thing I want to mention is that I did need to add some new tabs to the frame for the ends of emergency brake cables coming from the backing plate to attach to, because the cables would not reach the originals. I also had to extend the length of the bolt at the end of the pedal cable, where it goes through the cross member.

I would like to thank everyone who guided me through this project and a very special thank you to Tad for a great kit that makes the job as simple as possible for people like me. I would also like to tell anyone who is planning this, to expect some additional and unforeseen costs from little things you find along the way. The worst part of mine was when I went to replace my front axle shaft seals and found that the carrier bearings were about shot. I bought the new carrier bearings, races and seals, but I chickened out on doing that part myself, so I took the axle, bearings and seals into a shop. I hadn't bought a pinion bearing, but decided to just have them replace that too, while they were at it and $614.00 later, I was set to go! I got hosed for 4-1/2 hrs labor and $180.00 for a pinion bearing and a seal! This is supposedly a "friend" of the family too! I will not be going back.
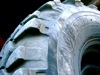
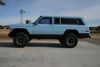
I am amazed at the articulation I'm getting out of this thing now! I can't wait to take this thing to the annual Spook Rally off-road event here in Az. for Halloween and see how much better it does this year! Also, I will be stepping up to 35's when I wear out these 33's. They look a bit dinky on it now.